4
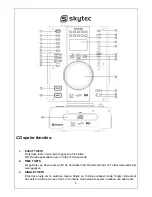
17. DISPLAY
LCD Display lndicate the Track/Numbers/Time/Remain/Pitch/Continue/Single.
18. PITHC
CONTROL
Use this fader to increase or decrease the speed of the track.
19. LOOP IN BUTTON
You may set the beginning point of the loop system and indicate on the display.
20. LOOP OUT BUTTON
When you press this button, you set the end point of the seamless loop and you start the loop.
To finish the loop, press again this button.
21. RELOOP
BUTTON
This button is used to start the last saved loop. To finish the loop, press the re-loop button
again.
22. JOG & SHUTTLE WHEELS
Shuttle
: Use the dial to select the scanning direction and speed. The disc is scanned in the
forward direction when the shuttle dial is turned clockwise from the neutral position, in the
reverse direction when the shuttle dial is turned counterclockwise. The scanning speeds up
when the shuttle dial is turned faster.
Jog
: In pause mode, if you turn the jog, the point at which the sound is being produced moves
by a number of frames corresponding to the number of clicks. Clockwise moves the point
forward; counterclockwise moves the point backward. In play mode, the jog increases or
decreases the speed of the song. (Clockwise: increase, counterclockwise: decrease).
23. PITCH
BUTTON
If you push this button, the adjustement of the pitch potentiometer is available.
24. PITCH BEND – BUTTON
The pitch will drop while the - button is pressed and return to the original pitch when it released.
25. PITCH BEND + BUTTON
The pitch will automatically rise when the + button is pressed and return to the original pitch
when it is released.
26. DISC
TRAY
To enter the disc, please refer to the explanations under 6.2 CD-tray.
Connection:
27.
AC
CORD
Used this cable to connect the AC mains power to the unit..


