background image

Figure AB

Troubleshooting 


and C

ar

e

42

You see

 slowly flashing


green 

mixing icon


and the progress bar is 

frozen.

You hear

 a repeating warning sound.

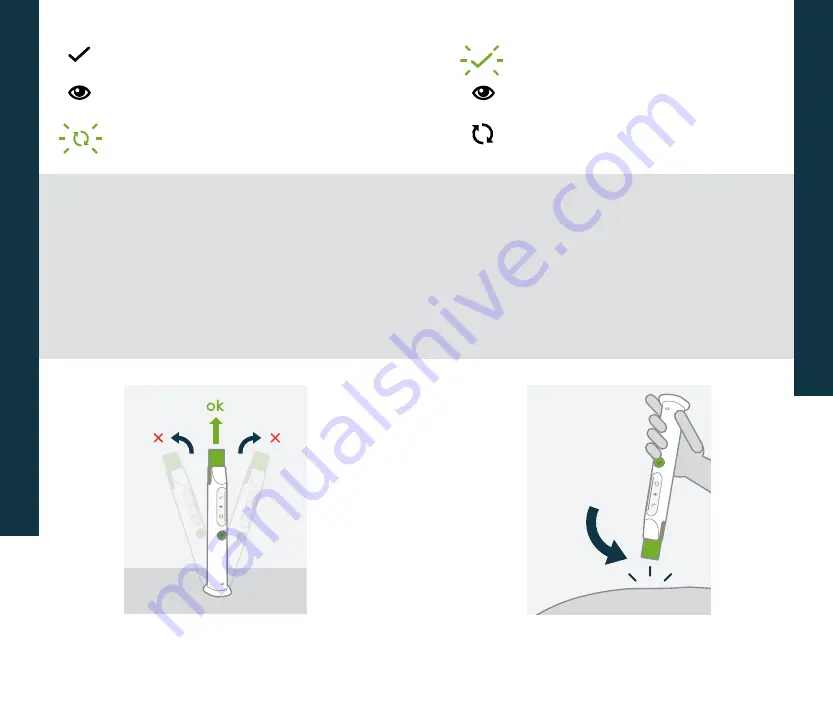
Mixing paused

 (Step 4 on page 20). If the 

SKYTROFA Auto-Injector is not in an upright position, 

mixing or air removal will pause (see Figure AB).

Do this:

 Place the auto-injector in an upright position 

and the mixing or air removal will continue.

43

You see

 a slowly flashing


green 

check mark icon


and the


progress bar is frozen.

You hear

 a repeating warning sound.

Injection paused

 (Step 9 on page 30). If the green top  

is removed from the skin before completing the 

injection, the auto-injector will pause the injection  

(see Figure AC).

Do this:

 Press the green top against skin and the 

injection will start again. If the injection is not completed 

within 15 minutes, the auto-injector automatically 

cancels the injection.

Figure AC

Summary of Contents for Auto-Injector

Page 1: ...Instructions for Use Single patient use ...

Page 2: ... 34 Put on the protective cover Store at room temperature between 59 F to 86 F 15 C to 30 C to be ready for next use Back Front Stomach abdomen Thighs Buttocks 6 1 6 2 10 1 10 2 10 3 6 Finish mixing 5 Turn the auto injector up and down 8 Prepare for injection 11 Check cartridge and throw away 12 Store the auto injector 9 Inject medicine 2 Turn on the auto injector 3 Insert cartridge 4 Wait while m...

Page 3: ...re provider about your medical condition or your treatment The back cover of this Instructions for Use folds out for reference while you read the rest of the instructions If you have any questions about the auto injector the medicine or these instructions please contact your healthcare provider or Ascendis Pharma Customer Support For contact information b back cover 3 Getting Started Page Importan...

Page 4: ...or and leave at room temperature for 15 minutes before use Your weekly dose may require that you use 2 cartridges Do not use your auto injector with other medicines or needles Do not share your auto injector with other people even if the needle has been changed You may give other people a serious infection or get a serious infection from them Do not reuse needles Do not drop the cartridges because...

Page 5: ...sistance of a medical professional The SKYTROFA Cartridge SKYTROFA comes in a single use cartridge The cartridge has 2 chambers 1 filled with powder and 1 filled with water The auto injector automatically mixes the powder and the water during preparation making it ready for injection The Needle The single use needle comes with SKYTROFA cartridges and is used for injecting the medicine Charger Quic...

Page 6: ...tting Up Figure B 3 Fully charge the auto injector before using it for the first time This will take 2 hours and 30 minutes When the battery icon located at the base of the auto injector see Figure C is flashing red or green it is charging When it shows constant green the auto injector is fully charged and is ready to use after the charging cable is unplugged When fully charged the battery should ...

Page 7: ...see Figure D 1 SKYTROFA Cartridge 1 Omnican fine 0 25 mm x 4 mm 31G x 5 32 B Braun needle Other supplies not included see Figure D 1 Alcohol Wipe 1 Sharps Container If your weekly dose requires 2 cartridges you will need the following additional supplies 1 SKYTROFA Cartridge 1 Omnican fine 0 25 mm x 4 mm 31G x 5 32 B Braun needle 1 Alcohol Wipe Setting Up Alcohol Wipe Needle B Braun Sharps Contain...

Page 8: ... If you have been prescribed a dose that requires 2 cartridges Take your first injection Step 1 to Step 11 pages 14 35 Then take your second injection by repeating Step 1 to Step 11 with a new cartridge and needle After your second injection continue to Step 12 page 36 13 How to Use Step by Step Guide Page Prepare 14 Mix 20 Inject 26 After Injection 32 ...

Page 9: ...icine expiration date please call Ascendis Pharma Customer Support For contact information b back cover Figure E Prepare Cartridge dose Expiration date YYYY MM year month 1 2 Check the expiration date on the needle Remove the paper from the needle see Figure F Do not use if the expiration date has passed on the needle 1 3 Screw the needle straight on the cartridge by turning clockwise until there ...

Page 10: ...reen button to turn on the auto injector You will hear 2 loud beeps Battery icon will light up and green top will start flashing Figure H You will hear 2 loud beeps and the green top will start flashing The auto injector is ready for use If the auto injector is not active for 6 minutes it will turn off Press the green button to turn it on again 2 5 Check the battery icon on the base of the auto in...

Page 11: ...en top will stop flashing mixing icon will light up and battery icon will switch off After click remove finger from cartridge Figure I Figure J Figure K 3 3 After the click remove your finger from the cartridge see Figure K If you cannot insert the cartridge check if an orange plug is still at tached to the cartridge If an orange plug is still attached to the cartridge remove it by pulling it stra...

Page 12: ...o injector to mix medicine Watch progress bar gradually light up Wait until you hear 2 loud beeps and the entire progress bar flashes 4 3 Continue with Step 5 page 22 immediately after automatic mixing is completed If you wait for more than 2 hours before completing the steps for mixing by hand Step 5 the auto injector will automatically cancel the procedure If this happens the cartridge will be r...

Page 13: ... sound confirms the turns are correct Turn 5 to 10 times until you hear 2 loud beeps and the progress bar except the top element lights up Do not press the green button If you see a flashing red mixing icon b page 46 After 5 to 10 correct turns you will hear 2 loud beeps and the progress bar except the top element will light up 5 2 Continue with Step 6 page 24 immediately after you finish mixing b...

Page 14: ...u hear 2 loud beeps and the entire progress bar lights up Figure P 6 2 Pull off the needle cover see Figure P The green eye icon will light up Removing the needle cover will allow you to check the mixed medicine in the inspection window Step 7 on page 26 Do not twist the needle cover off If you have trouble removing the needle cover gently pull up the green top Keep the needle cover for later use ...

Page 15: ...to injector see Figure Q The medicine should look colorless and clear Some air bubbles are okay Do not inject the medicine if there are visible particles medicine is not dissolved or the mixed medicine is discolored If you see a flashing red mixing icon b page 46 If you see visible particles or the medicine is discolored Cancel the injection procedure by pressing and holding the green button for 3...

Page 16: ...every injection Figure R Inject Prepare for injection Stomach abdomen Thighs Front Buttocks Back 8 2 Wash your hands with soap and water see Figure S 8 3 Clean the injection site with an alcohol wipe see Figure T Do not inject through clothes Inject directly into the skin Do not touch the cleaned area before injecting Do not fan or blow on the cleaned area Figure T Figure S ...

Page 17: ...heck mark icon will light up Remove the auto injector from skin and wait until you hear 2 loud beeps Green top will start flashing Do not remove the auto injector from the injection site until the injection is finished to ensure you get your full cartridge dose The injection is finished when you hear 2 loud beeps and the green top flashes 2 times The green check mark will light up 9 2 Remove the a...

Page 18: ...ashing see Figure X Do not twist the cartridge Press needle cover into flashing green top Remove used cartridge Press needle cover down to release cartridge 10 3 Remove the used cartridge by pulling straight up see Figure Y Only remove the cartridge by using the needle cover After you remove the cartridge the battery icon will display the battery level The auto injector turns off automatically Do ...

Page 19: ... have an FDA cleared sharps disposal container you may use a household container that is Made of a heavy duty plastic Can be closed with a tight fitting puncture resistant lid without sharps being able to come out Upright and stable during use Leak resistant Properly labeled to warn of hazardous waste inside the container When your sharps disposal container is almost full you will need to follow y...

Page 20: ...r Store at room temperature between 59 F to 86 F 15 C to 30 C to be ready for next use 12 3 Charge the auto injector if the battery icon has been flashing before or after the injection For more information about how to charge the auto injector b page 49 12 4 Store the auto injector at room temperature between 59 F to 86 F 15 C to 30 C between use Store with the protective cover on until the next i...

Page 21: ...Troubleshooting and Care 38 39 Troubleshooting and Care Page Troubleshooting 40 Cleaning and Maintenance 48 Charging and Charger Cable 49 Storing 50 ...

Page 22: ...t all b page 44 Green battery icon If you see any of these b page 44 Green flashing icons If you see any of these Troubleshooting What do you see b pages 42 43 41 Red battery icon If you see this b page 45 Red flashing icons If you see any of these b pages 46 47 ...

Page 23: ...ht position and the mixing or air removal will continue 43 You see a slowly flashing green check mark icon and the progress bar is frozen You hear a repeating warning sound Injection paused Step 9 on page 30 If the green top is removed from the skin before completing the injection the auto injector will pause the injection see Figure AC Do this Press the green top against skin and the injection wi...

Page 24: ...n it on again If you see a flashing red battery icon the battery needs charging Read more bpage 45 You see a flashing green battery icon You see a constant green battery icon Charging recommended There is enough battery for at least 1 injection Do this Charge the auto injector after the next injection 45 The battery needs charging Do this Charge the auto injector Insert the charger cable into the ...

Page 25: ...w on the needle straight and tightly Read more b page 14 47 The auto injector is near its expiration The first time you see this either there are 5 injections left or the auto injector expires in 1 month Do this The auto injector can be used as usual for the remaining injections When there are no more injections left or the expiration date has passed the auto injector cannot be used Please contact...

Page 26: ...e Charging the SKYTROFA Auto Injector Connect the USB large end of the cable to the charger Plug the charger into a power outlet Connect the Micro USB small end of the cable to the rear of the auto injector For protection charge the auto injector with the protective cover on Read more b pages 8 9 Only charge the auto injector when the battery icon is flashing green or red Read more b pages 44 45 D...

Page 27: ... 10 C to 40 C if not in use Keep the protective cover on when traveling with the auto injector Do not store the auto injector closer than 12 inches 30 cm to microwave ovens or electronic equipment with antennas such as mobile phones and WiFi transceivers Keep the auto injector away from dirt dust and humid or wet places Storing Keep the auto injector the charger and the charging cable away from pe...

Page 28: ...Product Information 52 53 Product Information Page Product Safety 54 Expiration 56 EMC Compliance Levels 58 Technical Specification 60 Symbols 62 Warranty and Disclaimer 64 Parts Overview 65 ...

Page 29: ...ay break Product Safety Do not clean the auto injector while charging Keep the auto injector dry Do not place the auto injector in liquid Do not wash the auto injector in a dishwasher Do not expose the auto injector to extreme temperatures Keep the auto injector away from heat and open flames Keep it out of direct sunlight Keep the auto injector away from microwave ovens Do not use or place the au...

Page 30: ...ing 5 injections After the final injection or after the expiration date your auto injector has to be replaced Please contact a healthcare provider or Ascendis Pharma Customer Support to receive a new auto injector For contact information b back cover Expiration The auto injector contains electrical and electronic components including a non replaceable battery Do not throw away dispose in household...

Page 31: ...ins c Conducted immunity disturbance by RF fields 3 Vrms 150 kHz to 80 MHz 6 Vrms in ISM and amateur radio bands d Conducted emission 150 kHz 30 MHz 120 V 60 Hz IEC EN 60601 1 2 4 th Edition IEC 61000 4 4 IEC 61000 4 5 IEC 61000 4 6 IEC 61000 4 11 EMC Compliance Levels EMC Voltage dips and interruptions a 5 UT for 5 sec b 5 UT for 0 5 cycles c 70 UT for 25 cycles d 40 UT for 5 cycles IEC EN 60601 ...

Page 32: ...0 Input 100 240V 50 60Hz Output 5 0V d 1 0A Technical Specification Use Conditions for SKYTROFA Auto Injector Operation temperature with medicine 59 F to 86 F 15 C to 30 C marking on device bottom Storage Transportation temperature 14 F to 104 F 10 C to 40 C marking on device cover Charging temperature 59 F to 86 F 15 C to 30 C Operation humidity 15 to 90 relative humidity non condensing Storage T...

Page 33: ...ce for sale by or on the order of a physician Symbols 30 C 86 F 15 C 59 F Operation temperature 40 C 104 F 10 C 14 F Storage Transportation temperature Keep dry 2460 SKYTROFA Auto Injector complies with the requirements of The Medical Device Directive MDD 93 42 EEC and the RoHS Restriction of Hazardous Substances directive 2011 65 EU SKYTROFA Auto Injector contains electrical and electronic compon...

Page 34: ...y and Disclaimer Green Check Mark Injection successfully completed Constant Green a Battery is fully charged a The auto injector is ready to use Green Eye Mixed medicine is ready for inspection in window Flashing Green a At least 1 injection remaining but charging recommended after use Green Mixing Medicine mixing is in progress Flashing Red a Battery needs charging Status Icons b Read more about ...

Page 35: ...our Quick Reference Guide For training video go to www skytrofa com This Instructions for Use has been approved by the U S Food and Drug Administration Approved August 2021 2022 01 26 13500500 Distributed by Ascendis Pharma Endocrinology Inc Princeton NJ 08540 USA Phillips Medisize A S Gimsinglundvej 20 DK 7600 Struer Denmark Instructions for Use Quick Reference Guide Training Video ...

Reviews: