PRO GUIDE
// X-ALPS5
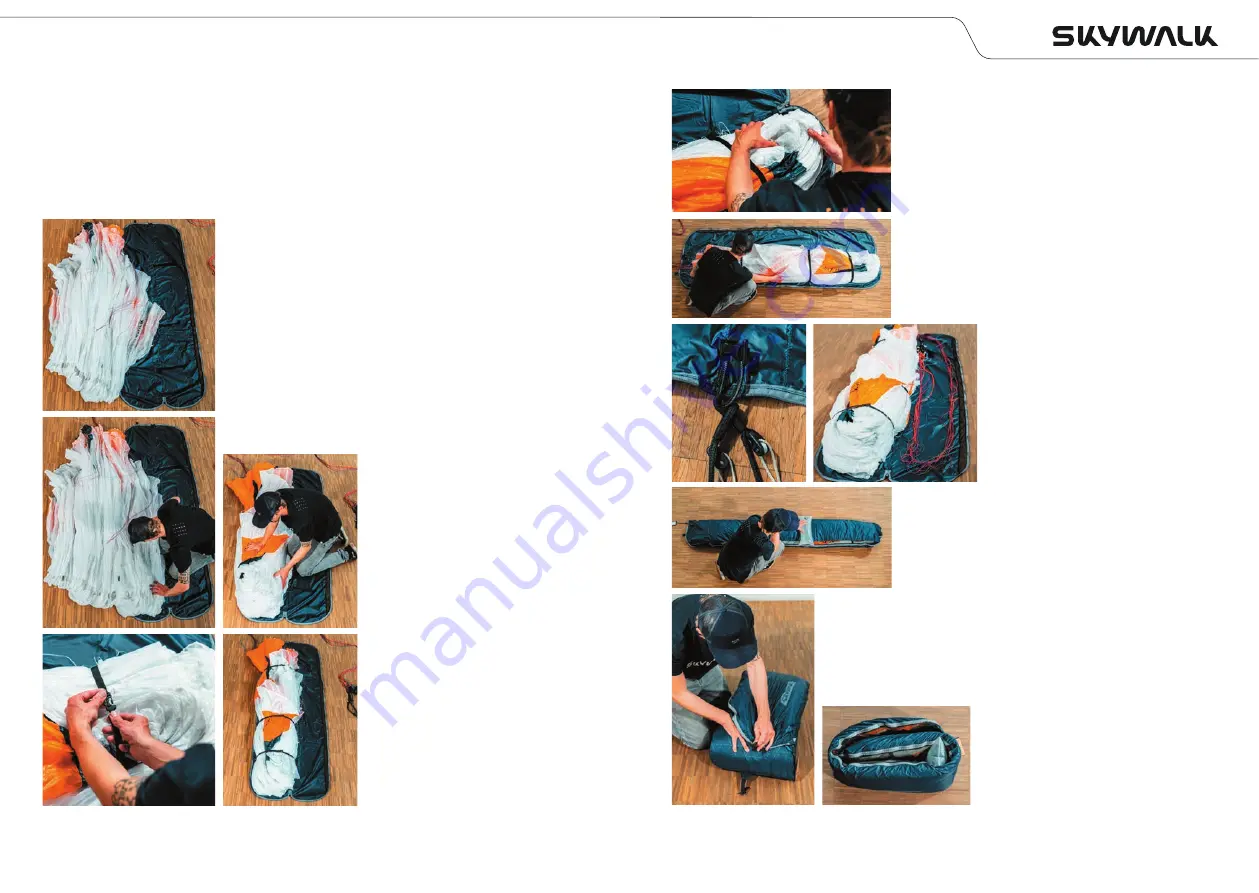
Make sure that the openings at the leading edge
are neatly aligned. The Rigid Foils on the stabilos
must also be pulled up towards the remaining
leading edge.
Now sort the rest of the canopy lengthwise to
the trailing edge, making sure that the Rigids
Foils lie neatly lengthwise and are not twisted.
Attach the risers to the toggle
button and place the risers and
lines in the Softbag.
Carefully close the zipper, being careful not to
pinch any lines or paraglider material.
Place the Packing Tube at the level of the second
webbed strap.
Fold the leading edge over the Packing Tube. The side of
the Sofbag with the lettering must be at the bottom.
Fold the other end over the folded side and close the
plastic clip.
Tip:
For a particularly gentle storage,
lay out the Softbag lengthwise when
not using the paraglider.
11 PACKING INSTRUCTIONS
Carefully packing your paraglider guarantees a consistently high level of quality.
Stick to the packing instructions described here to protect the Rigid Foils and use the
included packing tube to avoid unnecessary bending or kinking of the Rigid Foils.
The supplied Softbag simplifies the packing process.
Gather your glider and lay it next to the Softbag.
The lines should protrude out of the trailing edge.
At the bottom of the Softbag there is a toggle button,
here the risers will be hooked in later. The trailing edge
should be in the direction of the toggle button.
.
Now stack Rigid Foil on Rigid Foil, starting at the stabi-
lo and working your way to the other stabilo.
With this technique, the glider
lies together like an accordion
from wing tip to wing tip and is
not folded in the center of the
glider. Thus, neither the center
cells nor the Rigid Foils are sub-
jected to increased stress.
The openings at the leading edge
must be aligned with the center
of the Softbag.
Secure the glider with the three
webbed straps.
Packing instructions
11
10
Packing instructions
Summary of Contents for X-ALPS5
Page 1: ...X ALPS5 PRO GUIDE...


