background image

10

ASSEMBLY

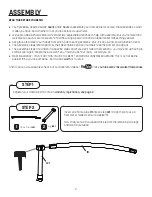
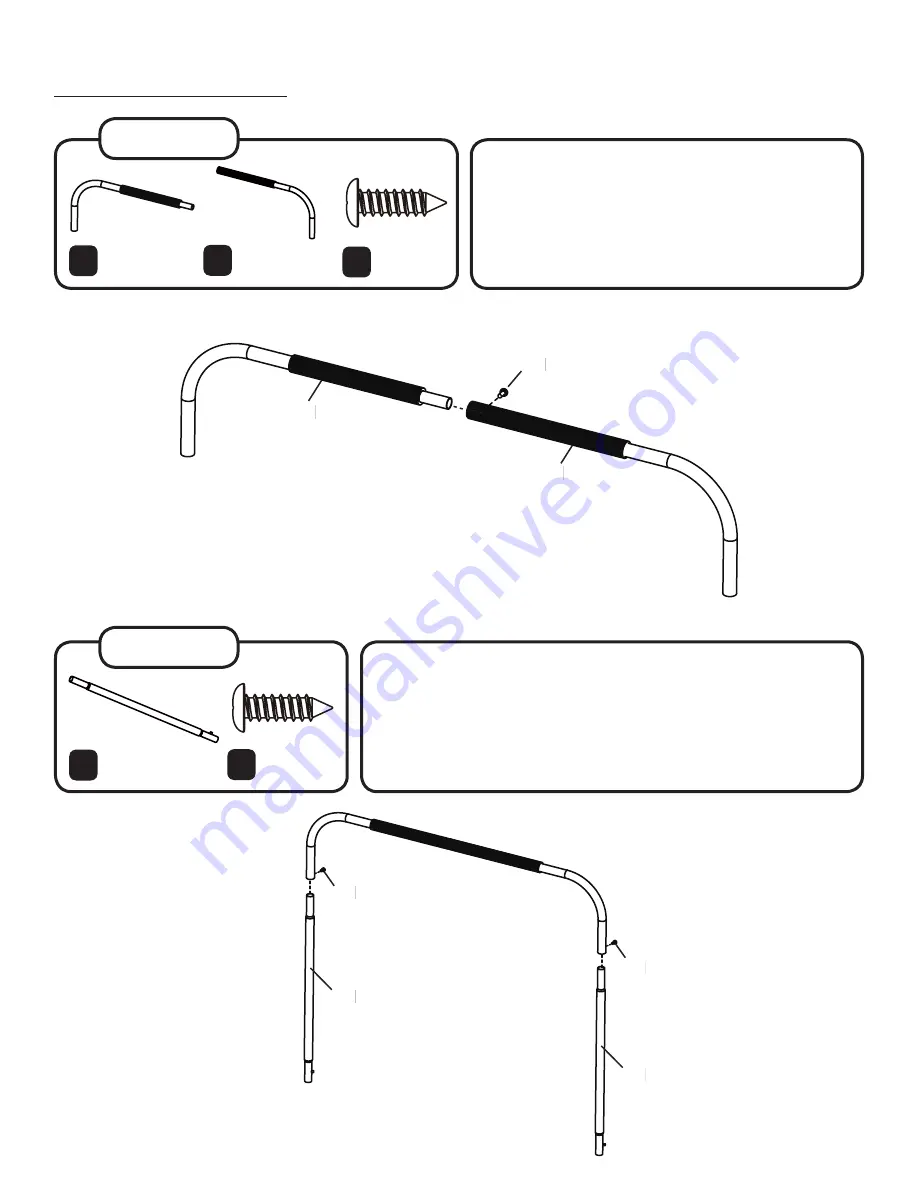
This step is a breeze. Insert the left handlebar with 

foam 

(6)

 into the right handlebar with foam 

(7)

,


and secure with one self-tapping screw 

(9)

.

Insert one upright tube 

(8)

 into one side of the handle bar, and 

secure using one self-tapping screw 

(9)

Don’t tighten the screw 

yet.

Repeat this step on the other side of the handle bar.

STEP 9

STEP 10

Left Handlebar 

with Foam 

(x1)

Upright Tube 

(x2)

Right Handlebar 

with Foam 

(x1)

Self-tapping 

Screw 

(x1)

Self-tapping 

Screw 

(x1)

6

8

7

9

9

(7)

(6)

(9)

(8)

(8)

(9)

(9)

Summary of Contents for SMB036

Page 1: ...ox 574 Brigham City UT 84302 MODEL SMB036 WARNING Read all precautions and instructions in this manual before using this equipment Save this manual for future reference Maximum user weight 60 lbs USER MANUAL ASSEMBLY MAINTENANCE ...

Page 2: ... www skywalkertrampolines com registration You ll need to have the following information handy Name Email address Address Trampoline model number Phone number Trampoline serial number Date of purchase Retailer the trampoline was purchased from HEY WE VE GOT SOMETHING REALLY IMPORTANT TO SAY And that is check us out online We ve got assembly videos for those of you who prefer movies over books FAQs...

Page 3: ...et the replacement part sent out as soon as possible We re not trying to complicate your life we promise When calling make sure to have the following information ready The model of the product see the front cover of this manual The key and description of the part see the part list on the next page The quantity needed only you know the answer to that one BEFORE YOU BEGIN Thanks for choosing Skywalk...

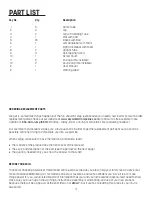
Page 4: ...will help you identify the parts during assembly PART IDENTIFICATION 1 2 3 4 5 6 7 8 Frame Tube x5 Leg with Welding Tube x2 Leg x3 Mat with Pad x1 Elastic with Ball x26 Left Handlebar with Foam x1 Right Handlebar with Foam x1 Upright Tube x2 9 10 11 End Cap x5 Pre installed Round Cap x2 Pre installed 12 Screw Driver x1 Self tapping Screw x3 ...

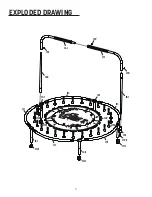
Page 5: ...EXPLODED DRAWING 5 1 1 2 3 4 6 7 8 9 9 9 8 5 12 12 11 11 11 11 3 2 2 1 1 1 ...

Page 6: ...e the part list on page 3 The assembly steps are written in a specific order and if you don t follow them exactly you may end up having to start all over again We promise we won t say I told you so but really we told you so Most importantly YOU VE GOT THIS YOU RE THE BEST TRAMPOLINE ASSEMBLER AROUND This may not be the easiest thing you ve ever done but it will be worth it Trust us And if you re a...

Page 7: ...e 3 Now repeat this step to assemble one more frame tube and leg with welding tube Leg with Welding Tube x2 3 Now all you need to do is connect the frame pieces together See this isn t too bad is it But make sure you pay attention to the placement of the legs with welding tubes 1 3 Leg with welding tube Leg with welding tube ...

Page 8: ...ntered in between each leg ASSEMBLY Following the pattern below continue to place the elastic bands around the frame until all 26 bands are used Make sure the balls on the elastic bands are located on the underside of the trampoline After all the elastics have been placed if the mat is not in the middle of the frame spend some time adjusting it by pulling on the elastics with balls STEP 6 STEP 5 M...

Page 9: ...ve it Now cover the frame with the attached pad Look underneath the trampoline and insert the strap with the buckle into the strap hole on the pad as shown Tie the straps to the frame as shown And if you don t know how to tie a knot we can t help you But maybe a friendly neighbor or a boy scout can ...

Page 10: ...screw 9 Insert one upright tube 8 into one side of the handle bar and secure using one self tapping screw 9 Don t tighten the screw yet Repeat this step on the other side of the handle bar STEP 9 STEP 10 Left Handlebar with Foam x1 Upright Tube x2 Right Handlebar with Foam x1 Self tapping Screw x1 Self tapping Screw x1 6 8 7 9 9 7 6 9 8 8 9 9 ...

Page 11: ...t So here comes the real question are you satisfied with this completed product If you are go ahead and write a review on the retailer s site you bought it from We d really appreciate it and if we could we d give you a gold star Are you completely frustrated and have some choice words for us Contact us directly We re not trying to ruin your life we promise And we ll do everything we can to make it...

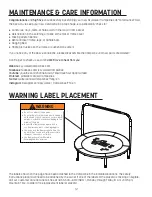
Page 12: ...locations The safety instructions placard will need to be attached by the owner If one of the labels or the placard is missing or illegible call our Customer Care Hot Line toll free at 1 866 603 JUMP 5867 Monday through Friday 8 a m until 5 p m Mountain Time to order a free replacement label or placard WARNING LABEL PLACEMENT Do not use without frame pads Inspect the trampoline and parts before us...

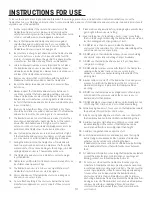
Page 13: ...poline for which the enclosure is designed 15 Misuse and abuse of the trampoline enclosure is dangerous and can cause serious injury 16 Do not attach anything to the enclosure barrier that is not a manufacturer approved accessory or part of the enclosure system 17 Please remove any jewelry before jumping begins Jewelry may get caught in the enclosure netting 18 Wear clothing free of drawstrings ho...

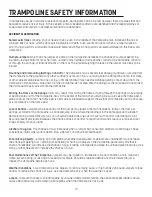
Page 14: ...ion or additional instructional materials contact a certified trampoline instructor TRAMPOLINE SAFETY INSTRUCTIONS For the Supervisor Read the instructions before using the trampoline Enforce all of the safety rules Become familiar with the information in this manual so you can help new users learn basic jumps and all users follow trampoline safety All trampoline users must have mature knowledgeab...

Page 15: ...sure to keep the frame pad in place to cover the fame The frame pad is not made or intended to support the weight of trampoline user Do not step or jump directly on the frame pad Loss of Control Jumpers who lose control of their jumps may land on the mat incorrectly land on the frame or springs or fall off of the trampoline A controlled jump is one where the landing is in the same spot as the take...

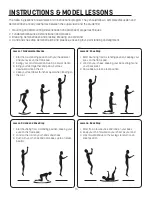
Page 16: ...Fundamental bounce Demonstration and practice 3 Breaking Demonstration and practice Breaking on command 4 Hand and knee drop Demonstration and practice stressing four point landing and alignment Lesson 2 Knee Drop 1 Start bouncing from a standing position keeping your eyes on the frame pad 2 Land on your knees keeping your back straight and your body erect 3 Come back up to an erect position Lesso...

Page 17: ...facilitated by contacting a certified trampoline instructor Lesson 5 Seat Drop 1 Land in a sitting position with your legs parallel to the mat 2 Place your hands on the mat beside your hips 3 Push with your hands to return to an erect position Lesson 6 Front Drop 1 Start from a low bounce and land on the mat in a prone position 2 Keep your head up and your arms extended forward on the mat 3 Push w...

Page 18: ...ipping or caused by abuse misuse improper or abnormal usage or authorized repair are not covered by this warranty and may also void the warranty Unauthorized Replacement Parts The warranty will become void if any defects or damages are associated with the use of unauthorized replacement parts All replacement parts must be obtained from an authorized agent Assembly Service The warranty does not cov...

Page 19: ...R CONSEQUENTIAL DAMAGES ACCORDINGLY THE ABOVE LIMITATION MAY NOT APPLY TO YOU THE WARRANTY EXTENDED HEREUNDER IS IN LIEU OF ALL OTHER WARRANTIES AND ANY IMPLIED WARRANTY OF MERCHANTABILITY OR FITNESS FOR A PARTICULAR PURPOSE IS LIMITED IN ITS SCOPE AND DURATION TO THE TERMS SET FORTH HEREIN SOME STATES OR COUNTRIES DO NOT ALLOW LIMITATIONS ON HOW LONG AN IMPLIED WARRANTY LASTS ACCORDINGLY THE ABOV...

Page 20: ...ODÈLE SMB036 AVERTISSEMENT Veuillez lire toutes les précautions et les instructions de ce manuel avant d utiliser cet équipement Conservez ce manuel pour référence ultérieure Poids maximal de l utilisateur 27 kg 60 lb ASSEMBLAGE ENTRETIEN ET MANUEL DE L UTILISATEUR ...

Page 21: ...skywalkertrampolines com registration Vous devrez avoir l information suivante sous la main Nom Adresse de courrier électronique Adresse Numéro de modèle de la trampoline Numéro de téléphone Numéro de série de la trampoline Date d achat Nom du détaillant duquel vous avez acheté la trampoline NOUS AVONS QUELQUE CHOSE DE TRÈS IMPORTANT À VOUS DIRE Et c est pour cela qu il est important de visiter no...

Page 22: ... vous envoyer la pièce de remplacement le plus rapidement possible Nous ne sommes pas là pour compliquer les choses c est une promesse Lorsque vous appelez assurez vous d avoir les informations suivantes sous la main Le numéro de modèle du produit voir la couverture de ce manuel Le numéro de pièce et sa description voir la liste des pièces à la page suivante La quantité requise vous êtes le seul à...

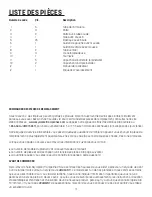
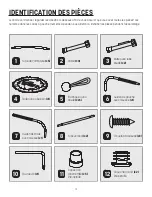
Page 23: ...dentifier les pièces pendant l assemblage IDENTIFICATION DES PIÈCES 1 2 3 4 5 6 7 8 Tube de l armature x5 Patte avec tube soudé x2 Patte x3 Toile avec coussin x1 Élastique avec boule x26 Guidon de gauche avec mousse x1 Guidon de droite avec mousse x1 Tube vertical x2 9 10 11 Capuchon d extrémité x5 Préinstallé Capuchon rond x2 Préinstallé 12 Tournevis x1 Vis autotaraudeuse x3 ...

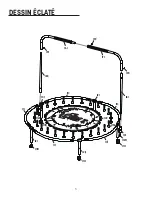
Page 24: ...DESSIN ÉCLATÉ 5 1 1 2 3 4 6 7 8 9 9 9 8 5 12 12 11 11 11 11 3 2 2 1 1 1 ...

Page 25: ...ivez pas dans cet ordre vous pourriez devoir recommencer toutes les étapes C est promis nous ne vous dirons pas la fameuse expression Je vous l avais bien dit mais tenez vous le pour dit Et surtout VOUS LE SAVEZ SUREMENT DÉJÀ VOUS ÊTES LE MEILLEUR ASSEMBLEUR DE TRAMPOLINE DE LA RÉGION Ce n est peut être pas la chose la plus facile que vous ayez faite Mais c est une tâche qui en vaut la peine Faite...

Page 26: ...ntenant cette étape pour assembler un autre tube de l armature à une patte avec tube soudé Patte avec tube soudé x2 3 Tout ce que vous avez à faire maintenant c est de connecter les morceaux de l armature ensemble Vous voyez ce n est pas trop compliqué Assurez vous de faire attention au positionnement des pattes avec tube soudé 1 3 Patte avec tube soudé Patte avec tube soudé ...

Page 27: ...entrée entre chacune des pattes ASSEMBLAGE En suivant le modèle d installation ci dessous continuez de placer les bandes élastiques autour de l armature jusqu à ce que les 26 bandes soient utilisées Assurez vous que les boules sur les bandes élastiques sont situées sous la trampoline Une fois que tous les élastiques ont été placés si la toile n est pas au milieu de l armature effectuez quelques aj...

Page 28: ...tenant l armature avec le coussin attaché Regardez sous la trampoline et insérez la courroie avec la boucle sur le trou du coussin comme illustré Attachez les courroies à l armature comme illustré Et si vous ne savez pas comment faire un nœud on ne peut pas vous aider Mais peut être qu un de vos gentils voisins ou même un scout pourrait vous aider ...

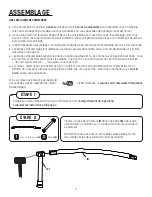
Page 29: ...totaraudeuse 9 Insérez le tube vertical 8 dans le côté du guidon et fixez le à l aide d une vis autotaraudeuse 9 Ne serrez pas tout de suite la vis Répétez cette étape de l autre côté du guidon ÉTAPE 9 ÉTAPE 10 Guidon de gauche avec mousse x1 Tube vertical x2 Guidon de droite avec mousse x1 Vis auto taraudeuse x1 Vis auto taraudeuse x1 6 8 7 9 9 7 6 9 8 8 9 9 ...

Page 30: ...ons Êtes vous satisfait de ce produit Si c est le cas allez écrire une évaluation sur le site du détaillant duquel vous avez acheté la trampoline Nous souhaitons réellement avoir des nouvelles et si nous pouvions on vous donnerait une étoile Êtes vous totalement frustré et vous avez quelques bons mots à nous dire Communiquez avec nous directement Nous ne sommes pas là pour compliquer les choses c ...

Page 31: ...ang en Instagram instagram com skywalker_trampolines hl en 12 Les étiquettes mentionnées sur cette page ont été fixées à la trampoline aux emplacements indiqués Les encarts d instructions de sécurité devront être fixés par le propriétaire Si les étiquettes ou l encart ne sont pas présents ou illisibles appelez notre ligne sans frais d assistance à la clientèle au 1 866 603 JUMP 5867 du lundi au ve...

Page 32: ...trampoline pour laquelle elle a été conçue 15 Une utilisation incorrecte ou abusive de l enceinte de trampoline est dangereuse et peut provoquer de graves blessures 16 N attachez rien au filet qui n est pas un accessoire approuvé par le fabricant ou qui fait partie des pièces du système d enceinte 17 Enlevez tous vos bijoux avant d utiliser la trampoline Les bijoux peuvent rester coincés dans le f...

Page 33: ...E Pour le superviseur Lisez les instructions avant d utiliser la trampoline Appliquez toutes les règles de sécurité Familiarisez vous avec l information contenue dans ce manuel de façon à pouvoir aider les nouveaux utilisateurs à apprendre les sauts de base et tous les utilisateurs à suivre les règles de sécurité Tous les utilisateurs de la trampoline doivent être sous supervision d un adulte ayan...

Page 34: ...s de protection de l armature en place pour recouvrir l armature Le coussin de protection de l armature n est pas fabriqué ou conçu pour soutenir le poids de l utilisateur de la trampoline Ne marchez pas ou ne sautez pas directement sur les coussins de protection de l armature Perte de contrôle Les utilisateurs qui perdent le contrôle de leurs sauts peuvent tomber incorrectement sur la toile tombe...

Page 35: ... Arrêt Démonstration et pratique Arrêt sur demande 4 Chute sur les mains et les genoux Effectuez la démonstration et pratiquez en insistant sur l atterrissage en quatre points et l alignement Leçon 2 Chute sur les genoux 1 Commencez à sauter en position debout en gardant vos yeux sur le coussin de protection de l armature 2 Tombez sur vos genoux en gardant le dos droit et le haut de votre corps re...

Page 36: ...des leçons Leçon 5 Chute sur le postérieur 1 Atterrissez dans une position assise en ayant vos jambes parallèles à la toile 2 Placez vos mains sur la toile de chaque côté de vos hanches 3 Poussez avec vos mains pour revenir en position debout Leçon 6 Chute avant 1 Commencez par un saut léger et retombez sur votre ventre 2 Tenez votre tête relevée et vos bras allongés vers l avant sur la toile 3 Po...

Page 37: ...e ou les dommages du produit en raison de La perte ou les dommages pendant la livraison ou provoqués par une utilisation inappropriée à un usage inadéquat ou anormal ou à une réparation qui n a pas été effectuée par un représentant autorisé ne sont pas couverts par la garantie et peuvent annuler la garantie Commander des pièces de remplacement La garantie peut être annulée si des défectuosités ou ...

Page 38: ...T POSSIBLE QUE LES LIMITATIONS MENTIONNÉES PRÉCÉDEMMENT NE S APPLIQUENT PAS À VOUS LA GARANTIE ÉNONCÉE DANS LA PRÉSENTE REMPLACE TOUTE GARANTIE ET TOUTE GARANTIE IMPLICITE DE QUALITÉ MARCHANDE OU D APTITUDE À UNE UTILISATION PARTICULIÈRE SE LIMITE À LA PORTÉE ET À LA DURÉE DES MODALITÉS DÉFINIES DANS LA PRÉSENTE CERTAINS ÉTATS OU PAYS NE PERMETTENT PAS DE DÉTERMINER UNE ÉCHÉANCE AUX GARANTIES IMPL...

Reviews: