background image

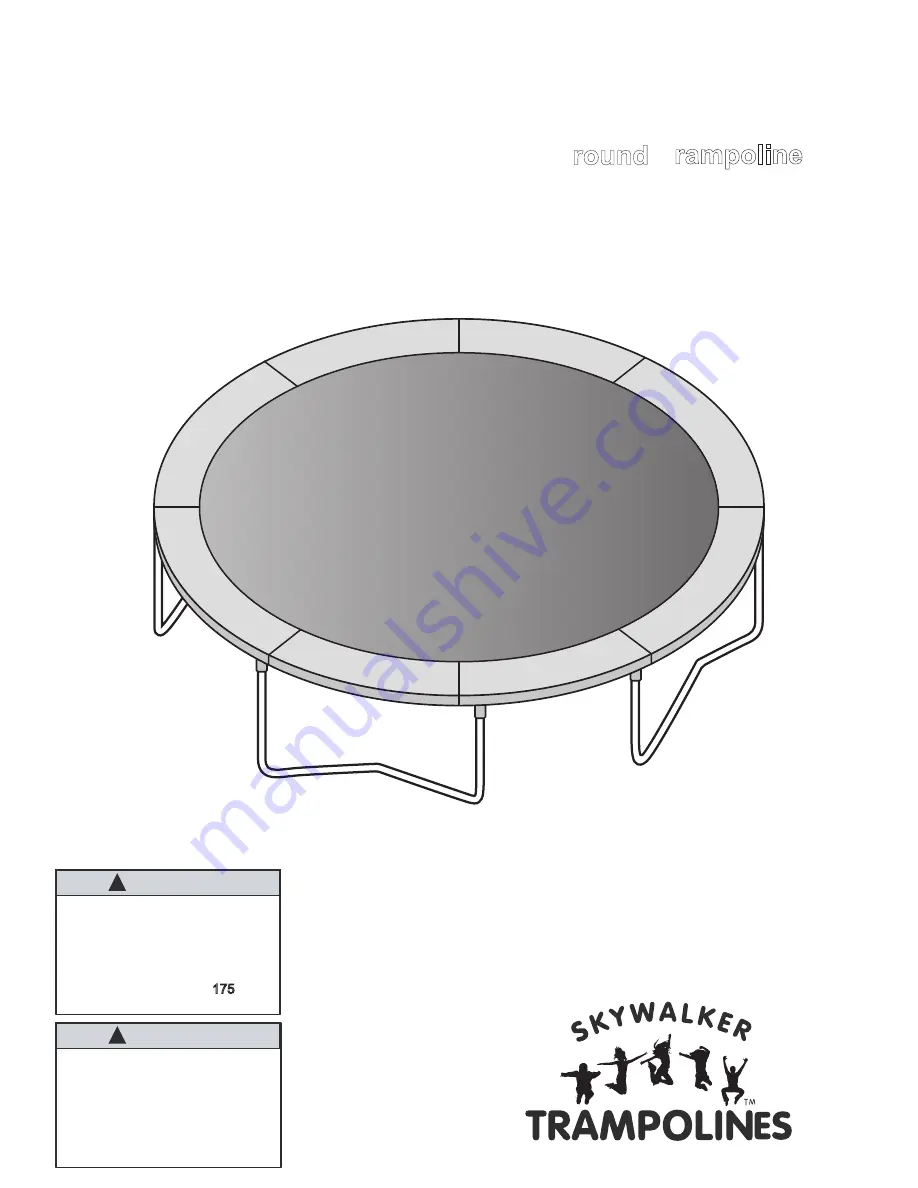
User’s Manual

Trampoline

10’

Model ____________

SWTC8001

WARNING

!

Read all precautions and 

instructions in this manual before

using this equipment. Save this 

manual for future reference.

Maximum user weight 

 lbs

.

IMPORTANT

!

Trampoline / Enclosure’s are 

susceptible to winds. Be sure to 

your Trampoline / Enclo

 - 

secure 

 Wind Damage is not covered 

sure.  

 warranty of your trampo

in the 

line.

175

 round

Summary of Contents for SWTC8001

Page 1: ...nstructions in this manual before using this equipment Save this manual for future reference Maximum user weight lbs IMPORTANT Trampoline Enclosure s are susceptible to winds Be sure to your Trampoline Enclo secure Wind Damage is not covered sure warranty of your trampo in the line 175 round ...

Page 2: ...ing and Part List 16 Ordering Replacement Parts 16 Limited Warranty 17 QUESTIONS If you have questions after reading this manual please call our toll free Customer Care Hot Line The trained technicians on our Customer Care Hot Line will provide immediate assistance Customer Care Hot Line 1 866 603 Jump 5867 Monday Friday 8 a m 5 p m Mountain Time REPLACEMENT PARTS www skywalkertrampolines com WARN...

Page 3: ...badly hurt 11 If you do not use the trampoline correctly someone can be seriously hurt 12 The trampoline should only be used when an older person who knows the proper safety precautions is there to supervise 13 Always climb onto and off of the trampoline Never jump onto it or off of it Do not use the trampoline to bounce you to other objects 14 You can get hurt if you hit the frame or fall through...

Page 4: ...hoosing you Skywalker Trampolines Brand Trampoline The SKYWALKER TRAMPOLINES Round Trampolines are designed and crafted to provide many years of fun and fitness This trampolines comes equipped with warnings and instructions for the assembly care maintenance and use of the trampoline This information must be read by all trampoline supervisors and users before any person is allowed to jump on the tr...

Page 5: ... jumping Be sure to keep the frame pad in place to cover the frame The frame pad is not made or intended to support the weight of the trampoline user Do not step or jump directly onto the frame pad Loss of Control Jumpers who lose control of their jumps may land on the mat incorrectly land on the frame or springs or fall off of the trampoline A controlled jump is one where the landing is in the sa...

Page 6: ...irst lesson Review this manual to learn about the basic techniques for using the trampoline Follow the rules on the placard with TRAMPOLINE SAFETY INSTRUC TIONS see step 8 on page 14 For further information or additional instructional materials contact a certified trampoline instructor TRAMPOLINE SAFETY INSTRUCTIONS For the Supervisor Read the instructions before using the trampoline Enforce all o...

Page 7: ...o any advanced stunt until they can perform all previous stunts correctly each time Allow each jumper a brief turn on the trampoline Extended bouncing exposes an overtired user to an increased risk of injury Longer turns tend to lessen the interest of others waiting to jump Clothing should consist of a T shirt and shorts Jumpers should wear regulation gymnastic shoes or heavy socks or they may jum...

Page 8: ...the back with the chin held forward to the chest and the eyes forward on the frame pad Spotting this skill is most important Demonstration of back drop with low bounce and practice of both techniques Lesson 5 1 Review and practice of skills already learned encouraging original routines based on them 2 Half turntable Start from the front drop position and push to the left or right with the hands Tu...

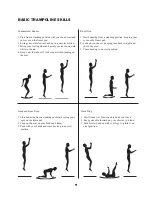
Page 9: ...cing from a standing position keeping your eyes on the frame pad 2 Land on your knees keeping your back straight and your body erect 3 Come back up to an erect position Hand and Knee Drop 1 Start bouncing from a standing position keeping your eyes on the frame pad 2 Land on the mat on your hands and knees 3 Push with your hands and come back up to an erect position Back Drop 1 Start from a low bou...

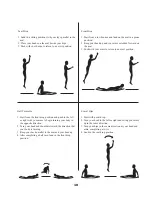
Page 10: ...f Turntable 1 Start from the front drop position and push to the left or right with your arms to begin turning your body in the opposite direction 2 Turn your head and shoulders toward the direction that your body is turning 3 Keep your back parallel to the mat and your head up 4 After completing a half turn land in the front drop position Swivel Hips 1 Start with a seat drop 2 Turn your head to t...

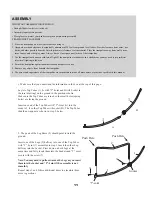
Page 11: ...ssemble three more leg sections 1 1 1 2 Push Here Push Here 1 11 A B T Joint Socket 7 7 secure with the screw 7 ASSEMBLY IMPORTANT ASSEMBLY INFORMATION Need phillips screw driver included Assembly requires two persons Wear gloves to protect your hands from pinch points during assembly TRAMPOLINE PLACEMENT 1 Place the trampoline on a level surface before using it 2 Adequate overhead clearance is es...

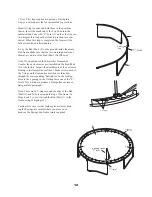
Page 12: ...line Combo the enclosure was pre installed on the Bed Mat 3 at the factory Inspect the attachments of the enclosure Netting to the trampoline mat bed Make certain each of the V rings on the trampoline mat bed is threaded through the corresponding buttonhole in the Netting Be sure the opening in the Netting faces one of the T Joints If you did not purchase a Trampoline enclosure disregard this para...

Page 13: ...have 8 evenly spaced Springs 4 attaching the Bed Mat 3 to the trampoline frame Attach remaining Springs not shown evenly between the eight attached Springs in the same manner as before Continue to attach the remaining Springs between the previously attached Springs until all Springs are attached Safety Note For the Bed Mat 3 to have the even ten sion necessary for safety in jumping the Springs 4 m...

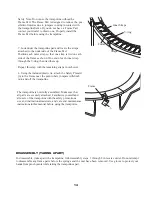
Page 14: ...e frame near the point where jumpers willclimb onto and off the trampoline The trampoline is now fully assembled Make sure that all parts are securely attached Familiarizeyourself and all users of the trampoline withthe safety precautions use and instructionalmaterials and care and maintenance instructions in this manual before using the trampoline 14 Straps Frame Frame 6 DISASSEMBLY TAKING APART ...

Page 15: ...rioration wearing out in the stitching or fabric of the mat or frame pad ruptured or missing springs a bent or broken frame or leg a sagging mat sharp points on the frame or suspension system If any of these conditions exist the trampoline should be taken apart or otherwise protected against use until the condition is fixed SPECIAL CONSIDERATIONS High Wind The trampoline can be blown around by hig...

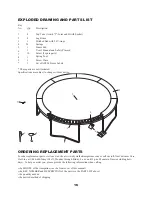
Page 16: ...ing the MODEL of the trampoline see the front cover of this manual the KEY NUMBER and DESCRIPTION of the part see the PART LIST above the quantity needed the desired method of shipping 16 5 3 4 2 1 6 Key No Qty Description 1 8 Top Tube Awith T Joint and B with Socket 2 4 Leg Brace 3 1 Stitched Bed with 56 V rings 4 56 Springs 5 1 Frame Pad 6 1 User s Manual and Safety Placard 7 10 Screw 2 spare pa...

Page 17: ...d for commercial or rental purpose No other Warranty beyond that specifically set forth above is authorized by Skywalker Holdings LLC SKYWALKER HOLDINGS LLC IS NOT RESPONSIBLE OR LIABLE FOR INDIRECT SPECIAL OR CONSEQUE NTIAL DAMAGES ARISING OUT OF OR IN CONNECTION WITH THE USE OR PERFORMANCE OF THE PRODUCT OR OTHER DAMAGES WITH RESPECT TO ANY ECONOMIC LOSS LOSS OF PROPERTY LOSS OF REVENUE OR PROFI...

Reviews: