


5
5
4
4
3
3
2
2
1
1
D
D
C
C
B
B
A
A
HDMI2-RX1+
5V_HDMI_HOT
HDMI2-RX2-
HDMI2-RX1-
HDMI2-RX0+
HDMI2-RX0-
HDMI2-RXC+
HDMI2-RXC-
SDA2
SCL2
HDMI-CEC
CEC
HDMI1-RX1P
HDMI1-RX2N
HDMI1-RX1N
HDMI1-RX0P
HDMI1-RX0N
HDMI1-CLKP
HDMI1-CLKN
HDMI1-RX2P
HDMI2-RX2+
CEC
ARC
HDMI1-SCL
HDMI1-SDA
ARC
HDMI2-RX2+
HDMI2-RX2-
HDMI2-RX1+
HDMI2-RX1-
HDMI2-RX0+
HDMI2-RX0-
HDMI2-RXC+
HDMI2-RXC-
HPD_SINK
HDMI_HP1
IN2D1-
IN2D1+
VCC_HDMI_SW
IN2D2-
IN2D2+
POW1
HPD1
SDA1
SCL1
VCC_HDMI_SW
IN1D0-
VCC_HDMI_SW
IN1CLK-
IN1D1-
GND
IN1D0+
GND
IN1D1+
SDA_CTL
SCL_CTL
HDMI1-SDA
IN1D2-
IN1D2+
HDMI1-SCL
HPD2
MI2C-SDA
MI2C-SCL
VCC_HDMI_SW
HDMI1-RX1P
HDMI1-RX2N
HDMI1-RX2P
SCL_CTL
SDA_CTL
HDMI1-SDA
HDMI1-SCL
HDMI1-CLKN
HDMI1-CLKP
HDMI1-RX0N
HPD_SINK
GND
HDMI1-RX0P
HDMI1-RX1N
HPD3
SDA2
SDA3
SCL3
IN3CLK-
POW3
IN3D0-
SCL2
IN3D0+
GND
IN3D1-
IN3D1+
VCC_HDMI_SW
IN3D2-
IN2CLK-
IN2D1+
IN2D2+
IN2D1-
IN3D2+
IN2D2-
IN2D0-
IN2D0+
IN2CLK-
POW2
IN2D0-
IN2D0+
GND
HDMI1-CLKP
HDMI1-CLKN
HDMI1-RX1P
HDMI1-RX2P
HDMI1-RX1N
HDMI1-RX2N
HDMI1-RX0N
HDMI1-RX0P
HPD2
SCL2
IN2CLK-
IN2D1+
IN2D2+
IN2D1-
IN2D2-
IN2D0-
IN2D0+
SDA2
HPD_SINK
HDMI1-SCL
HDMI1-SDA
HPD2
HDMI1-RX2-
HDMI1-RX1+
HDMI1-RX1+
HDMI1-RX2-
HDMI1-RX1-
HDMI1-RX0+
HDMI1-RX0-
HDMI1-RXC+
HDMI1-RXC-
SDA1
SCL1
HDMI1-RX1-
HDMI1-RX2+
HDMI1-RX0+
CEC
HDMI1-RX0-
HDMI1-RXC+
HDMI1-RXC-
HPD1
IN1CLK-
IN1D1+
IN1D2+
IN1D1-
IN1D2-
IN1D0-
IN1D0+
HDMI1-RX2+
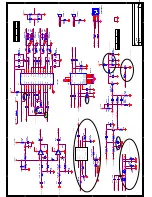
HDMI2-HPD
HDMI1-HPD
CEC
POW2POW2
POW1POW1POW1
POW2
VCC_HDMI_SW
VCC_HDMI_SW
HDMI2_5V
VCC_HDMI_SW
VCC_HDMI_SW
VCC_HDMI_SW
HDMI1_5V
HDMI2_5V
3.3V_HDMI
+5V_Normal
+5V_Normal
HDMI2_5V
5V_HDMI_HOT
+5V_Normal
HDMI1_5V
HDMI1_5V
5V_HDMI_HOT
HDMI1-RX2P
HDMI1-RX2N
HDMI1-RX1P
HDMI1-RX1N
HDMI1-RX0P
HDMI1-RX0N
HDMI1-CLKP
HDMI1-CLKN
HDMI-CEC
HDMI1-SCL
HDMI1-SDA
ARC
HDMI_HP1
MI2C-SDA
MI2C-SCL
Title
Size
Document Number
Rev
Date:
Sheet
of
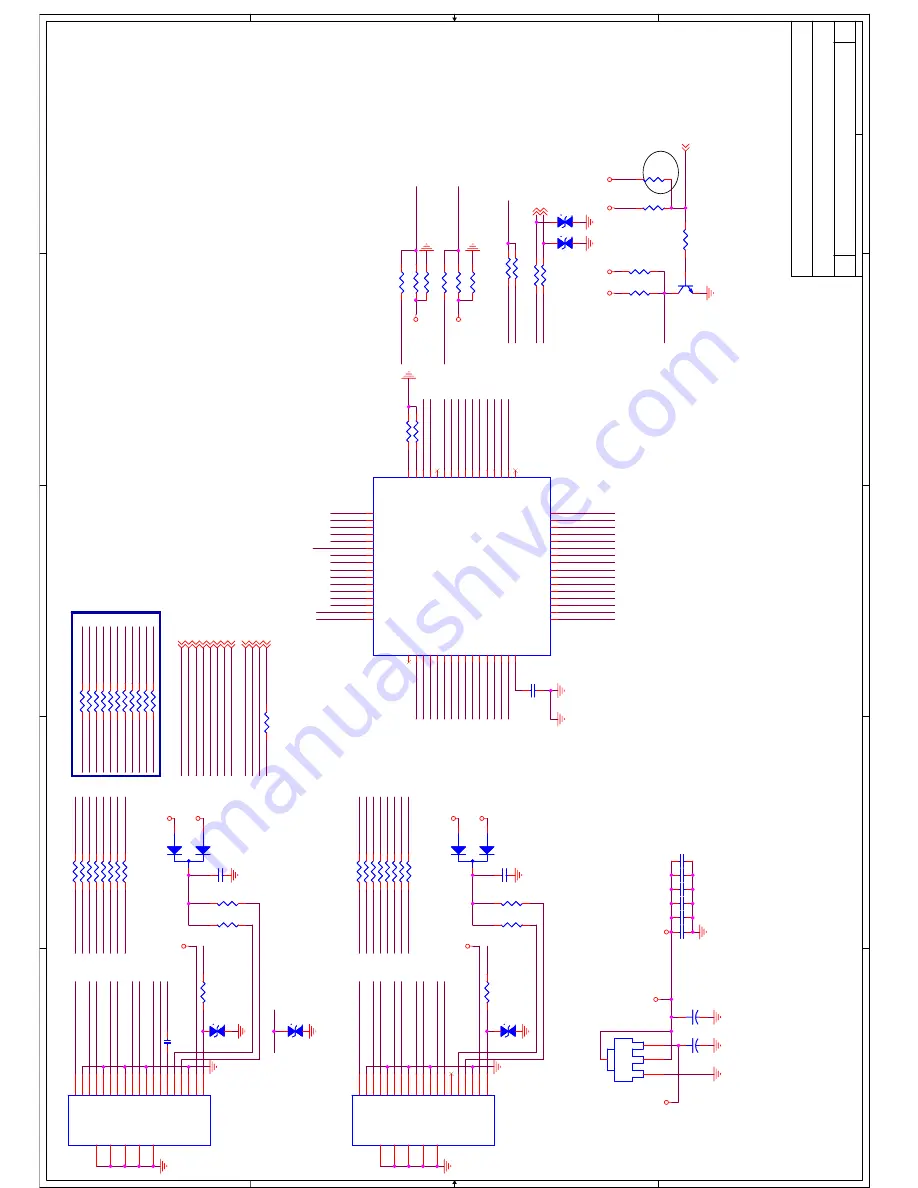
HDMI
V1.0
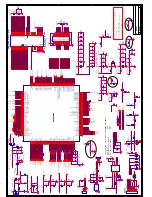
MST6M181VS
<OrgName>
A3
31
0
Tuesday, June 28, 2011
Title
Size
Document Number
Rev
Date:
Sheet
of
HDMI
V1.0
MST6M181VS
<OrgName>
A3
31
0
Tuesday, June 28, 2011
Title
Size
Document Number
Rev
Date:
Sheet
of
HDMI
V1.0
MST6M181VS
<OrgName>
A3
31
0
Tuesday, June 28, 2011
HOTPLUG
HDMI BYPASS OPTION
HDMI1(REAR)
HDMI2(REAR)
AGND-----DGND
Ⳉ䗮ᯊ
:
R251,R249
Ў
22
ྚ
R78=0
ྚ
R75=10K
R72=1K
Add by lin.20110311
R263
3.6K
R263
3.6K
C158
0.1uF
C158
0.1uF
R251
NC/22R
R251
NC/22R
R673
10R
R673
10R
R265
100
R265
100
VD106
NC
VD106
NC
1
2
R674
10R
R674
10R
C88
47n
C88
47n
R259
37K
R259
37K
VD107
NC
VD107
NC
1
2
R675
10R
R675
10R
+
CA85
22uF/16V
+
CA85
22uF/16V
R75
10K
R75
10K
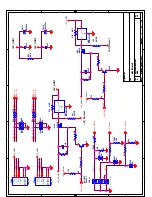
P1
HDMI_J
P1
HDMI_J
DATA2+
1
DATA2 SHIELD
2
DATA2-
3
DATA1+
4
DATA1 SHIELD
5
DAT1A-
6
DATA0+
7
DATA0 SHIELD
8
DATA0-
9
CLK+
10
CLK SHIELD
11
CLK-
12
CEC
13
NC
14
SCL
15
SDA
16
DDC/CEC GND
17
+5V POWER
18
HOT PLUG
19
GND1
20
GND2
21
GND3
22
GND4
23
GND5
24
R76
4.7K
R76
4.7K
VD105
NC
VD105
NC
1
2
C161
0.1uF
C161
0.1uF
C93
0.1uF
C93
0.1uF
R267
NC/0R
R267
NC/0R
R266
500_1%
R266
500_1%
R261
37K
R261
37K
R305
4.7K
R305
4.7K
ADJ
OUT
IN
U31
AMS1117-3.3
ADJ
OUT
IN
U31
AMS1117-3.3
3
2
1
4
R668
10R
R668
10R
R74
10K
R74
10K
R81
1K
R81
1K
R242
NC/0R
R242
NC/0R
R678
10R
R678
10R
R681
10R
R681
10R
R672
10R
R672
10R
VD103
NC
VD103
NC
1
2
R264
100
R264
100
R250
NC/0R
R250
NC/0R
VD104
NC
VD104
NC
1
2
C164
0.1uF
C164
0.1uF
C168
2.2uF
C168
2.2uF
R252
NC/0R
R252
NC/0R
R254
NC/0R
R254
NC/0R
R671
10R
R671
10R
R94
47K
R94
47K
R257
4.7K
R257
4.7K
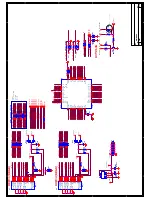
U19
PS331
U19
PS331
HPD2
1
SDA2
2
SCL
2
3
B21
4
A21
5
POW
2
6
B22
7
A22
8
GND
9
B23
10
A23
11
VCC
12
B24
13
A24
14
POW
1
15
HPD1
16
I2C_RST
17
SDA1
18
SCL1
19
B11
20
A11
21
VCC
22
B12
23
A12
24
GND
25
B13
26
A13
27
NC
28
B14
29
A14
30
REXT
31
POWDN
32
SDA_
CT
L
33
SC
L_CTL
34
I2
C_ADDR
35
Y4
36
Z4
37
VCC
38
Y3
39
Z3
40
GND
41
Y2
42
Z2
43
HPD_S
INK
44
Y1
45
Z1
46
SCL
_SIN
K
47
SDA_
SINK
48
POW_SINK
49
HPD3
50
SDA3
51
SCL3
52
B31
53
A31
54
POW3
55
B32
56
A32
57
GND
58
B33
59
A33
60
VCC
61
B34
62
A34
63
CEXT
64
R667
10R
R667
10R
R245
NC/0R
R245
NC/0R
R99
47K
R99
47K
R665
200R
R665
200R
R680
10R
R680
10R
R676
10R
R676
10R
R79
47K
R79
47K
R71
1K
R71
1K
R80
47K
R80
47K
R666
10R
R666
10R
D20
BAT54C
D20
BAT54C
D17
BAT54C
D17
BAT54C
R268
NC/100
R268
NC/100
R669
10R
R669
10R
R243
NC/0R
R243
NC/0R
R670
10R
R670
10R
P6
HDMI_J
P6
HDMI_J
DATA2+
1
DATA2 SHIELD
2
DATA2-
3
DATA1+
4
DATA1 SHIELD
5
DAT1A-
6
DATA0+
7
DATA0 SHIELD
8
DATA0-
9
CLK+
10
CLK SHIELD
11
CLK-
12
CEC
13
NC
14
SCL
15
SDA
16
DDC/CEC GND
17
+5V POWER
18
HOT PLUG
19
GND1
20
GND2
21
GND3
22
GND4
23
GND5
24
Q10
MMBT3904
Q10
MMBT3904
1
3
2
R304
4.7K
R304
4.7K
C89
0.1uF
C89
0.1uF
R269
NC/100
R269
NC/100
R72
1K/NC
R72
1K/NC
R78
1K
R78
1K
C157
0.1uF
C157
0.1uF
C76
0.1uF
C76
0.1uF
R677
10R
R677
10R
C74
0.1uF
C74
0.1uF
+
CA84
22uF/16V
+
CA84
22uF/16V
R679
10R
R679
10R
R262
3.6K
R262
3.6K
R241
NC/0R
R241
NC/0R
R253
NC/0R
R253
NC/0R
R249
NC/22R
R249
NC/22R
Summary of Contents for 8M26S
Page 2: ...Content 2 11 17 18 19 20 21 28 29 45 46 49 50 57 ...
Page 3: ...LED 8M26S ...
Page 5: ...40 55 80 For 22 LED For 24 LED For 32 LED ...
Page 6: ... 24 inches is 3W 24 inches is 4 ohm ...
Page 7: ...40 40 3 2 1 4 2 50 0 5 80 40 3 12000 26inches is 8 ohm ...
Page 8: ...40 YES 8 6 46 46 NO NO Standard Spanish Standard 20 ...
Page 9: ...4 2 4 0 40 70 0 40 70 0 40 40 85 Y0 50 30000 ...
Page 14: ...IC Block Diagram 14 U29 4MX16BIT BANKS DDR M13S2561616A 5TG2K ...
Page 18: ... 18 ...
Page 19: ... 19 Main PCB Top Bottom Layer ...
Page 20: ...Main PCB Top Bottom Layer 20 ...


