background image

61

Troubleshooting

9. Troubleshooting

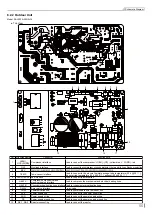
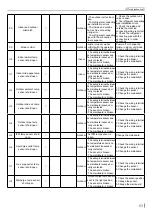
9.1 Error Code List

Error 

Code

Name of malfunction and 

status

Way of display 

Error 

Type

Possible Causes

Solution

Display 

directly

By remote 

conrol 

procedure 

only

By remote control 

procedure within  

compressor stop 

200s or direcly 

after compressor 

stop 200s

CL

Filter cleaning reminder

Indoor Filter may have dust

Clean the fliter

d0

Compressor RMS phase 

current limit down

Outdoor

Compressor phase current 

effective value is too high, 

the compressor need to limit 

the frequency or frequency 

reduction operation

The normal limit frequency 
reduction function.

d1

RMS machine current 

limit down

Outdoor

The whole unit current 

effective value is too high, 

compressor need to limit 

the frequency or frequency 

reduction operation

The normal limit frequency 
reduction function.

d2

Exhaust gas temperature 

limit down

Outdoor

The Exhaust pipe 

temperature is too high, 

compressor need to limit 

the frequency or frequency 

reduction operation

The normal limit frequency 
reduction function.

d3

Anti-freeze limit down

Outdoor

The inner pipe temperature 

is too low, compressor 

need to limit the frequency 

or frequency reduction 

operation

The normal limit frequency 
reduction function.

d4

Overload limit down

Outdoor

The system is overload, 

compressor need to limit 

the frequency or frequency 

reduction operation

The normal limit frequency 
reduction function.

d5

IPM temp limit down

Outdoor

The compressor module 

temperature is too high, 

compressor need to limit 

the frequency or frequency 

reduction operation

The normal limit frequency 
reduction function

E0

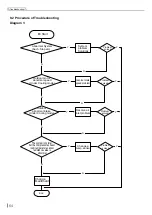
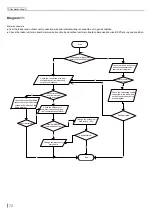
High discharge temp 

protection

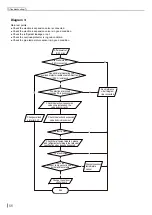
Outdoor See Diagram 1

See Diagram 1

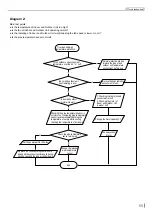
E1

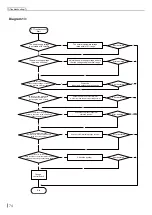
Overload protection 

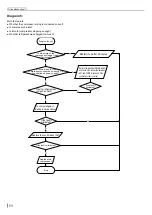
Outdoor See Diagram 2

See Diagram 2

E2

Compressor overload 

protection 

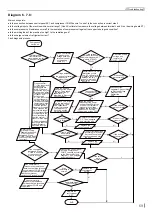
Outdoor See Diagram 3

See Diagram 3

E3

Anti-freeze protection

Outdoor

1. Indoor machine return air 

is not smooth.             

2. The fan speed is too low.             

3. The filter or evaporator 

not clean. 

4. The inner temperature 

sensor abnormal.

1. Indoor machine return air 

is not smooth.             

2.  The  fan  speed  is  too  low.             

3. The filter or evaporator 

not clean. 

4. Change the temperature 

sensor abnormal.

E4

Syestem high pressure 

protection


Outdoor  

1.Filter may have dust
2.Indoor or outdoor air Inlet 
is blocked.

1.Clean the fliter

2.Clean the air Inlet

E7

4 way valve malfunction

Outdoor

1.Supply voltage is unstable 

2.Mainboard and 4-Way 

valve unconnected. 

3.4-Way valve is broken.

1.Check the voltage of 

power supply. 

2.Check the connecting of 

mainboard and 4-way valve. 

3.Change the 4-Way valve.

E8

Outdoor ambient 

temperature abnormal 

protection

Outdoor

1. The outdoor environment 

temperature is too high or 

too low.     

2. The outdoor environment 

temprature sensor is damage.

1. The outdoor environment 

temperature is in normal 

range.   

2. Change the temprature 

sensor. 

H0

Compressor stalling

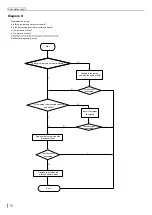
Outdoor See Diagram 4

See Diagram 4

H1

Start up failure

Outdoor See Diagram 5

See Diagram 5

Summary of Contents for SAVH12A-A3NAO

Page 1: ...MODEL SDVH12M A3NA I SAVH12A A3NA O SDVH18M A3NA I SAVH18A A3NA O SDVH24M A3NA I SAVH24A A3NA O Refrigerant R32 ...

Page 2: ... 3 Installation of Wired Controller 25 5 4 Installation Indoor Unit 26 5 5 Installation Outdoor Unit 32 5 6 Check after installation 35 5 7 Test operation 35 5 8 Configuration of connection pipe 36 5 9 Pipe expanding method 37 6 Construction Views 38 6 1 Indoor Unit 38 6 2 Outdoor Unit 38 7 Exploded Views and Parts List 40 7 1 Indoor Unit 40 7 2 Outdoor Unit 46 8 Schematic Diagram 52 8 1 Electrica...

Page 3: ...Supply Power Supply Intake SDVH12M A3NA I KEF001N0310 SAVH12A A3NA O KED001W0010 220 240V 50Hz 1Ph Outdoor Unit SDVH18M A3NA I KEF001N0320 SAVH18A A3NA O KED001W0020 SDVH24M A3NA I KEF001N0350 SAVH24A A3NA O KED001W0030 Wired Controller Indoor Unit Model SDVH12M A3NA I SDVH18M A3NA I SDVH24M A3NA I XKRB1 ...

Page 4: ...2 Summary and Features Outdoor Unit SAVH12A A3NA O SAVH18A A3NA O SAVH24A A3NA O ...

Page 5: ... the site after installation Make sure no foreign objects are left in the unit Always ensure effective grounding for the unit Incorrect handling could result inpersonal injury or death Incorrect handling may result inminor injury or damage to product or property Warning Caution Warning Caution All electric work must be performed by a licensed technician according to local regulations and the instr...

Page 6: ...olluting refrigerant with no harm to the ozonosphere The influence upon the greenhouse effect is also lower R32 has got very good thermodynamic features which lead to a really high energy efficiency The units therefore need a less filling The Refrigerant WARNING Do not use means to accelerate the defrosting process or to clean other than those recommended by the manufacture Should repair be necess...

Page 7: ...ating Capacity Btu h 14330 22178 Pdesignh Average KW 3 0 5 0 Pdesignh Warmer KW 3 8 5 3 Pdesignh Colder KW 3 5 Cooling Power Input W 1100 1460 Min Cooling Power Input W 180 250 Max Cooling Power Input W 1600 2400 Heating Power Input W 1000 1330 Min Heating Power Input W 220 300 Max Heating Power Input W 1650 2300 Cooling Current A 4 7 6 7 Heating Current A 4 3 6 1 Rated Input W 1650 2400 Rated Cur...

Page 8: ...Fan Motor RLA A 0 4 0 62 Outdoor Unit Air Flow Volume m3 h 1800 2800 Condenser Form Aluminum Fin copper Tube Aluminum Fin copper Tube Condenser Pipe Diameter mm Φ7 94 Φ7 Condenser Rows fin Gap mm 2 1 4 2 1 4 Condenser Coil Length L D W mm 719 38 1 506 869 38 1 572 Permissible Excessive Operating Pressure for the Discharge Side MPa 4 3 4 3 Permissible Excessive Operating Pressure for the Suction Si...

Page 9: ...armer KW 7 Pdesignh Colder KW 6 5 Cooling Power Input W 2190 Min Cooling Power Input W 380 Max Cooling Power Input W 2800 Heating Power Input W 1840 Min Heating Power Input W 400 Max Heating Power Input W 3120 Cooling Current A 10 0 Heating Current A 8 4 Rated Input W 3120 Rated Current A 13 84 EER W W 3 20 EER Btu h W 10 91 COP W W 3 80 COP Btu h W 12 98 SEER 6 2 SCOP Average 4 1 SCOP Warmer 4 6 ...

Page 10: ...nser Rows fin Gap mm 2 1 4 Condenser Coil Length L D W mm 878 38 1 660 Permissible Excessive Operating Pressure for the Discharge Side MPa 4 3 Permissible Excessive Operating Pressure for the Suction Side MPa 2 5 Maximum Allowable Pressure MPa 4 3 Cooling Operation Ambient Temperature Range 15 48 Heating Operation Ambient Temperature Range 15 24 Throttling Method Electron expansion valve Defrostin...

Page 11: ...oor DB20 C Indoor air flow Super High Pipe length 5m Outdoor temp C Condition Indoor DB27 C WB19 C Indoor air flow High Pipe length 5m Condition Indoor DB27 C WB19 C Indoor air flow High Pipe length 5m Condition Indoor DB20 C Indoor air flow High Pipe length 5m Heating operation ambient temperature range is 20ºC 24ºC Heating operation ambient temperature range is 15ºC 24ºC Compressor Speed rps Com...

Page 12: ...igh Super High 12K 40 42 44 46 48 50 52 54 56 20 0 3 0 4 50 60 70 80 90 Noise dB A 12K Cooling 12K Heating Indoor side noise when blowing Outdoor side noise when blowing Indoor fan motor rotating speed Compressor frequency Hz Noise dB A 50 60 30 40 20 Low Middle High Super High 24K 18K 42 44 46 48 50 52 54 56 58 20 0 3 0 4 50 60 70 80 90 Noise dB A 18 24K Cooling 18 24K Heating 12K 18K 24K ...

Page 13: ...ealth Function Status Floor Heating Floor Heating Function Status Child Lock Child Lock Function Status Horizontal Swing Horizontal Swing Function Status Vertical Swing Vertical Swing Function Status Access Control Plug And Unplug Status Out Out Function Status NO Icon Name Icon Instruction 2 TEMP Ambient Temp Setting Temp 3 Fan Speed Current Setting Fan Speed 4 Timer Timier Status 5 Clean Clean F...

Page 14: ...ng mode Auto Cooling Dry Fan Heating 3 1 Setting operating temp range 16 31 C 61 F 88 F 2 Setting timer time range 0 5 24 hour 8 4 Fan Adjust fan speed 5 Function Select Clean Eco Sleep Turbo Quiet etc Fuctions 6 Swing OK 1 Turn on off Swing function 2 Turn on off function 7 Timer Setting timer on off 5 4 3 2 6 7 8 1 ...

Page 15: ...tting temperature in on state of the unit If press either of them continuously temperature will be changed rapidly Temperature setting range is 16 C 31 C 61 F 88 F Note In Auto mode the setting temperature is un adjustable 2 21 F 6 7 7 03 5 285 6 7 DRY G CONTROL FRESH AIR Note You cannot set to a mode from the wired controller of the indoor unit that conflicts with the master wired controller of a...

Page 16: ...ld the button for 5 seconds the temperature display area of the wired controller will display the searchable parameter code F00 Then press the button for another 5 seconds and you will be directed to the parameter setting interface and the temperature display area will show a flashing A01 Press the or button to switch to A15 and then press the button to enter the setting interface In this case A15...

Page 17: ...ce to enter the timer ON OFF setting interface The icon will appear and the ON OFF icon flashes Press the or button to adjust the time to your desire Then press the button to save your settings and exit The timer ON OFF icon will be displayed Cancel Timer After the timer is set press the button twice to enter the scheduled timer ON OFF setting mode When you press the button again the ON OFF icon d...

Page 18: ...t to 26 C and the initial maximum temperature limit for heating is set to 22 C 2 21 6 7 7 03 5 285 6 7 5 21752 FRESH AIR 2 21 6 7 7 03 5 285 6 7 5 21752 FRESH AIR 2 21 6 7 7 03 5 285 6 7 5 21752 FRESH AIR In heating dry mode Press the button to switch to the E Heater function E HEATER Setting The E Heater function can be turned on under the heating mode to improve the heating effect In dry mode th...

Page 19: ... mode exits automatically when switching modes and adjusting the fan speed Powering off and then on will turn off the quiet function Turbo and Quiet cannot be enabled at the same time 2 21 6 7 7 03 6 7 7 03 2 21 6 7 7 03 5 285 6 7 5 21752 FRESH AIR 2 21 6 7 7 03 6 7 7 03 HEALTH Setting Press the button to switch to the health function The icon will flash Press the button to turn the health functio...

Page 20: ... F00 Then press the or button to select the parameter to search The timer area displays the related parameter value Press the button to exit parameter searching Search Parameter Code Parameter Name Parameter Range View Mode F00 Settable parameter entry F03 Search for indoor unit engineering code and location 1 16 1 The Timer area displays the current indoor unit engineering code 2 Location of a fa...

Page 21: ...eck whether the Wi Fi feature is provided 1 If the Wi Fi feature is provided the icon will display and the following applies The wired controller displays and flashes when there is no connection with a server When connected to a server the wired controller will display an icon according to the connection signal strength with the server When the wired controller cannot detect a Wi Fi module or when...

Page 22: ... i is equal or below 19 degree plus additional temperature it will run in heating mode and the setting temperature reach 20 degree at that time 3 When 1 9 degree additional temperature environment temperature 26 degree It will run in airfan mode if it is the first time entering auto mode It will run in original mode if it change from cooling and heating mode If original mode is dehumidifying it wi...

Page 23: ...aving mode 6 Low temperature heating Press MODE and button at the same time in heating mode it will show LA 7 Environment temperature push temperature button it will show environment temperature 5s and the setting temperature 8 Outdoor power Power on outdoor power is off 9 When unit is on except for fan mode outdoor power supply input high frequency 10 Entering off mode or fan mode outdoor power i...

Page 24: ...nt of the nameplate It s only allowed to be operated in the rooms that meet the requirement of the nameplate Check whether the maintenance area is well ventilated The continuous ventilation status should be kept during the operation process Check whether there is fire source or potential fire source in the maintenance area The naked flame is prohibited in the maintenance area and the no smoking wa...

Page 25: ...ormal operation wrong action mechanical malfunction or even series safety accident 3 When refrigerant needs to be recovered during relocating or repairing the unit be sure that the unit is running in cooling mode Then fully close the valve at high pressure side liquid valve About 30 40 seconds later fully close the valve at low pressure side gas valve immediately stop the unit and disconnect power...

Page 26: ...ch is out of reach for children and far away from animals or plants If it is unavoidable please add the fence for safety purpose 5 2 2 Installation Site of Indoor Unit 5 2 3 Installation Site of Outdoor Unit 5 2 4 Safety Precautions for Electric Appliances 1 A dedicated power supply circuit should be used in accordance with local electrical safety regulations 2 Don t drag the power cord with exces...

Page 27: ...ss this line through the oblong hole located at the bottom of the wired controller Use M4 25 screws to fix the base plate together with installation hole of the wall Insert the through signal wire in the slot on the wired controller also lock the wired controller panel and base plate together Then use ST2 2 4 5 screw to fixed the wired controller panel and base plate together 2 1 Clips 5 3 2 Disas...

Page 28: ...outdoor units must be at least 1m away from the TV set or radio to avoid the image interference and noise even if 1m is kept the noise may be produce due to the strong electric wave b Installation of the indoor unit 1 Drilling Holes for Bolts and Installing the Bolts Using the installation template drill holes for bolts four holes Drilling position for bolts 2 Installing the Suspension Bolts 1 Ins...

Page 29: ...laring tool 4 Check if the flare part is spread evenly and there are no cracks 1 The pipes are shaped by your hands Be careful not to collapse them 2 Do not bend the pipes in an angle more than 90 3 When pipes are repeatedly bent or stretched the material will harden making it difficult to bend or stretch them any more Do not bend or stretch the pipes more than three times 4 When bending the pipe ...

Page 30: ...ter Inch 1 4 3 8 1 2 5 8 3 4 7 8 Tightening Torque N m 15 30 35 40 45 50 60 65 70 75 80 85 Installation of the Drain Hose a Installation of Drain Piping Install the drain hose in accordance with the instructions in this installation manual and keep the area warm enough to prevent condensation Problems with the piping may lead to water leaks 1 Install the drain hose with downward gradient 1 50 to 1...

Page 31: ...n can be directly attached to the drain hose CAUTION Condensate Drain pipe Enlarged View Condensate Drain pipe A A B B As the inside of the unit is in the negative pressure status it is required to set up a backwater elbow The requirements is A B P 10 20 mm P is the absolute pressure inside the unit The unit of the pressure is Pa Drain port Drain cap Fastener b Testing of Drain Piping After piping...

Page 32: ...lange and the return air cover plate 4 Connect one end of the return air duct to the return air outlet of the unit by rivets and the other to the return air louver For the sake of the convenience to freely adjust the height a cutting of canvas duct will be helpful which can be reinforced and folded by 8 iron wire 5 More noise is likely to be produced in the bottom return air mode than the backward...

Page 33: ...rminal fastener or pliers securely clamp a round terminal to each stripped wire end 4 Position the round terminal wire and replace and tighten the terminal screw with a screwdriver WARNING Before obtaining access to terminals all supply circuits must be disconnected The rated voltage of the unit is as shown as table 7 Before turning on verify that the voltage is within the 198 264V range Perform w...

Page 34: ...he corresponding wire clamp packed in the chassis Fix the power cord tightly with the binding wire CAUTION blue yellow green Outdoor unit connection black brown 3 2 N 1 Installation of the Wired Controller Fix the support of outdoor Select it according to the actual installation situation 1 Select installation location according to the house structure 2 Fix the support of outdoor unit on the selec...

Page 35: ...t with hand 4 Tighten the union nut with torque wrench by referring to the sheet below handle liquid valve gas valve Hex nut diameter Tightening torque N m Ф 6 15 20 Ф 9 52 30 40 Ф 12 45 55 Ф 16 60 65 Ф 19 70 75 Connect indoor and outdoor pipe 1 Remove the wire clip connect the power connection wire and signal control wire only for cooling and heating unit to the wiring terminal according to the c...

Page 36: ...sure of piezometer remains in 0 1MPa 4 Close the vacuum pump and maintain this status for 1 2min to check if the pressure of piezometer remains in 0 1MPa If the pressure decreases there may be leakage 5 Remove the piezometer open the valve core of liquid valve and gas valve completely with inner hexagon spanner 6 Tighten the screw caps of valve and refrigerant charging vent 7 Reinstall the handle ...

Page 37: ... grounded securely It may cause electric leakage Does the power cord follow the specification It may cause malfunction or damaging the parts Is there any obstruction in the air inlet and outlet It may cause in sufficient cooling heating capacity The dust and sundries caused during installation are removed It may cause malfunction or damaging the parts The gas valve and liquid valve of connection p...

Page 38: ...pipe is prolonged for 10m at the basis of standard length you should add 5ml of refrigerant oil for each additional 5m of connection pipe The calculation method of additional refrigerant charging amount on the basis of liquid pipe Additional refrigerant charging amount prolonged length of liquid pipe additional refrigerant charging amount per meter Basing on the length of standard pipe add refrige...

Page 39: ... C Put on suitable insulating pipe D Put on the union nut Remove the union nut on the indoor connection pipe and outdoor valve install the union nut on the pipe union pipe pipe E Expand the port Expand the port with expander expander hard mold pipe Note A is different according to the diameter please refer to the sheet below Outer diameter mm A mm Max Min Ф6 6 35 1 4 1 3 0 7 Ф9 52 3 8 1 6 1 0 Ф12 ...

Page 40: ... B A D E F A B C D E F G SDVH12M A3NA I 740 350 700 200 450 472 26 SDVH18M A3NA I 1040 350 1000 200 450 472 26 SDVH24M A3NA I 1340 350 1300 200 450 472 26 Item Model Outline Dimensions Fig 2 6 2 Outdoor Unit 830 762 540 257 325 540 290 Model SAVH12A A3NA O Unit mm ...

Page 41: ...39 Construction Views 890 820 372 310 598 550 338 Model SAVH18A A3NA O Unit mm 960 890 396 358 700 560 368 Model SAVH24A A3NA O ...

Page 42: ...40 Exploded Views and Parts List 7 Exploded Views and Parts List 7 1 Indoor Unit Model SDVH12M A3NA I 1 2 3 4 5 6 7 8 9 10 11 12 13 14 15 16 17 18 19 20 21 22 23 24 25 26 27 28 29 30 31 32 ...

Page 43: ...lation Plate Subassembly K11230003 1 14 Hang Hook K11410003 4 15 Right side Plate Assembly K10600014 1 16 Electrical Box Subassembly K10810003 1 17 Electrical Box Cover K10450036 1 18 Wiring Board K33600008 1 19 Mainboard K50102254 1 20 Mainboard Installation Box K20410002 1 21 Fixing Clip K61000003 1 22 Insulation Gasket K60600004 1 23 Capacitor K3122000104 1 24 Outlet Nozzle Sealed Plate Subasse...

Page 44: ...42 Exploded Views and Parts List Model SDVH18M A3NA I 4 5 6 7 8 9 10 11 12 13 14 15 16 17 18 19 20 21 22 23 24 35 36 37 25 26 27 28 29 30 31 32 33 34 1 2 3 ...

Page 45: ...rifugal Fan Subassembly K14420005 3 15 Up Volute K15800006 3 16 Filter Assembly K15420035 3 17 Motor Clamp K6080000301 2 18 Support K11280001 1 19 Motor K1680003201 1 20 Motor Loop Clamp K60800004 1 21 Motor Clamp Subassembly K60800002 2 22 Motor Support K11200014 1 23 Top Cover Assembly K20600013 1 24 Hang Hook K11410003 4 25 Electrical Box Subassembly K10810003 1 26 Wiring Board K33600008 1 27 I...

Page 46: ...44 Exploded Views and Parts List Model SDVH24M A3NA I 11 37 36 35 10 9 12 40 38 39 5 6 7 8 4 24 34 13 22 23 27 26 33 29 3 21 2 32 30 1 14 15 20 19 18 28 31 16 17 25 ...

Page 47: ...p K61000002 1 18 Mainboard K50102254 1 19 Mainboard Installation Box K20410002 1 20 Capacitor K31210003 1 21 Electrical Box Cover K20400026 1 22 Outlet Nozzle Sealed Plate Subassembly K11460002 1 23 Right side Plate Assembly K10600021 1 24 Drain Pipe Subassembly K13010004 1 25 Temp Sensor K33000001 1 26 Evaporator Subassembly K10200038 1 27 Drain Pan Assembly K16410004 1 28 Wind casing Assembly K1...

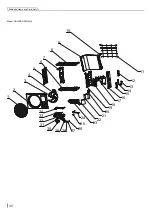
Page 48: ...46 Exploded Views and Parts List 7 2 Outdoor Unit Model SAVH12A A3NA O 1 2 3 4 5 6 7 8 9 10 11 12 13 14 15 16 17 18 19 20 21 22 23 24 25 26 27 28 29 30 31 32 33 34 35 36 37 ...

Page 49: ...6 1 15 4 way valve Coil K3380000508 1 16 Big Handle Apricot Grey K22210002 1 17 Right Side Panel Apricot K1060000101P 1 18 Valve Support Apricot K1120000201P 1 19 Stop Valve 3 8 K1420000203 1 20 Stop Valve 1 4 K1420000103 1 21 4 way valve Assembly K20305130 1 22 Wiring Compressor K33200009 1 23 Noise absorption Sponge K61410056 1 24 Noise absorption Sponge K40108001 1 25 Drain Joint K13210001 1 26...

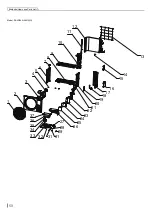
Page 50: ...48 Exploded Views and Parts List Model SAVH18A A3NA O 1 2 3 7 8 6 9 10 11 12 13 14 15 16 17 18 19 20 21 22 23 34 33 32 31 30 29 25 24 4 5 28 27 26 ...

Page 51: ...op Valve K1420000103 1 14 Big Stop Valve K1420000603 1 15 Valve Support Subassembly K11200007P 1 16 Right Side Panel Apricot Grey K1060003201P 1 17 Compressor And Accessory K10000156 1 18 4 Way Valve Assembly K20305136Y 1 19 Partition Board Subassembly K10440028 1 20 Reactor K34020003 1 21 Noise absorption Sponge Outside K61410028 1 22 Noise absorption Sponge Inside K61410027 1 23 Electric Box Ass...

Page 52: ...50 Exploded Views and Parts List Model SAVH24A A3NA O 1 2 3 4 6 7 8 9 10 11 12 13 14 15 16 17 18 19 20 21 22 23 24 25 26 37 36 35 34 33 32 31 29 28 27 5 31 ...

Page 53: ... Big Handle Apricot Grey K22210003 1 16 Valve Cover K21420010 1 17 Right Side Panel Apricot Grey K10600006P 1 18 Big Stop Valve K1420004403 1 19 Valve Support Subassembly K1120000701P 1 20 Partition Board Subassembly K10440015 1 21 Reactor K34020004 1 22 4 Way Valve Assembly K20305148Y 1 23 Compressor And Accessory K10000180 1 24 Noise absorption Sponge Outside K61410028 1 25 Noise absorption Spon...

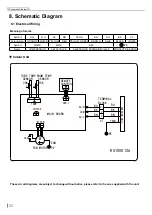
Page 54: ...ACK VIOLET Symbol COMP 4WAY EKV PE Name COMPRESSOR 4 WAY VALVE ELECTRONIC EXPANSION VALVE PROTECTIVE EARTH Meaning of marks Indoor Unit These circuit diagrams are subject to change without notice please refer to the one supplied with the unit 1 20 0 1 2 5 8 7 03 1 1 1 78 7 03 6 1625 5220 7 03 6 1625 7 50 1 2 1 02725 287 225 81 7 8 1 0 1 5 027 21752 2 3 1 0 3 3 7 ...

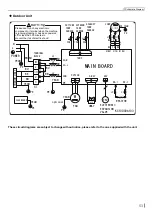
Page 55: ...8 203 9 8 5 8 5 3 1 3 3 3 5 725 9 9 7 03 6 1625 2875220 7 03 6 1625 867 8 8 9 5 7521 3 16 21 9 9 3 1 8 1 8 1 1 20 RSWLRQDO 0 1 2 5 3 1 3 2 5 3 32 5 1 8 1 1 Please don t touch any electronic component or terminal when the machine is running stopping or has been powered off for less than 30 minutes to prevent the risk of electric shock ZDUQLQJ 1 225 81 7 7 50 1 2 287 1 5 5 7 03 COMP ...

Page 56: ...nction 1 access interface 2 water full detection 3 wire controller communication interface 4 temperature sensor 5 display board interface 6 DC water pump interface 7 communication interface between indoor unit and outdoor unit 8 220V AC fire line 9 220V AC neutral line ...

Page 57: ...st 50 k 25 đ 5 OFAN OFAN1 Fan interface Used to connect to external fan 6 HEAT C Compression mechanical and electrical heated interface Used to compress the mechanical and electrical heating zone 7 HEAT B Chassis electrical heating zone interface Used for chassis electrical heating zone 8 F WAY 4 way valve interface 4 way valve 9 COM Communication line Used to communicate with the indoor unit 10 A...

Page 58: ...ase current sampling circuit PFC current sampling circuit 3 Power factor correction PFC control circuit 4 Master control chip circuit 5 DC fan electric circuit sampling circuit 6 Switch power supply circuit 7 8 Wire communication circuit 9 Fan and load control circuit 1 2 3 4 5 9 6 8 7 ...

Page 59: ...ust 50 k 25 đ 5 OFAN OFAN1 Fan interface Used to connect to external fan 6 HEAT C Compression mechanical and electrical heated interface Used to compress the mechanical and electrical heating zone 7 HEAT B Chassis electrical heating zone interface Used for chassis electrical heating zone 8 F WAY 4 way valve interface 4 way valve 9 COM Communication line Used to communicate with the indoor unit 10 ...

Page 60: ...essor phase current sampling circuit PFC current sampling circuit 3 Power factor correction PFC control circuit 4 Master control chip circuit 5 DC fan electric circuit sampling circuit 6 Switch power supply circuit 7 8 Wire communication circuit 9 Fan and load control circuit ...

Page 61: ... k 25 5 OFAN OFAN1 Fan interface Used to connect to external fan 6 HEAT C Compression mechanical and electrical heated interface Used to compress the mechanical and electrical heating zone 7 HEAT B Chassis electrical heating zone interface Used for chassis electrical heating zone 8 F WAY 4 way valve interface 4 way valve 9 COM Communication line Used to communicate with the indoor unit 10 AC L Pow...

Page 62: ...ampling circuit PFC current sampling circuit 3 Power factor correction PFC control circuit 4 Master control chip circuit 5 DC fan electric circuit sampling circuit 6 Switch power supply circuit 7 EMI filter circuit 8 Wire communication circuit 9 Fan and load control circuit Bottom view ...

Page 63: ...normal limit frequency reduction function d5 IPM temp limit down Outdoor The compressor module temperature is too high compressor need to limit the frequency or frequency reduction operation The normal limit frequency reduction function E0 High discharge temp protection Outdoor See Diagram 1 See Diagram 1 E1 Overload protection Outdoor See Diagram 2 See Diagram 2 E2 Compressor overload protection ...

Page 64: ...agram 11 See Diagram 11 L4 Select the port level abnormal error Indoor The mainboard is broken Change the mainboard L5 Indoor EEPREM error Indoor See Diagram See Diagram L6 Outdoor display communication between Indoor and Outdoor failure Outdoor See Diagram 12 See Diagram 12 LL Trial running Indoor Normal Function Normal Function P0 Outdoor EEPREM error Outdoor 1 EEPROM chip U8 loose 2 The mainboa...

Page 65: ...mainboard loosened or poorly contacted 2 The sensor is broken 3 The mainboard is broken 1 Check the wiring terminal 2 Change the sensor 3 Change the mainboard U3 Outdoor mid coil temp sensor short open Outdoor 1 The wiring terminal between the temperature sensor and the mainboard loosened or poorly contacted 2 The sensor is broken 3 The mainboard is broken 1 Check the wiring terminal 2 Change the ...

Page 66: ...oblem solved Problem solved N N Y Y Y Y Y Y End Outdoor motor abnormal speed Under Cooling mode Resolve rotate speed problem Outdoor abnormal intake Under Cooling mode Resolve air inlet problem Change a temp sensor The system is normal but the compressor exhaust room temperature sensor resistance value is abnormal N N N N N N Change Mainboard Diagram 1 ...

Page 67: ...ion environment of unit Indoor and outdoor unit heat radiating is poor Indoor and outdoor motor work well 1 Checking the fan terminals connect well or not 2 Checking the motor of Indoor and Outdoor Unit is well or not Change the motor capacity C1 Checking the pipe temperature sensor is normal or not comparing pipe temperature sensor resistance table Checking the temperature of out pip while coolin...

Page 68: ...nnected Use ohmmeter measuring the overload protector resistance at ambient temp 1000 Ω resistance Check the electronic expansion valve coil is installed on the valve body correctly Change overload protector SAT Check the electronic expansion valve body is block or not The fault is clear Check the refrigerant situation please add refrigerant according to the technical specification when leakage ha...

Page 69: ...d Connected wires End Change Compressor Errors declared Change control board AP1 Over fill refrigerant The input voltage setting is normal The unit heat dissipation is bad Step out during the operation Check the outside fan motor is normal Check the fan terminals OFAN is connected Change fan motor capacity C1 Change outside fan motor Improve heat dissipation for unit such as heat exchanger clearan...

Page 70: ...p after 3 minutes Are the wires for the connection sequence right Replace the control panel AP1 If the fault is eliminated Replace the compressor 3 minutes End compressor connected correctly Is If the fault is eliminated If the fault is eliminated Refer to the Electrical Wiring Diagram and check if the connection between AP1 and COMP is loose and if the connection order is correct Whether refriger...

Page 71: ...stem pressure becomes too high The connection of capacitor C2 is loose Reconnect the capacitor C2 according to Electrical Wiring Diagram Then Restart the unit Stop the unit and disconnect the power supply Wait 20 minutes or use DC voltmeter to measure the voltage between the two ends of capacitor C2 until the voltage is lower than 20V Replace the capacitor C2 Then energize and start the unit Repla...

Page 72: ...alfunction diagnosis process Start Is there jumper cap on the mainboard Is the jumper cap inserted correctly and tightly Replace the jumper cap with the same model Assemble the jumper cap with the same model Insert the jumper cap tightly Is malfunction eliminated Is malfunction eliminated Is malfunction eliminated Replace the mainboard with the same model End Y Y Y Y Y N N N N N ...

Page 73: ...he connection of PG Turn on the unit again measure whether the output voltage on control terminal for PG motor is more than 50V within 1 min after the louvers are opened Tighten the screw reassemble the blade motor and shaft bearing rubber base sub assy to make sure there is no foreign object between them Y Y Y Y Y Y Y Y Y Y N N N N N N N N N Is malfunction eliminated Is malfunction eliminated Is ...

Page 74: ...ical box is normal Check the connecting cables connected to the indoor and outdoor unit properly by the wiring diagram Check the outdoor unit communication circuit See the Troubleshooting Method Fault declared Fault declared Fault declared Problem with the communication circuit Change the indoor unit main board Change the outdoor unit main board AP1 End Start Main check points Test the indoor and ...

Page 75: ...Numerical change Numerical change Use the Tesr 15 position to test voltage values by voltmeter Numerical change Use the Tesr 10 position to test voltage values by voltmeter Numerical change Outdoor unit communication circuit detection is normal Outdoor unit error End Outdoor unit communication circuit detection process as follows outdoor unit key test points ...

Page 76: ...is clear The fan motor and wind speed are operating normally or the fan speed is low or stop The compressor is operating normally check the noise oil leakage body temperature etc Solved the compressor abnormal operation problem Check the motor and re install motor in order to make fan motor operating normal Solved system internal blockage problem Check the system Error declared Error declared Erro...

Page 77: ...e or short circuit Replace it as per the wiring diagram and reconnect the wires If the fault is eliminated Remove the PFC capacitor and measure resistance between the two terminals Is the resistance around zero The capacitor is short circuited and the capacitor should be repla ced Restart the unit If the fault is eliminated Disconnect the terminals for the reactor and measure the resistance betwee...

Page 78: ... indoor unit and outdoor unit is improper Check whether the installation postion is proper according to installation requirement for air conditioner Adjust the installation position and install the rainproof and sunproof for outdoor unit Refrigerant is leaking Discharged air temperature during cooling is higher than normal discharged wind temperature Discharged air temperature during heating is lo...

Page 79: ...r Cylinder of compressor is blocked Compressor can t operate Repair or replace compressor 6 Air Conditioner is Leaking Possible Causes Discriminating Method Air conditioner Status Troubleshooting Drain pipe is blocked Water leaking from indoor unit Eliminate the foreign objects inside the drain pipe Drain pipe is broken Water leaking from drain pipe Replace drain pipe Wrapping is not tight Water l...

Page 80: ...5 29 12 6 65 3 105 101 0 9801 6 66 88 30 12 07 66 2 998 102 0 9519 5 63 46 31 11 57 67 2 898 103 0 9247 4 60 23 32 11 09 68 2 797 104 0 8984 3 57 18 33 10 63 69 2 702 105 0 873 2 54 31 34 10 2 70 2 611 106 0 8484 1 51 59 35 9 779 71 2 523 107 0 8246 0 49 02 36 9 382 72 2 439 108 0 8016 1 46 8 37 9 003 73 2 358 109 0 7793 2 44 31 38 8 642 74 2 28 110 0 7577 3 42 14 39 8 297 75 2 205 111 0 7369 4 40...

Page 81: ...4 6 167 90 1 818 17 162 1 19 26 17 55 5 942 91 1 763 16 153 3 20 25 01 56 5 726 92 1 71 15 145 21 23 9 57 5 519 93 1 658 14 137 2 22 22 85 58 5 32 94 1 609 13 129 9 23 21 85 59 5 13 95 1 561 12 123 24 20 9 60 4 948 96 1 515 11 116 5 25 20 61 4 773 97 1 47 10 110 3 26 19 14 62 4 605 98 1 427 9 104 6 27 18 32 63 4 443 99 1 386 8 99 13 28 17 55 64 4 289 100 1 346 7 94 29 16 8 65 4 14 101 1 307 6 89 1...

Page 82: ...04 54 616 52 250 50 000 47 859 45 822 43 882 42 034 40 275 38 598 37 000 35 476 34 032 32 637 31 315 30 052 28 847 27 697 26 597 25 547 841 108 791 159 659 701 621 342 585 412 551 747 520 197 490 621 462 888 436 875 412 468 389 563 368 059 347 865 328 895 311 070 294 315 278 561 263 743 249 801 236 679 224 325 212 690 201 728 191 397 181 657 172 472 163 807 155 630 147 910 140 620 133 733 127 225 ...

Page 83: ...r electric box cover 3 Remove lower cover plate2 Remove the screws on electric box by screws drivers and then lift front Loose buckles on two sides of lower cover plate and lift up 45 and then remove lower cover plate2 Please refer to step 11 to remove fan motor Procedure Note Remove the screws on electric box by screws drivers and then lift up Loose buckles of electric box bottom and then remove ...

Page 84: ...r cover plate1 by screws drivers and then remove lower cover plate1 Lift up water pan and then remove water pan Please refer to step 10 to remove evaporator Procedure Note 4 Remove air outlet assembly Loose the screws on air outlet assembly by screws drivers and then remove air outlet assembly ...

Page 85: ...screws drivers and remove seaplate for feed nozzle B Loose the screws on right plate by screws drivers and remove right plate C Remove right plate and then take down the hook A Loose the fixed screws on hooks by screws drivers B Loose the fixed screws between support and evaporator by screws drivers C Loose the fixed screws on the left plate by screws drivers and remove left plate and then take do...

Page 86: ...ote 10 Remove evaporator A Lift up evaporator and remove evaporator Note Please check step 6 to remove evaporator and loose the fixed screws among evaporator left plate right plate and sealplate lift up evaporator and take out liquid pipe and windpipe from right plate and then remove the evaporator assembly Note remove the fan motor begin with step 11 and Loose the fixed screws from hole on the fa...

Page 87: ...re of Outdoor Unit Warning 1 Before disassembly 2 Remove top cover Remove connection screws connecting the top cover plate with the front panel and the right side plate and then remove the top panel Top cover Screw Screw 3 Remove protective grille Remove the screws fixing protective grille and then remove the protective grille Note Procedure ...

Page 88: ...onnection screw fixing the big handle and then remove the handle Big handle 4 Remove grille and panel A Remove connection screws between the front grille and the front panel Then remove the front grille B Remove connection screws connecting the front panel with the chassis and the motor support and then remove the front panel Screw Grille Front panel Note Procedure ...

Page 89: ...e plate Remove connection screws connecting the right side plate with the valve support and the electric box Then remove the right side plate 9 Remove electric box assy Remove screws fixing the electric box assy loosen the wire bundle and unplug the wiring terminals Then lift the electric box to remove it Right side plate Electric box assy Screw Left side plate Note Procedure ...

Page 90: ...ove tapping screws fixing the motor and lift the motor support to remove it Motor support Motor 12 Remove acoustic cotton Split the acoustic cotton lock and take out 3 pcs slowly NOTE Do not damage the pipe Acoustic cotton 1 10 Remove Reactor Reactor Take off the fixed screw and you could take off the reactor Screw Screw Note Procedure Acoustic cotton 2 Acoustic cotton 3 ...

Page 91: ...dering when unsoldering wrap the gas valve with awet cloth completely to avoid damage to the valve caused by high temperature Unsolder the spot weld of 4 way valve assy compressor and condenser and then remove the 4 way valve assy When unsoldering the spot weld wrap the 4 way valve with wet cloth completely to avoid damaging the valve due to high temperature 4 way valve assy Isolation sheet Screw ...

Page 92: ...e the 2 screws fixing the gas valve and unsolder the welding joint between the gas valve and the air return pipe to remove the gas valve 15 Remove Expansion valve Assy Unsolder the spot weld of expansion valve assy liquid valve and condenser and then remove the expansion valve assy Expansion valve Assy Gas valve Compressor Note Procedure ...

Page 93: ...SHENZHEN SKYWORTH AIR CONDITIONING TECHNOLOGY CO LTD NO 12 GAOKE AVENUE BAOLONG INDUSTRIAL CITY LONGGANG DISTRICT SHENZHEN GUANGDONG CHINA Web www skyworth ac com Tel 86 755 26743958 ...

Reviews: