background image

If bases become mismatched, pressing the FLAT button will 
re-sync the mechanical positions.

PERFORMANCE NOTES

Syncing Two Bases (Optional)

A Sync Cord is included with the base. Not available on Queen, Full or Full-Long size bases.

The Sync Cord connects the two control boxes to a single remote for the synchronization of two bases.

Disconnect the Power Down Box cable from each Control Box 
or splitter cable. Make note where the cable was plugged in.

Connect the male end of each Sync Cord to Control Box or 
splitter cable. Insert it into the same port that you disconnected 
the Power Down Box from in Step 2.

Unplug bases from power source.

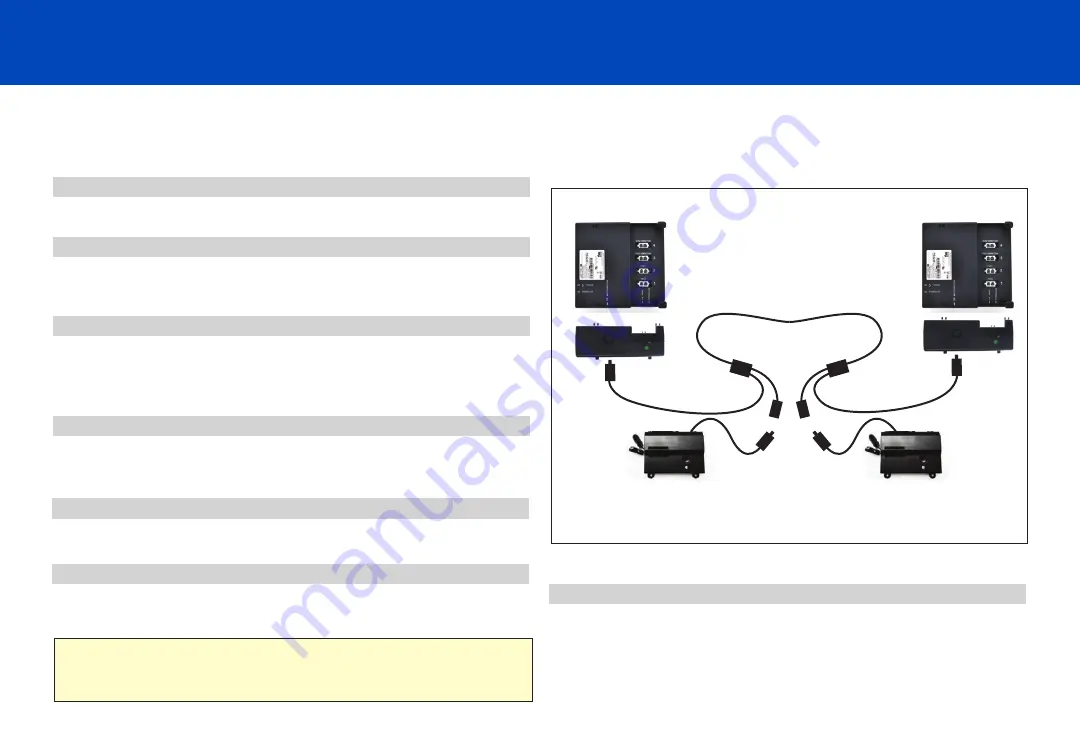
Connect each Power Down Box male connection to the sync 
cord female connection (refer to illustration at right).

STEP 3

STEP 2

STEP 1

STEP 4

STEP 5

Plug bases back into the power source.

STEP 6

Check to ensure all cords are securely attached. Both remotes 
will now operate both bases simultaneously.

The system is now linked. Pressed buttons on either remote

will control the two bases simultaneously.

Power Down 

Box 1

Sync Cord

Power Down 

Box 2

Control Box 1

Control Box 2

16

Summary of Contents for 633

Page 1: ...633 OWNER S MANUAL Actual product appearance and functionality may vary from photographs illustrations and descriptions included in this manual ...

Page 2: ...iew 6 Quick Reference Guide 7 Installation Guide 8 9 Remote Control 10 Bluetooth App Guide 12 14 Power Down Box 15 Remote Control Pairing 11 Troubleshooting 18 Connecting Strap Optional 17 Syncing Two Bases Optional 16 Table of Contents Deutsch 19 25 Português 26 33 Español 34 41 ...

Page 3: ...ur warranty PETS AND CHILDREN Immediately dispose of all packing materials as it may pose a smothering risk to small children and pets To avoid injury it is not advised to allow children and small pets to play on or under the bed Children should not Attention Important Safety Disclaimers Read all instructions before using your adjustable base Save these instructions operate the bed base without ad...

Page 4: ... a show room the surrounding environmental noise will cover some of the massage noise However when installed in a home setting with wooden floors carpeted or not the massage volume will be more noticeable To minimize this resonance place a piece of carpet or rubber caster cups under each leg or caster of the base It is possible to experience vibration or noise from the exterior bed frame headboard...

Page 5: ...aturally and inevitably occurs as a result of normal use or aging FABRIC CARE To prolong the life of your fabric protect from direct sunlight whenever possible For spot cleaning wipe area with a light damp sponge or vacuum with a soft brush attachment to remove particles Keep at a minimum of 30cm 12 inches away from direct heat sources For a deeper cleaning blot liquid spills with a clean dry clot...

Page 6: ...n Enter or exit your adjustable in the fla horizontal position Tinker with or modify base This will void the warranty Press down on the head or foot while actuated can damage frame and motors SAVE THESE INSTRUCTIONS Safety Precautions and Usage Statements FCC Compliance NOTE This equipment has been tested and found to comply with the limits for a Class B digital device pursuant to part 15 of the F...

Page 7: ...s not included G Connecting Strap H Sync Cord Misc Parts not included I Surge Protector J 9 Volt Batteries 2 Only included in the width of the bases 1000mm Before discarding the packing materials ensure all the parts are accounted for A A B C D E G H I J F MISC Parts NOT INCLUDED Parts List These items are attached to the base for shipping purposes Carefully remove from base and set aside 10 MIN 2...

Page 8: ...otor Base and Remote Overview 10 20 30 Minute Massage Timer Lights TV Preset Position FLAT Preset Position Relax Preset Position Underbed Lighting Underbed Lighting Foot Motor Underbed Lighting Lifts and Lowers Head Lifts and Lowers Foot Head Massage On Off 6 Intensity Foot Massage On Off 6 Intensity Turn on Head and Foot Massage Timer Turn on Head and Foot Massage Zero G Preset Position ...

Page 9: ...before beginning installation If installing a split unit see page 16 Head Vibration Foot Vibration Massage Motor Splitter Cable Quick Reference Guide Power Cord Foot Motor Head Motor Power Supply Input Cord Power Down Box Control Box Y Cable Underbed Lighting Bluetooth ...

Page 10: ...d surge protector To sync two bases see detailed installation instructions on page 16 Always use two people when setting up the base STEP 1 STEP 2 STEP 3 Place the bed base box in a desired location with the top of the box facing up Remove the binding straps and packing materials making sure not to puncture the box with any sharp objects Remove the bed base from the box keeping the bottom of the b...

Page 11: ...he legs A surge protector is recommended Quickly test remote functions to verify proper setup before placing mattress on base Return the base to a flat position before placing the mattress on top STEP 10 Slide the left side of the mattress retainer bar into the bracket Pull the retainer bar to the opposite bracket and secure the right side Setup is now complete Test all functions on remote Plug th...

Page 12: ...ing a fourth time will turn off massage preset position One touchZERO G Zero G adjusts your legs to a higher level than your heart helping to and promote circulation relieve pressure off the lower back One touchRELAX preset position The HEAD and buttons adjust the head massage intensities Levels 1 6 The FOOT and buttons adjust the foot massage intensities Levels 1 6 One touchFLATpreset position On...

Page 13: ... functions If the remote buttons do not impact the adjustable base movements please repeat the process again STEP 1 The original remote that comes in the box is already paired to the adjustable base No further action is required In the event that the remote is not paired with the base follow the steps below Locate the Power Down Box and press the button TWICE A light on the Power Down Box will ill...

Page 14: ...NG PROCESS please make sure the blue indicator light on your Bluetooth dongle is blinking indicating that it is discoverable If the blue indicator light is not blinking please unplug your base from its power source a surge protector is recommended for 10 seconds and plug it back in 12 Once in Settings please select V4 0 in Bluetooth version item Bluetooth Setup For iOS and Android devices ...

Page 15: ...with BASE i4 STEP 3 Once you are successfully connected you will be brought back to the remote page and may now operate your adjustable base Remote Style STEP 1 To choose the Remote style that most reflects the options on your physical handset please cycle through options A D Bluetooth App Guide 13 ...

Page 16: ...Bluetooth App Guide 14 Once you have chosen the correct remote style please select the back button to go back to the remote screen STEP 2 Optional Settings You can choose to turn haptic feedback on or off by turning Vibrate to the On or Off position You can opt to have Bluetooth auto connect by turning Bluetooth auto connect to the On or Off position ...

Page 17: ...t the base is stuck in an articulated position during a power outage the Power Down Box will return the base to a FLAT position Batteries are not to be used for normal operation of the base Install the 9 Volt batteries into the provided Power Down Box Do not mix brand name batteries Press the button on the Power Down Box to lower the base to FLAT position OVERVIEW STEP 2 STEP 1 Control Box Power D...

Page 18: ...t the male end of each Sync Cord to Control Box or splitter cable Insert it into the same port that you disconnected the Power Down Box from in Step 2 Unplug bases from power source Connect each Power Down Box male connection to the sync cord female connection refer to illustration at right STEP 3 STEP 2 STEP 1 STEP 4 STEP 5 Plug bases back into the power source STEP 6 Check to ensure all cords ar...

Page 19: ...ether STEP 2 STEP 3 STEP 1 With the bases in their desired location slightly loosen both legs to allow the strap to fit on the leg bolt between the leg washer and frame Slide side a of the connecting strap onto leg bolt Swing the strap and connect side b to the leg bolt Secure the strap by shifting to the left Re tighten legs Do not over tighten Use the remaining strap on other end of the base a b...

Page 20: ... and power cords are properly connected Unplug the base for 1 hour to reset the electronic components electrical surge protector is recommended Remove and replace full batteries in the remote control and re pair the remote to the base see page 11 If issue is not resolved by following the instructions above locate serial number on warranty card or back of remote and call Customer Service Center 8 8...

Page 21: ... Betriebsposition ausrichten Bei normalem Betrieb treten die pg 1 4 Sicherheitsvorkehrungen und Nutzungshinweise Achtung Haftungsausschluss Lesen Sie alle Anweisungen bevor Sie Ihr verstellbares Bettgestell benut zen Bewahren Sie diese Anleitung sorgfältig auf UM DAS RISIKO VON SCHOCK VERBRENNUNGEN BRAND ODER VERLETZUNGEN ZU REDUZIEREN Für optimale Sicherheit und Betrieb schließen Sie das Bettgest...

Page 22: ...1 5 Sekunden kommen VERSCHLEISS Verschleiß ist eine natürliche und unvermeidliche Folge normaler Verwendung Räder durch welche das Bett einen Mindestabstand zur Wand halten kann in Kontakt mit den Stahlträgern des Gestells wodurch ein Kontaktgeräusch oder Verschieben kann dieses Berührungsgeräusch hörbar werden Das ist normal MATERIAL Verstellbare Bettgestelle von Ergomotion sind aus verschiedenen...

Page 23: ...e Störungen auftreten Wenn das Gerät den Radio oder Fernseh oder Alterung TEXTILPFLEGE Um die Lebensdauer des Textils zu verlängern sollten Sie es möglichst vor direkter Sonneneinstrahlung schützen Zur Fleckenreinigung den Bereich mit einem leicht feuchten Schwamm abwischen Partikel mit einem weichen Bürstenaufsatz absaugen Halten Sie das Textil mindestens 30 cm von direkten Wärmequellen entfernt ...

Page 24: ...ese Teile sind für den Versand am Bettgestell befestigt Lösen Sie sie vorsichtig vom Gestell und bewahren Sie sie auf Nur bei Bettgestellen mit einer Breite 1000mm pg 6 Überblick über das Bettgestell und die Fernbedienung Head Motor Kopfmotor Foot Motor Fußmotor Massage Motor Massagemotor Power Down Box Batteriebox Control Box Schaltkästchen Bluetooth Bluetooth Underbed Lighting Unterbettbeleuchtu...

Page 25: ...tzkabel in eine Stromquelle Wir empfehlen einen Überspannungsschutz zu verwenden SCHRITT 9 Testen Sie nun die Remote Funktionen um die korrekte Konfigura tion zu überprüfen bevor Sie die Matratze auf das Gestell legen Bringen Sie das Gestell in eine flache Position bevor Sie die Matratze darauflegen SCHRITT 10 Schieben Sie die linke Seite der Matratzenhalteleiste in die Halter ung Ziehen Sie die H...

Page 26: ... gedrückt Die Originalposition ist jetzt wiederhergestellt Laden Sie die Remote App Ergomotion aus dem App Store herunter und öffnen Sie sie Öffnen Sie das Menü indem Sie auf die Schaltfläche in der oberen linken pg 15 Batteriebox Bewahren Sie die Batteriebox an einem geeigneten Ort für den Notfall auf Für den Batteriebetrieb sind zwei 9 Volt Blockbatterien erforderlich die NICHT im Lieferumfang e...

Page 27: ...einzigen Fernbedienung für die Synchronisation von zwei Bettgestellen SCHRITT 1 Trennen Sie beide Bettgestelle von der Stromquelle SCHRITT 2 Trennen Sie das Batterieboxkabel von jedem Schaltkäst chen oder jedem Splitterkabel Merken Sie sich wo das Kabel angeschlossen war SCHRITT 3 Verbinden Sie das männliche Ende jedes Synchronisa tionskabels mit dem Kabel des Schaltkästchens oder dem Splitter Ka ...

Page 28: ...ianças pequenas e os animais domésticos jogarem na cama ou debaixo desta As crianças não devem usar a base de cama sem cuidado de adultos MARCAPASSOS Alguns artigos contêm os imãs de neodímio que podem ser o obstáculo para funcionamento de tais dispositivos como os marcapassos os cardiover sores desfibriladores implantáveis e quaisquer outros dispositivos sensíveis aos campos magnéticos É recomend...

Page 29: ... segundo marca e modelo são projectadas e produzidas para funcionar dentro dos limites de parâmet ros dados de controlo de qualidade As bases são submetidas às inspecções minuciosas e severas durante processo de controlo de qualidade para garantir o funcionamento de acordo com padrões durante operação normal O uso efetivo normal é determinado de seguinte maneira a base regulada deve operar com col...

Page 30: ...s colchões regulados correspondentes Baixe à posição plana horizontal após o uso e durante os intervalos entre pré instalações Registre a garantia de artigo imediatamente depois de entrega de sua base regulada NÃO Sente se sobre os extremos bordos da base isso pode entortar o quadro os espeques ou a espuma de plástico Incline a base de lado Isso pode levar à danificação dos pés e ou dos parafusos ...

Page 31: ...os 2 Estas peças são fixadas à base só durante tempo de entrega Tire da base com cuidado e põe de lado Forma parte do conjunto só com largura da base 1000 mm pg 6 Revista das peças de base e de controlo remoto Massage Motor Motor de massagem Control Box Unidade de controlo Bluetooth Bluetooth Control Box Unidade de interrupção de alimentação Power Down Box Unidade de interrupção de alimentação Und...

Page 32: ...e alimentação e todos os cabos forem ligados ao estabilizador de tensão necessário pg 10 Controlo remoto A unidade de controlo remoto vai em conjunto com base regulada Para a unidade de controlo remoto funcionar serão requeridas três 3 pilhas de tipo AAA SAVE UP TO FAVORITE POSITION CONSERVAM A POSIÇÃO ESCOLHIDA Programar Aperte e mantenha apertado um dos botões e durante pelo menos 5 segundos Par...

Page 33: ...R se incendia de cor azul e começa piscar Quando o botão PAIR deixa de piscar se apaga a lâmpada incendi ada na unidade de interrupção de alimentação Tire o dedo do botão PAIR Agora a unidade de controlo remoto é ligada à base regulada PAIR Button Botão PAIR Passo 3 Verifique as funções remotas Se os botões remotos não influem sobre os movimentos básicos regulados por favor volte a fazer este proc...

Page 34: ...e desligação de energia elétrica a unidade de interrupção de alimentação voltará a base na posição horizontal As pilhas não devem se usar para o funcionamento habitual da base Passo 1 Instale as pilhas de 9 voltios na unidade de interrupção de alimentação Não misture as pilhas de firma Passo 2 Aperte o botão na unidade de interrupção de alimentação para baixar a base na posição horizontal Power Do...

Page 35: ...mente para que haja espaço entre o pé e a estrutura da cama ajustável Passo 2 Deslize a peça de junção no vão criado e faça o mesmo com a outra cama Passo 3 Aperte os pés novamente Não aperte demais Repita este processo na outra extremidade da cama 33 Pg 18 Solução de problemas Se uma ou mais funções na base da cama pararam de operar Verifique sob a base da cama para verificar se as conexões estão...

Page 36: ...iesgo de asfixia para niños pequeños o mascotas Para evitar daños no se recomienda dejar a los niños o a las mascotas pequeñas que jueguen encima o debajo de la cama Los niños no deben operar el bastidor de la cama sin la supervisión de un adulto MARCAPASOS Algunos productos contienen IMANES de neodimio que podrían interferir con dispositivos tales como marcapasos ICD desfibrilador cardioversor im...

Page 37: ...eño y funcionamiento dentro de los parámetros de control de calidad designados Los bastidores están sujetos a meticulosas y rigurosas inspecciones durante el proceso de control de calidad para asegurarse de que los bastidores operen dentro de estos estándares y durante un uso operativo normal El uso operativo normal se define de la siguiente manera El bastidor ajustable se opera con un colchón y c...

Page 38: ...istribuir uniformemente el peso cuando duerma en una configuración dividida La distribución desigual del peso puede hacer que el bastidor se levante de manera desigual Llamar al Servicio de Atención al Cliente para cualquier problema técnico No intentar forzar el bastidor hacia abajo esto podría dañar los motores o el marco Si tuviera manchas usar un jabón suave y agua para limpiar el bastidor aju...

Page 39: ...más de 1000 mm pg 6 Resumen de Base y Control Remoto Head Motor Motor del cabecero Foot Motor Motor de la parte trasera Massage Motor Motor del masajeador Power Down Box Caja de alimentación auxiliar Control Box Caja de control Underbed Lighting Iluminación bajo cama Bluetooth Bluetooth Head Massage On Off 6 Intensity Masaje del cabecero ON OFF 6 intensidades Foot Massage On Off 6 Intensity Saje d...

Page 40: ...recomienda el uso de un protector contra subidas de tensión PASO 9 Probar rápidamente las funciones a distancia para verificar la configuración adecuada antes de colocar el colchón sobre la base Volver a colocar la base en posición plana antes de colocar el colchón encima PASO 10 Deslizar el lado izquierdo de la barra de retención del colchón en el soporte Tirar de la barra de retención hacia el s...

Page 41: ...nados los botones FLAT y ZERO G simultánea mente durante 5 segundos Los preajustes originales serán restablecidos repetir el proceso otra vez PROCESO ALTERNATIVO DE EMPAREJAMIENTO A DISTANCIA Localizar la caja de control consultar la descripción general de la base y la guía de referencia rápida para la base correspondiente y presionar el botón Reinicio Emparejamiento dos veces Se iluminará una luz...

Page 42: ...a posición PLANA No se deben usar las pilas para el funcionamiento normal de la base PASO 1 Instalar las pilas de 9 V en la caja de alimentación auxiliar suministrada No mezclar las pilas de diferentes marcas PASO 2 Presionar el botón en la caja de alimentación auxiliar para poner la base en la posición PLANA Power Down Box Caja de alimentación auxiliar Control Box Caja de control pg 16 Sincroniza...

Page 43: ... ropa de cama que obstruyan el movimiento del bastidor Comprobar que la luz LED verde esté iluminada en la caja de control Si no hay luz comprobar que la entrada y los cables de alimentación estén conectados correctamente Desenchufar el bastidor durante 1 hora para restablecer los compo nentes electrónicos Conectar el bastidor de la cama a una toma de corriente diferente o probar la toma de corrie...

Page 44: ...Nationwide Customer Service Phone 8 800 200 40 90 Web www askona ru Serial Number 2020 Ergomotion Inc V001_09 2020 35005653 ...

Reviews: