1. Select correct pilot pin and place in cutter shank from the rear. Align flats on cutter shank with arbor body set
screws. Insert cutter into arbor body.
2. Tighten set screws securely on cutter shank flats.
NOTE:
Set screws should be recessed in arbor body when tight.
3. The surface you are working on should be clean and flat, and free from rust, scale, dirt and chips.
4.
Fill coolant reservoir with a water-soluble cutting fluid.
5.
Place Slugger® machine on workpiece with pilot pin over the center of hole to be drilled.
6.
Connect machine to power source.
7. Lower Slugger® cutter to surface of material to be cut. Once the pilot makes contact, coolant will be released down
the milled slot on the pilot and into the Slugger® cutter. Coolant flow can be stopped by lifting pilot pin off work
surface or shutting off coolant valve.
NOTE:
Be sure coolant valve is open. Regulate coolant flow by adjusting
coolant valve on coolant bottle.
CAUTION!
always
use
safety
strap
.
failure
to
do
so
could
result
in
personal
injury
and
/
or
damage
to
the
s
lugger
®
drilling
machine
.
8.
The safety strap must be securely fastened to machine and around work being drilled. Loop strap around work piece
and connect strap ends by attaching to D-rings on drill.
NOTE:
Safety strap is intended only to restrain the drill to the
work piece in the event of a power failure to the magnetic base.
9. Position chip guard toward work area before drilling.
before
the
cut
ready
to
make
the
cut
CAUTION!
position
chip
guard
toward
work
area
before
drilling
.
1. Move magnet switch to “ON” position. Switch will illuminate to indicate power is present – magnetic base should
be firmly secured to workpiece at this time. Thin materials may require an additional steel backing plate to achieve
proper magnet adhesion.
2. Start drill motor by depressing green motor “ON” button.
3. Using the feed handles, advance cutter into material until Slugger® cutter has established an external groove
in the material. During the remainder of the cut apply smooth constant pressure without overloading motor.
NOTE:
Slugger® cutters are designed for uninterrupted cutting. Chips are evacuated during the cut. Do not peck
drill when using Slugger® cutters.
4.
NOTE:
This machine is equipped with motor overload protection circuitry. An overload indicator light will turn on if
the motor load is excessive. If the motor load is increased beyond this point, the motor will shut off and the overload
indicator light will remain on. To restart the motor, first press the red motor “OFF” button. The overload light will turn
off, and the green motor “ON” button can now be pressed to restart the motor. See caution below.
CAUTION!
if
drill
motor
should
stall
or
stop
before
a
complete
cut
is
made
,
always
remove
cutter
from
hole
before
attempting
to
restart
motor
.
failure
to
do
so
could
result
in
personal
injury
and
/
or
damage
to
the
s
lugger
®
drilling
machine
and
cutter
.
note
:
this
machine
’
s
circuitry
will
automatically
shut
the
drill
motor
off
if
magnetic
base
is
sepa
-
rated
from
its
work
surface
.
if
your
machine
requires
adjustment
,
contact
jancy
’
s
service
department
.
1.
After the Slugger®
cutter has finished the cut, the “slug”, or uncut center portion of material, will be expelled when
the motor is returned to the full up position.
2.
Return machine into full upright position and depress red motor “OFF” button, wait until motor completely stops.
3.
Move magnet switch to “OFF” position when ready to release magnetic base from work surface.
4.
Move magnet switch to “DEMAG” position for one or two seconds to reduce residual magnetism.
after
the
cut
8
Summary of Contents for 17985
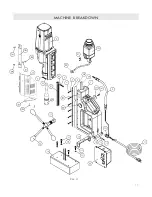
Page 11: ...machine breakdown 11 Rev D...
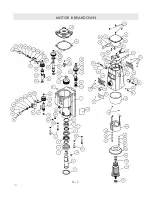
Page 14: ...motor breakdown Rev D 14...


