background image

Remove all contents from packaging and inspect to ensure no damage was incurred during shipping. Your Magforce pack-

age should also include the following:

operating


instructions


(

before


you


begin

)


description


part

 # 

qty

  OPERATOR’S MANUAL 

LIT107A 

1

  WARNING CORD LABEL 

06951 

1

  WARRANTY CARD 

0070342 

1

  MAGNET NOTICE WARNING 

0108D0C 

1

  3/16" PILOT, 1" DEPTH CUT 

16001 

1

  3/16" PILOT, 2" DEPTH CUT 

16002 

1

  1/4" PILOT, 1" DEPTH CUT 

16003 

1

  1/4" PILOT, 2" DEPTH CUT 

16004 

1

  SSS 10MM - 1.5 x 8MM FLAT POINT  70545 

2

  3MM HEx KEY 

70586 

1

  5MM T-HANDLE WRENCH 

70589 

1

  SAFETY STRAP 

06798 

1

  SPOKE HANDLE ASSEMBLY 

06316RS 

1

getting


started

what


you


should


know


before


you


drill

CAUTION!


always


disconnect


magforce


from


power


source


before


making


adjustments

.

Assemble spoke handle assembly #06316RS to pinion feed shaft #06206 using screw which is attached to center of 

drive handle. 

NOTE:

 Handle can be mounted on right or left side of machine.

WARNING!


smart


magnet


function


will


strobe


magnet


lamp


to


indicate


insufficient


magnetic


adhesion

.

smart magnet no longer interrupts motor function!

1. Type of material to be drilled, Brinnell or Rockwell hardness, material thickness and position should all be 

  determined to ensure proper selection of Slugger cutting tools, RPM, coolant and drilling time.

2. Remove any excessive mill scale or rust from surface to be drilled.

3. Material that has been flame cut may have become heat-treated and therefore difficult to drill. Avoid drilling 

  near such areas whenever possible.

4. Drilling with the Magforce in horizontal positions requires a special lubrication for Slugger cutters. 

  Consult Jancy Engineering for details.
5. 

Do not use Slugger drilling machines on surfaces or materials being welded. 

    Doing so can damage the machine’s electrical components.

7

Summary of Contents for Magforce 06920

Page 1: ...ROTECTION REQUIRED EYE PROTECTION REQUIRED Model 06920 Serial Date of Purchase BEWARE OF ROTATING MACHINE PARTS LINE VOLTAGE PRESENT NEVER PLACE FINGERS NEAR CUTTING AREA OR MACHINE ARBOR WARNING before use be sure everyone using this machine reads and understands all safety and operating instructions in this manual ...

Page 2: ...r from the original date of purchase repair or replace any goods found to be defective in materials or workmanship provided the product warranty registration card has been returned to Jancy Engineering Inc with in thirty 30 days of purchase date This warranty is void if the item has been damaged by acci dent neglect improper service or other causes not arising out of defects in materials or workma...

Page 3: ...tored in a dry high and locked up place out of reach of children 6 Do Not Force Tool It will do the job better and safer at the rate for which it was intended 7 Use Right Tool Do not force a small tool or attachment to do the job of a heavy duty tool Do not use tool for unintended purpose For example Do not use a circular saw for cutting tree limbs or logs 8 Dress Properly Do Not Wear Gloves While...

Page 4: ... sure switches are off before connecting to a power source 17 Outdoor Use Extension Cords When tool is used outdoors use only extension cords intended for use outdoors and so marked 18 Stay Alert Watch what you are doing Use common sense Do not operate tool when you are tired Do not use when taking medications that may cause drowsiness 19 Check Damaged Parts Before further use of the tool a guard ...

Page 5: ...ear cutting area or rotating machine parts 6 Always use eye and hearing protection 7 Always use safety strap and chip guard provided with machine 8 Always use proper tooling Keep cutters securely fastened 9 Do not use dull or broken cutters 10 Do not use Slugger drilling machines on surfaces or materials being welded Doing so can damage the machine s electrical components 11 Beware of slugs ejecte...

Page 6: ...ling along power cord and contacting power source tie a drip loop in power cord as shown in Figure B Fig B Use only 3 wire extension cords that have 3 prong grounding type plugs and 3 pole receptacles that accept the tool s plug Replace or repair damaged cords Make sure your extension cord is in good condition When using an extension cord be sure to use one heavy enough to carry the current your p...

Page 7: ...eed shaft 06206 using screw which is attached to center of drive handle NOTE Handle can be mounted on right or left side of machine WARNING smart magnet function will strobe magnet lamp to indicate insufficient magnetic adhesion SMART MAGNET NO LONGER INTERRUPTS MOTOR FUNCTION 1 Type of material to be drilled Brinnell or Rockwell hardness material thickness and position should all be determined to...

Page 8: ...lure to the magnetic base 9 Position chip guard toward work area before drilling before the cut ready to make the cut CAUTION position chip guard toward work area before drilling 1 Move magnet switch to I position to engage magnet Red lamp will illuminate to indicate power is present Magnet base should be firmly secured to workpiece at this time NOTE Thin materials may require an additional steel ...

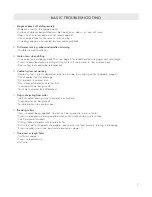
Page 9: ...dent machine must be in a upright position to operate properly Check coolant lines for blockage Dirt or debris in coolant tank Consistency of coolant mixture too thick Is correct pilot pin being used Vent hole in coolant tank lid blocked 5 Slugs not ejecting from cutter Lack of coolant causing slugs to expand in cutter bore Is correct pilot pin being used Possible broken internal arbor parts 6 Bre...

Page 10: ...use hands or fingers to rotate arbor or motor spindle 4 Inspect motor brushes and replace as needed during extended periods of heavy machine usage 5 Replace any worn parts and regularly tighten fasteners that have become loose during usage NOTE Never operate machine with worn or missing parts Use only Jancy replacement parts 6 Regularly test machine by placing machine on non ferrous material Engag...

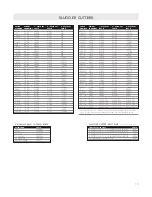
Page 11: ...456 SL145 1456S 38mm 1 496 S1496 SL149 1496S 1 1 2 1 500 S1500 SL150 1500S 39mm 1 535 S1535 SL153 1535S 1 9 16 1 562 S1562 SL156 1562S 40mm 1 574 S1574 SL157 1574S 41mm 1 614 S1614 SL161 1614S 1 5 8 1 625 S1625 SL162 1625S 42mm 1 654 S1654 SL165 1654S 1 11 16 1 687 S1687 SL168 1687S 43mm 1 692 S1692 SL169 1692S 44mm 1 732 S1732 SL173 1732S 1 3 4 1 750 S1750 SL175 1750S 45mm 1 771 S1771 SL177 1771S...

Reviews: