background image

Sunny Mini Central – Installation des Powerline-Kit 

Kurzanleitung 

www.SMA.de 

Seite 5 von 5


SMA Technologie AG 

Hannoversche Str. 1-5 

34266 Niestetal


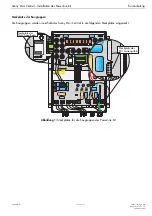
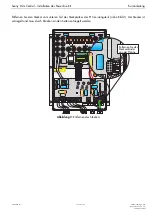
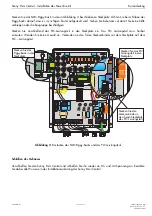
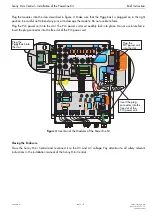
Stecken Sie das NLM Piggy-Back in den in Abbildung 3 beschriebenen Steckplatz. Achten Sie beim Einbau des 
Piggy-Backs darauf, dass es im richtigen Raster aufgesteckt wird. Gehen Sie behutsam vor damit Sie keine Stifte 
verbiegen oder die Baugruppe beschädigen. 

Stecken Sie anschließend das PLC-Leistungsteil in den Steckplatz ein. Das PLC Leistungsteil muss hörbar 
einrasten. Wenden Sie keine Gewalt an. Verbinden sie den freien Steckverbinder mit dem Steckplatz auf dem 
PLC – Leistungsteil. 


MC

MC

MC

MC

2 3 5 7

SMC60-AST

VN30.15/00858

Potter

&Brumfield

Potter

&Brumfield

Potter

&Brumfield

C

B

A

+     +

+     +

-     -

-     -

0 V

240 V

MC

MC

MC

MC

N

L

PE

N

L1

230 Vac:

A

S2

A

B

B

S1

E-Total 124.4kWh

h-Total     512h

A

S2

A

B

B

S1

Stecken Sie das PLC

Leistungsteil in den

Steckplatz.

Stecken Sie den

Steckverbinder in

den freien Steckplatz

des PLC Leistungsteils.

Stecken Sie das

Piggy-Back in den

Steckplatz.


Abbildung 3: 

Einstecken des NLM Piggy-Backs und des PLC Leistungsteils 


Schließen des Gehäuses


Verschließen Sie den Sunny Mini Central und schließen Sie ihn wieder an DC- und AC-Spannung an. Beachten 
Sie dabei alle Hinweise in der Installationsanleitung des Sunny Mini Central.  


Summary of Contents for NLMPB-SMC-NR

Page 1: ...NLMPB SMC NR Netzleitungskommunikation f r Sunny Mini Central Powerline Communication for Sunny Mini Central...

Page 2: ......

Page 3: ...ommunikation verwendet werden Die Netzleitungskommunikation kommt ohne separates Datenkabel aus da die Daten ber die vorhandene AC Leitung bertragen werden Die Kommunikationsmodule von Sunny Mini Cent...

Page 4: ...in der Installationsanleitung des Sunny Mini Central Vorgehensweise f r das ffnen eines Sunny Mini Central 1 Trennen Sie den Sunny Mini Central vom AC Netz 2 Trennen Sie den Sunny Mini Central allpol...

Page 5: ...erhalb des Sunny Mini Central in die folgenden Steckpl tze eingesteckt MC MC MC MC 23 5 7 SMC60 AST VN30 15 00858 Potter Brumfield Potter Brumfield Potter Brumfield C B A 0 V 24 0 V MC MC MC MC N L PE...

Page 6: ...s des PLC Leistungsteils siehe Bild 2 Der Stecker ist verriegelt und muss durch Dr cken an den Seiten entriegelt werden MC MC MC MC 23 57 SMC60 AST VN30 15 00858 Potter Brumfield Potter Brumfield Pott...

Page 7: ...an Verbinden sie den freien Steckverbinder mit dem Steckplatz auf dem PLC Leistungsteil MC MC MC MC 23 5 7 SMC60 AST VN30 15 00858 Potter Brumfield Potter Brumfield Potter Brumfield C B A 0 V 24 0 V M...

Page 8: ......

Page 9: ...powerline communication can be used to monitor PV plants with Sunny Boy and Sunny Mini Central inverters As the data is transferred via the available AC cable no separate data cable is required for po...

Page 10: ...Observe all precantions in the installation manual of the Sunny Mini Central How to open a Sunny Mini Central 1 Disconnect the Sunny Mini Central from the AC grid 2 Disconnect all poles of the Sunny...

Page 11: ...dules are plugged into the following slots in the Sunny Mini Central MC MC MC MC 23 5 7 SMC60 AST VN30 15 00858 Potter Brumfield Potter Brumfield Potter Brumfield C B A 0 V 24 0 V MC MC MC MC N L PE N...

Page 12: ...of the PLC power unit s slot see figure 2 The plug is locked It can be unlocked by pressing on the sides of the plug MC MC MC MC 23 5 7 SMC60 AST VN30 15 00858 Potter Brumfield Potter Brumfield Potter...

Page 13: ...Insert the plug connector into the free slot of the PLC power unit MC MC MC MC 23 5 7 SMC60 AST VN30 15 00858 Potter Brumfield Potter Brumfield Potter Brumfield C B A 0 V 24 0 V MC MC MC MC N L PE N L...

Page 14: ......

Page 15: ......

Page 16: ...rica Inc 12438 Loma Rica Drive Unit C Grass Valley CA 95945 USA Tel 1 530 273 4895 Fax 1 530 2747 271 www SMA AMERICA com SMA Solartechnology China Room 20F InternationalMetro Center Building A City S...

Reviews: