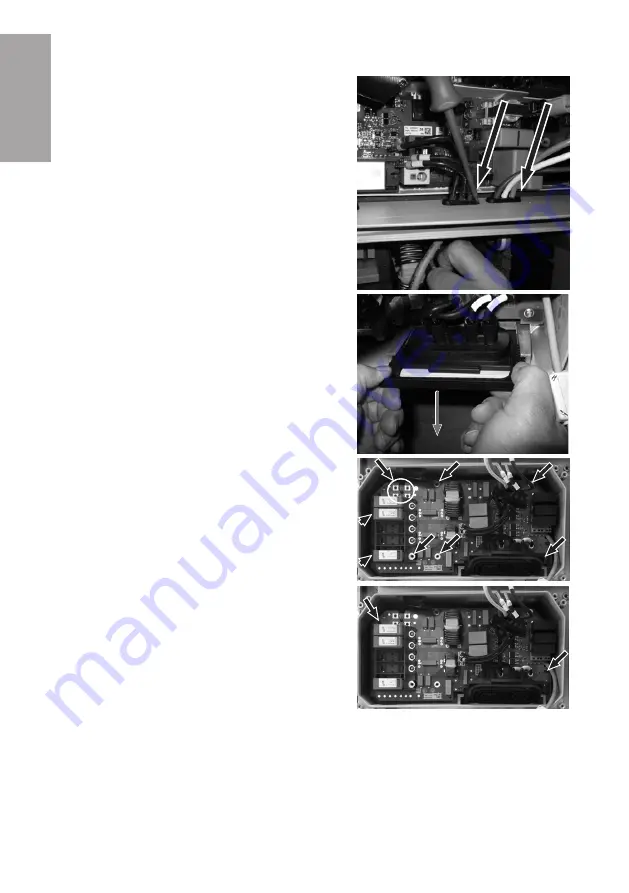
6 Removing the DC filter assembly
SMA Solar Technology AG
Replacement Manual
DC-EMV-STPTL10-RM-xx-10
18
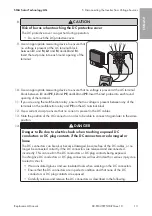
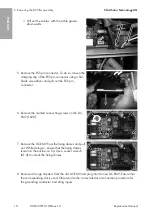
• Pull out the cables, with the cable glands,
downwards.
5. Remove the ESS pin connector. To do so, loosen the
clamping clip of the ESS pin connector using a flat-
blade screwdriver and pull out the ESS pin
connector.
6. Remove the marked connecting screws on the DC-
EMV (TX20).
7. Remove the DC-EMV from the fixing domes and pull
out. While doing so, ensure that the fixing domes
remain in the enclosure. Tip: Use a socket wrench
(AF 4) to unlock the fixing domes.
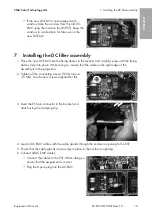
8. Remove all surge arresters from the old DC-EMV and plug into the new DC-EMV. Ensure that
the corresponding slot is used. Observe also the correct electrical connection procedure for
the grounding conductor and string inputs.
ENGLISH
Summary of Contents for NR-STP-DC-EMV
Page 68: ...1 SMA Solar Technology AG DC EMV STPTL10 RM xx 10 68 1 5 1 6 X703 1 X703 6 10...
Page 71: ...2 SMA Solar Technology AG DC EMV STPTL10 RM xx 10 71 DC DC DC DC 5...
Page 73: ...2 SMA Solar Technology AG DC EMV STPTL10 RM xx 10 73 5 C v v SMA SMA...
Page 75: ...4 SMA Solar Technology AG DC EMV STPTL10 RM xx 10 75 4 B A 1 A HM DC EMV B PVS 5 DC 1000 V...
Page 79: ...5 SMA Solar Technology AG DC EMV STPTL10 RM xx 10 79 18 20 20 4 19 2 DC DC DC PE...
Page 80: ...6 DC SMA Solar Technology AG DC EMV STPTL10 RM xx 10 80 DC PE 20 v v 6 DC 1 5 75...
Page 81: ...6 DC SMA Solar Technology AG DC EMV STPTL10 RM xx 10 81 2 4 DC 3 DC 3 PVS DC EMV 8 DC EMV 4...
Page 87: ...9 SMA Solar Technology AG DC EMV STPTL10 RM xx 10 87 SMA Solar Technology AG 2...
Page 236: ...www SMA Solar com...

