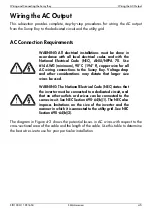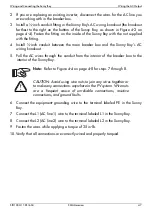
Wiring and Connecting the Sunny Boy
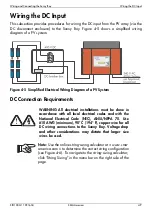
Wiring the DC Input
SB1100U-11:SE1604
SMA America
4-13
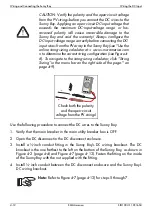
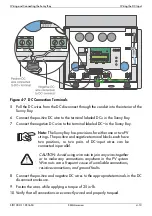
Figure 4-7 DC Connection Terminals
5. Pull the DC wires from the DC disconnect through the conduit into the interior of the
Sunny Boy.
6. Connect the positive DC wire to the terminal labeled DC+ in the Sunny Boy.
7. Connect the negative DC wire to the terminal labeled DC– in the Sunny Boy.
Note:
The Sunny Boy has provisions for either one or two PV
strings. The positive and negative terminal blocks each have
two positions, so two pairs of DC-input wires can be
connected in parallel.
CAUTION: Avoid using wire nuts to join any wires together
or to make any connections anywhere in the PV system.
Wire nuts are a frequent cause of unreliable connections,
resistive connections, and ground faults.
8. Connect the positive and negative DC wires to the appropriate terminals in the DC
disconnect enclosure.
9. Fasten the wires while applying a torque of 35 in-lb.
10. Verify that all connections are correctly wired and properly torqued.
Summary of Contents for SB1100U
Page 1: ...Photovoltaic Grid Tied String Inverter Sunny Boy 1100U Installation Guide SOLARTECHNOLOGY...
Page 2: ......
Page 8: ...vi SMA America SB1100U 11 SE1604...
Page 12: ...Unpacking and Inspection 2 2 SMA America SB1100U 11 SE1604...
Page 44: ...Commissioning the Sunny Boy 5 6 SMA America SB1100U 11 SE1604...
Page 68: ...Displays and Messages 6 24 SMA America SB1100U 11 SE1604...
Page 72: ...Troubleshooting 7 4 SMA America SB1100U 11 SE1604...
Page 74: ......
Page 75: ......
Page 76: ......

