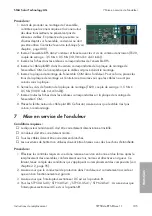
5 Smontaggio del gruppo BFS
SMA Solar Technology AG
Istruzioni per la sostituzione
STP50-4x-BFS-RM-xx-11
119
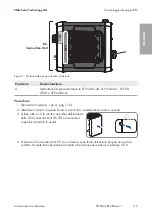
DC-
Connection Unit
COM
LED
A
BFS
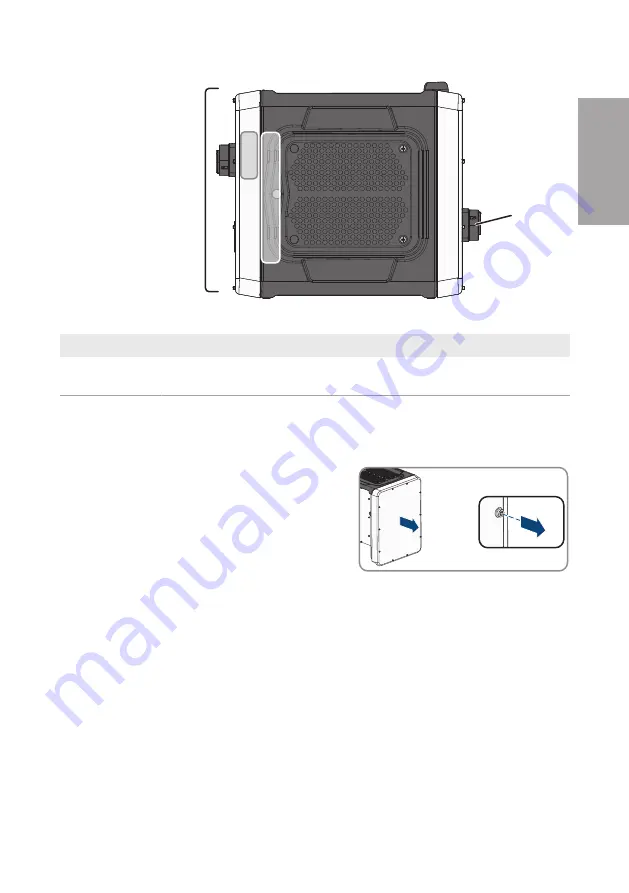
Figura 1 : Posizione del gruppo di comunicazione
Posizione
Denominazione
A
Interruttore CA presente tranne in STP 50-US-40, STP 33-US-41, STP 50-
US-41 e STP 62-US-41
Procedura:
1. Disinserire l’inverter (v. cap. 4, pag. 116).
2. Attendere 5 minuti. In questo modo si è certi che i condensatori si siano scaricati.
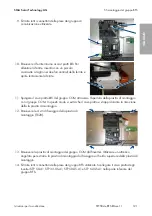
3. Svitare tutte e 10 le viti del coperchio dell'involucro
della DC-Connection Unit (TX 25) e rimuovere il
coperchio tirandolo in avanti.
10x
4. Scaricare la Connection Unit CC con un tester senza fonte di tensione propria nei punti di
contatto. Durante tale operazione accertarsi che la tensione residua sia inferiore a 5 V.
ITALIANO
Summary of Contents for STP 33-US-41
Page 57: ...1 SMA Solar Technology AG STP50 4x BFS RM xx 11 57 1 5 1 6 X703 1 X703 6 10...
Page 60: ...2 SMA Solar Technology AG STP50 4x BFS RM xx 11 60 DC DC DC DC 5...
Page 61: ...2 SMA Solar Technology AG STP50 4x BFS RM xx 11 61 AC DC DC AC DC 1000 V...
Page 62: ...2 SMA Solar Technology AG STP50 4x BFS RM xx 11 62 DC 5 C v v...
Page 67: ...5 BFS SMA Solar Technology AG STP50 4x BFS RM xx 11 67 5 DC DC DC 1 1 6 DC DC DC 7 8 X1...
Page 196: ...1 SMA Solar Technology AG STP50 4x BFS RM xx 11 196 1 5 1 6 X703 1 X703 6 10 WCtlHz Hz...
Page 198: ...2 SMA Solar Technology AG STP50 4x BFS RM xx 11 198 2 2 5 DC DC DC DC DC...
Page 199: ...2 SMA Solar Technology AG STP50 4x BFS RM xx 11 199 5 AC DC DC AC...
Page 200: ...2 SMA Solar Technology AG STP50 4x BFS RM xx 11 200 DC 1000 V DC 5 C...
Page 205: ...5 BFS SMA Solar Technology AG STP50 4x BFS RM xx 11 205 5 DC DC DC 1 1 6 DC DC DC 1 7 8 X1...
Page 211: ......
Page 212: ...www SMA Solar com...

