SMA America, LLC
Mounting
Installation Guide
SB50US-80US-eng-IUS112633
31
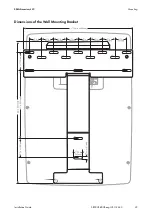
5.3.2 Mounting the Wall Mounting Bracket
1. Position the wall mounting bracket at the installation location. If possible, select eye level.
2. Align the wall mounting bracket with a spirit level. The bottom end of the wall mounting bracket
reaches approximately until the bottom corner of the inverter.
3. Use the wall mounting bracket as a template. Mark at least 3 holes in the horizontal or vertical
position of the wall mounting bracket (see section 5.3.1 ”Possibilities for Mounting the Wall
Mounting Bracket” (page 30)).
4. Remove mounting bracket and drill the holes at the markings.
5. Insert the screws into the bore holes through the holes in the wall mounting bracket.
6. Tighten the screws clockwise until the wall mounting bracket hangs securely on the wall.
DANGER
Risk of electric shock by drilling into power cables.
Risk of death or serious injury.
• Check mounting location for power cables prior to drilling.
CAUTION
The Sunny Boy may fall over due to its heavy weight.
Risk of bruising and broken bones.
• For installing the inverter on plasterboard or panels, do not use cavity plugs or toggle
plugs.
• Studs must be present behind the installation points on plasterboard or panels.
Information for the installation
The diameter of the bore holes must correspond to the fastening elements that you use for
mounting the inverter.
Mounting on a concrete wall:
• The hole diameter must be the same as the outer diameter of the screw anchors.
• Insert suitable screw anchors into the bore holes.
Mounting on a wall with wooden studs:
• The hole diameter must correspond to the screw diameter used. The screws are to be
stainless steel. The diameter of the screws must correspond to the diameter of the
holes in the wall mounting bracket. The screws must be long enough to reach a depth
in the wall of up to 1.5 in.

