SMA
Technologie AG
Installation
Installation Guide
SB25_30-11:SE0307
Page 27
5.
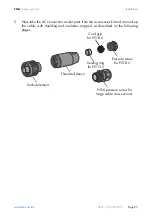
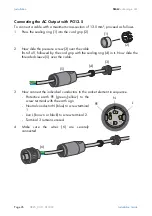
Now screw the threaded sleeve (7) onto the socket element (8) and tighten it.
6.
Now screw the pressure screw (9)
into the threaded sleeve (10) and
tighten it. The cord grip with the
sealing ring is pressed into the
threaded sleeve and can no longer
be seen.
The AC connection socket is now fully assembled.
If you are not going to connect up the Sunny Boy immediately, close the socket element
using the cap supplied in the accessories kit.
If the Sunny Boy is already installed, you can now connect up the fully assembled AC
connection socket to the flange plug on the Sunny Boy. To do this, remove the protective
cap from the flange plug on the Sunny Boy. Firmly tighten the threaded ring on the AC
connection socket to the flange plug to seal the connection and secure it.
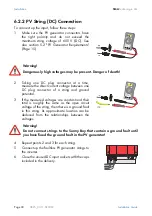
Warning!
Do not switch the line circuit breaker on yet! The Sunny Boy may only be
connected to the AC grid once the PV strings are connected and the device
is securely closed.
(7)
(8)
(9)
(10)
Summary of Contents for Sunny Boy SB 2500
Page 2: ......
Page 6: ...Explanation of the Symbols Used SMA Technologie AG Page 6 SB25_30 11 SE0307 Installation Guide...
Page 10: ...Safety Instructions SMA Technologie AG Page 10 SB25_30 11 SE0307 Installation Guide...
Page 20: ...Installation Requirements SMA Technologie AG Page 20 SB25_30 11 SE0307 Installation Guide...
Page 62: ...The Communication Interface SMA Technologie AG Page 62 SB25_30 11 SE0307 Installation Guide...
Page 65: ......

