Assembly
SMA America, LLC
34
SI5048U-TUS121440
Technical Description
4.2.1 Mounting the Sunny Island on a Stone Wall
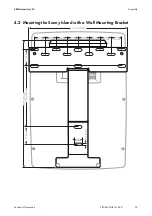
1. Place the wall mounting bracket against a suitable wall for mounting and align using a level.
Mark the position of the drill holes using the wall mounting bracket. When doing this, use at
least 1 hole on the left side and 1 hole on the right side of the wall mounting bracket.
2. Check the mounting location for the presence of current-carrying cables. If there are current-
carrying cables at the mounting location, select a different mounting location.
3. Drill holes on the markings for them.
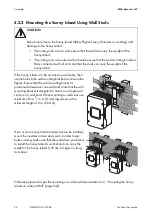
4. Secure the wall mounting bracket to the wall using
appropriate screws and washers. Tighten the
screws in a clockwise direction.
CAUTION
Risk of injury due to the Sunny Island falling. Physical injury (fractures or crushing) and
damage to the Sunny Island.
• If mounting onto a stone wall, ensure that the wall can carry the weight of the
Sunny Island.
• If mounting onto a wooden wall with studs, ensure that the wall mounting bracket is
firmly connected with all studs and that the studs can carry the weight of the
Sunny Island.
CAUTION
Risk of injury due to the Sunny Island falling during transport or mounting. Physical injury
(fractures or crushing) and damage to the Sunny Island.
• Consider the Sunny Island's weight of 139 lb. (63 kg).
• Use the recessed grips or steel bars for transporting and mounting.


