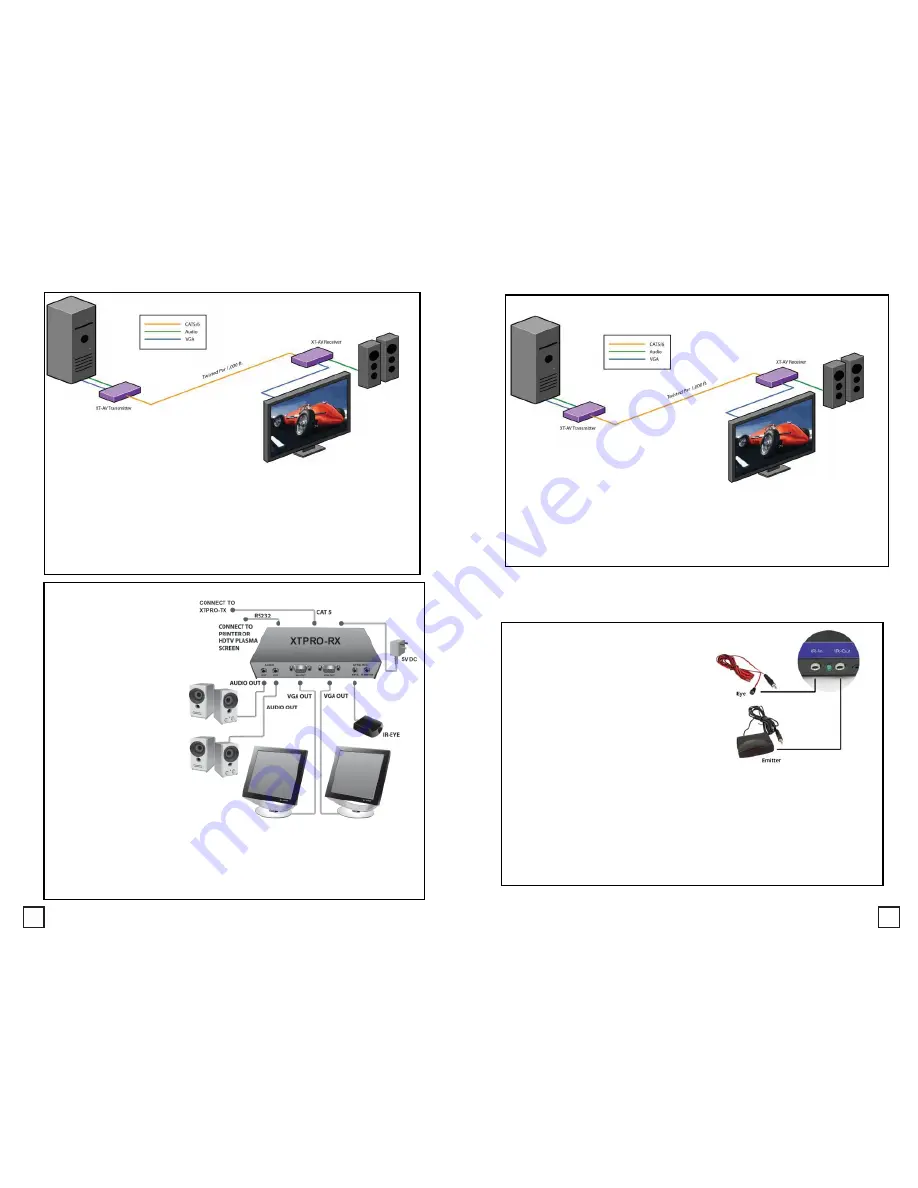
Connecting The Receiver
1. Connect CAT5 cable (coming from the transmitter) to the back of the
receiver.
2. Connect display monitors to the VGA out connector on the front of the
receiver.
3. Connect external speakers to the transmitter’s audio out (Standard
3.5 stero miniplug).
XTAV Receiver Installation Diagram
XTPRO Receiver Installation Diagram
Connecting The Receiver
1. Connect the CAT5 cable (coming from the transmitter) to the back of the
receiver.
2. Connect 1-2 display monitors to the VGA out connectors on the front of
the receiver.
3. Connect 1-2 sets of external speakers to the audio output connections
on the front of the unit. (Standard 3.5mm stero Miniplug)
*NOTE: You can not
use RS232 and IR at
the same time.
4
3
Connecting the Receiver
This functions is allowed by
Smartavi remote control only.
Connecting The Transmitter
1.
Connect the output of the computer videocard to the
video input of
the transmitter using the included male-to-male video cable.
2.
Connect the out-put of the computer audio card to the
audio input of
the transmitter using 3.5 mm audio male-to-male audio cable.
3. Connect external speakers to the transmitter’s audio out (Standard
3.5stero miniplug).
4. At the back of the unit connect the CAT5 cable that will connect the
receiver (XTAV-RX)
XTAV Transmitter Installation Diagram
Optional IR
Offer remote users full control over DVD
players, gaming consoles and/or cable boxes
by selecting channels from the matrix IR
function is completely transparent and
supports any infrared frequency between 20
and 100 Khz. Offers remote users full control
over the DVD, VCR or cable box by selecting a
channel from the matrix. The IR function is
completely transparent and supports any
infrared frequency between 20 and 100 Khz


