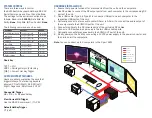
HARDWARE INSTALLATION
1. Ensure that power is turned off or disconnected from the unit and the computers.
2. Use DP cables to connect the DP output ports from each computer to the corresponding DP
ports of the unit.
3. Use a USB cable (Type-A to Type-B) to connect a USB port on each computer to the
respective USB ports of the unit.
4. Optionally connect a stereo audio cable (3.5mm to 3.5mm) to connect the audio output of
the computers to the AUDIO IN ports of the unit.
5. Connect monitors to the DP console ports of the unit using DP cables.
6. Connect a USB keyboard and mouse in the two USB console ports.
7. Optionally connect stereo speakers to the AUDIO OUT port of the unit.
8. Finally, power on the KVM by connecting a 12VDC power supply to the power connector, and
then turn on all the computers.
Note
: You can connect up to 2 computers to the 2 port KVM.
DP IN
DP OUT
USB IN
USB K/M OUT
USB 2.0 OUT
AUDIO IN
AUDIO OUT
There are three ways to control
the KVM Switch: Keyboard HotKeys, RS-232
Serial Commands, and Front Panel Buttons.
The settings for the serial connection are as
follows: Baud rate:
115200
; Data Bits:
8
;
Parity:
None
; Stop Bits:
1
; Flow Control:
None
.
The following commands can be used:
SYSTEM CONTROL
Users are able to customize the keys that
trigger Hotkeys. The following keys are
allowed: CT (Left/Right), Alt, Shift (Left/
Right), Caps Lock, Scroll Lock, F1-F12
Change HK Trigger
HK + HK + X + desired hotkey
View Current HK Trigger
Use the RS-232 command: //??<CR>
Default HotKey Trigger
CT (Left)
Chart Key
[CT]
= Ctrl
<CR>
= Carriage Return (Enter Key)
[HK]
= Current Hot Key Trigger
Command
Hotkey
RS-232
All USB/Video/Audio
[CT][CT][#]<CR>
//
m
[#]<CR>
Audio Only
[CT][CT]
a
[#]<CR>
//
a
[#]<CR>
KVM Only
[CT][CT]
c
[#]<CR>
//
c
[#]<CR>
USB Only
[CT][CT]
u
[#]<CR>
//
u
[#]<CR>
Learn EDID
[CT][CT]
e
<CR>
//
e
<CR>
Trigger Hotplug
[CT][CT]
h
<CR>
//
h
<CR>
Reset Software
[CT][CT]
r
<CR>
//
r
<CR>
Factory Defaults
[CT][CT]
f
<CR>
//
f
<CR>
Get Port Status
N/A
//
??
<CR>
CUSTOM HOTKEY TRIGGERS


