background image

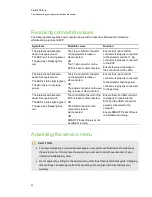
Resolving connection issues

The following table explains how to resolve issues with connections between the interactive

whiteboard, projector and ECP.

Symptoms

Possible cause

Solution

The interactive whiteboard
doesn’t recognize touch.

The ECP isn’t receiving power.

The pen tray’s Ready light is
red.

The 7-pin mini-DIN connector
on the projector is loose or
disconnected.

OR

The 11-pin connector on the
ECP is loose or disconnected.

Ensure the 7-pin mini-DIN
connector is properly connected
to the projector and the 11-pin
connector is properly connected
to the ECP.

Ensure there is no damage to
the connectors or the cable.

The interactive whiteboard
doesn’t recognize touch.

The ECP’s status light is green.

The pen tray isn’t receiving
power.

The 4-pin mini-DIN connector
on the projector is loose or
disconnected.

OR

The power connector on the pen
tray is loose or disconnected.

Ensure the 4-pin mini-DIN

connector is properly connected

to the projector and the power

connector is properly connected

to the pen tray.

The interactive whiteboard
doesn’t recognize touch.

The ECP’s status light is green.

The pen tray’s Ready light is
red.

The mini USB connector on the
ECP is loose or disconnected.

OR

The USB connector on the
computer is lose or
disconnected.

OR

SMART Product Drivers is not
installed or running.

Ensure the mini-USB connector
is properly connected to the
ECP and the USB connector is
properly connected to the
computer.

Ensure SMART Product Drivers
is installed and running.

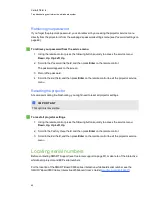
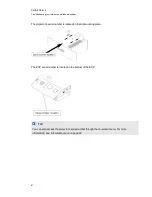
Accessing the service menu

C

  C A U T I O N

l

To prevent tampering or unintentional changes, only system administrators should access

the service menu. Do not share the service menu access code with casual users of your

interactive whiteboard system.

l

Do not adjust any settings in the service menu other than those listed in this guide. Changing

other settings can damage or affect the operation of your projector and invalidates your

warranty.

C H A P T E R 6

Troubleshooting your interactive whiteboard system

59

Summary of Contents for Board X800i4

Page 1: ...SMART Board X800i4 Interactive Whiteboard System Configuration and User s Guide PLEASE THINK BEFORE YOU PRINT...

Page 2: ...81 US6421042 US6540366 US6563491 US6674424 US6747636 US6760009 US6803906 US6829372 US6919880 US6954197 US7184030 US7236162 US7289113 US7342574 US7379622 US7411575 US7532206 US7619617 US7626577 US76430...

Page 3: ...and optional equipment The SMART UF65 or SMART UF65w projector included with your system is designed to work only with certain SMART Board interactive whiteboard models Contact your authorized SMART r...

Page 4: ...n the interactive whiteboard or projector boom could result in personal injury or product damage l There are no user serviceable parts inside the pen tray Only qualified personnel should disassemble t...

Page 5: ...e the air is thin and cooling efficiency is reduced use the projector with the fan mode set to High l Cycling power to the projector repeatedly can lock or damage your SMART product After you turn off...

Page 6: ...electrical socket is near your SMART product and remains easily accessible during use l Using your SMART product near a TV or radio could cause interference to the images or sound If this happens move...

Page 7: ...he lens If it is necessary to clean the lens o Use liquids or commercial solvents such as glass cleaners to clean the lens but do not spray them directly on the system o Use protective gloves and dip...

Page 8: ...Not for industrial use where heavy dust and pollutants can cause malfunctions or impaired operation Periodic cleaning is required in areas with heavier dust See Cleaning the projector on page 34 for i...

Page 9: ...or 13 Using your interactive whiteboard 24 Using the Extended Control Panel ECP 25 Using the RCA connector pod 26 Integrating other devices 27 Video format compatibility 27 Connecting peripheral sourc...

Page 10: ...agement Protocol SNMP 83 Hardware environmental compliance 85 Waste Electrical and Electronic Equipment regulations WEEE directive 85 Restriction of Certain Hazardous Substances RoHS directive 85 Batt...

Page 11: ...od 4 Included accessories 4 Remote control 4 Pens 5 Eraser 5 Optional accessories 5 Your SMART Board X800i4 interactive whiteboard system combines the wall mounted short throw SMART UF65 or SMART UF65...

Page 12: ...also draw on the interactive surface at the same time and you can use an array of gestures within applications The projector also supports video and audio connections from a variety of devices includ...

Page 13: ...nt environments The features of the projector system include l Wall mounted high offset projector engine that uses DLP technology by Texas Instruments providing Brilliant Color performance and Gamma 2...

Page 14: ...attaches to the interactive whiteboard pen tray The ECP features controls for power source selection and volume adjustment as well as a USB A receptacle for USB drives RCA connector pod The RCA conne...

Page 15: ...select or erase without replacing the pen Eraser The eraser resembles a rectangular chalkboard eraser You can use a substitute object as long as it has a similar shape reflects infrared light and does...

Page 16: ......

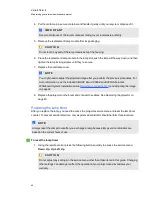
Page 17: ...oard system installation document for instructions on how to install your product and use the mounting template and extended control panel ECP I I MP OR TA N T Use the instructions included with the E...

Page 18: ...iteboard on drywall use all the toggle bolts supplied If one of the bracket holes aligns with a wall stud use appropriate hardware in that hole instead of a toggle bolt l When mounting the projector b...

Page 19: ...e while maintaining enough space for airflow and installation access above the unit l Position the projector at the correct height above your interactive whiteboard to align the projected image with t...

Page 20: ...from a SMART UF65w projector to the interactive whiteboard make sure that all cables pass between the two interactive whiteboard wall mounting brackets Space your wall mounting brackets innermost scr...

Page 21: ...eractive whiteboard system This section explains how to secure the different components of your interactive whiteboard system Locking the pen tray to your interactive whiteboard To learn how to lock t...

Page 22: ......

Page 23: ...ur interactive whiteboard system and also explains how to set up your remote control retrieve system information access the projector s image adjustment options and integrate your interactive whiteboa...

Page 24: ...cordance with applicable regulations g To access or replace the remote control battery 1 Hold down the side release on the left side of the battery holder and pull the battery holder completely out of...

Page 25: ...Hide Freeze hide or display the image l Press once to freeze the image For example you can display a question on the screen while you check your e mail l Press again to hide the image that is to disp...

Page 26: ...ing applies to VGA inputs only H position Moves the projected image s horizontal position left or right from 0 to 100 Don t adjust this setting unless you re advised to by a certified SMART Support sp...

Page 27: ...ume is restored automatically You can prevent this from happening by disabling the volume control Disable Volume Control Disables the projector s volume control and the ECP s volume control knob Close...

Page 28: ...Select 0 to turn off the timer Zoom Adjusts the zoom to the center of the image in or out from 0 to 30 This setting affects image adjustments done mechanically to the boom Projector ID Displays the p...

Page 29: ...nu changes you made This action is irreversible Don t adjust this setting unless you want to reset all of the applied settings or unless you re advised to by a certified SMART Support specialist smart...

Page 30: ...Language menu Language Selects language preference Projector menu support is available in English default Brazilian Portuguese Czech Danish Dutch Finnish French German Greek Iberian Portuguese Italian...

Page 31: ...he projector s model number Serial Number Displays the projector s serial number Focusing the image To focus the projected image use the focus ring located on the bottom of the projector N N OTE Ensur...

Page 32: ...the bottom of the projected image l When moving the projector left or right ensure that the top and bottom edges of the image are horizontal before you position the left and right edges of the image r...

Page 33: ...stereo audio input 2 Stereo Y cable 8 DB15F RGB video output VGA Out Secondary display not included 9 3 5 mm stereo audio output Speakers not included 10 RCA composite video input and left and right R...

Page 34: ...formation on using your interactive whiteboard When you connect your SMART Board interactive whiteboard system to a computer with SMART software you can access the full capabilities of your interactiv...

Page 35: ...emote control l Do not disconnect cables from the ECP to connect peripherals because you could disconnect controls for your interactive whiteboard or host computer N N OTE Low Power mode reduces your...

Page 36: ...ed SMART reseller smarttech com wheretobuy Using the RCA connector pod The RCA connector pod enables you to connect DVD Blu ray players and other devices to your interactive whiteboard system using th...

Page 37: ...nformation on integrating your SMART Board X800i4 interactive whiteboard system with peripheral devices Video format compatibility SMART UF65 or SMART UF65w projectors have a native video format and v...

Page 38: ...2 188 Full screen 800 600 SVGA 75 4 3 75 Full screen 800 600 SVGA 85 4 3 85 061 Full screen 832 624 MAC 16 4 3 74 55 Full screen 1024 768 XGA 60 4 3 60 004 Full screen 1024 768 XGA 70 4 3 70 069 Full...

Page 39: ...9 Pillarbox 1024 768 XGA 75 4 3 75 029 Pillarbox 1024 768 XGA 85 4 3 84 997 Pillarbox 1024 768 MAC 19 4 3 74 7 Pillarbox 1152 864 SXGA 75 4 3 75 Pillarbox 1280 768 WXGA 60 1 67 1 60 Letterbox 1280 960...

Page 40: ...720p 750p 16 9 45 59 94 Letterbox 720p 750p 16 9 37 5 50 Letterbox 1080i 1125i 16 9 33 75 59 94 Letterbox 1080i 1125i 16 9 28 13 50 Letterbox 1080p 1125p 16 9 67 5 59 94 Letterbox 1080p 1125p 16 9 56...

Page 41: ...iteboard system temporarily N N OTE S l Measure the distance between the projector and the peripheral device you want to connect Make sure each cable is long enough has plenty of slack and can be plac...

Page 42: ...way down to prevent buzzing or sparking 2 Connect your peripheral device s input cables to the receptacles on the RCA connector pod 3 Press the Input button on the ECP or remote control to switch inpu...

Page 43: ...or 40 Focusing and adjusting the projector image 43 Replacing the projector lamp 43 Removing and replacing the projector lamp module 43 Resetting the lamp timer 45 This chapter includes methods for pr...

Page 44: ...the projector l Wipe the exterior of the projector with a lint free cloth l If necessary use a soft cloth moistened with a mild detergent to clean the projector housing l Do not use abrasive cleaners...

Page 45: ...he projector from the boom Before you can access the projector lamp module you must remove the projector from the boom W W A R N I N G Two people are required to remove the projector from the boom g T...

Page 46: ...rojector padlock remove it from the locking loop If you need to access the projector locking screw loosen the wing nut and slide the projector away from your interactive whiteboard screen and then tig...

Page 47: ...th the warning lights facing upward Accessing the lamp module To access the lamp module remove the lamp cover and then remove the lamp from the projector g To remove the lamp cover and lamp module 1 P...

Page 48: ...s handle and then remove the lamp C C A U TI ON Do not touch the lamp with your fingers when removing cleaning and replacing the lamp module The oils from your skin can damage the lamp when it turns o...

Page 49: ...nd projector vents g To vacuum the lamp module and projector vents 1 Use a vacuum cleaner to thoroughly vacuum each side of the lamp module for 10 seconds 2 Thoroughly vacuum the three top vents the l...

Page 50: ...l they re secure 2 Replace the outer lamp cover Replacing the projector After you replace the lamp module and lamp cover replace the projector on the boom W W A R N I N G Two people are required to re...

Page 51: ...W W A R N I N G Be sure to replace this screw Without it the projector can fall from the boom and cause personal injury damage to the projector or both 3 Optionally replace your projector padlock 4 Re...

Page 52: ...dule is correctly installed and then wait for the projector to turn on completely The ECP s Power light turns solid green when the system starts 9 Wait five minutes for the projector to warm up N N OT...

Page 53: ...Read the warnings and other important information at the beginning of this document before attempting this procedure l Disconnect the power cable from the wall outlet before performing the following p...

Page 54: ...cover and set it aside 2 Using the screwdriver loosen the two screws on the inner lamp module The screws remain captive inside the lamp module 3 Pull up on the lamp module s handle and then remove th...

Page 55: ...smarttech com kb 149615 and Adjusting the image on page 22 8 Replace the projector on the boom and connect the cables See Replacing the projector on page 40 Resetting the lamp timer After you replace...

Page 56: ...setting the lamp hour counter on an old lamp can damage your projector due to lamp failure N N OTE You re unable to reset the Display Hour value because it s the running total of hours the projector h...

Page 57: ...ailure message appears 52 The projector Power light isn t lit 52 Resolving network communication issues 53 Resolving audio issues 54 Resolving video issues 54 Resolving image issues 55 Loss of signal...

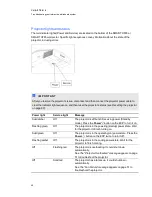
Page 58: ...Whiteboard System Installation Guide smarttech com kb 149615 to eliminate most image alignment issues Diagnosing issues using the interactive whiteboard system indicators and controls This section do...

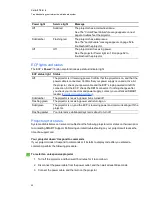
Page 59: ...ss the Power button on the ECP to turn it on Flashing green Off The projector is in the powering startup power state Wait for the projector to finish turning on Solid green Off The projector is in the...

Page 60: ...ur authorized SMART reseller smarttech com wheretobuy Solid amber The projector is receiving power but is turned off Flashing green The projector is receiving power and is turning on Solid green The p...

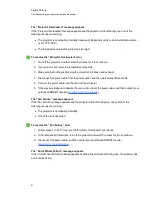
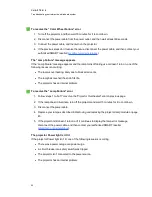
Page 61: ...ctor 6 If the previous steps don t resolve the issue disconnect the power cable and then contact your authorized SMART reseller smarttech com wheretobuy The Fan Failure message appears If the Fan Fail...

Page 62: ...g To resolve the Lamp Failure error 1 Follow steps 1 to 5 of To resolve the Projector Overheated error on previous page 2 If the lamp doesn t illuminate turn off the projector and wait 15 minutes for...

Page 63: ...s RJ45 cable is properly connected to the modular cable connection on the projector s connection panel 2 Ensure that the LAN warning light on the projector is green To activate the LAN use the vgaoutn...

Page 64: ...eo device isn t malfunctioning that its audio output is on and that its volume isn t set to the lowest position 6 If the previous steps don t resolve the issue contact your authorized SMART reseller s...

Page 65: ...k your cable connections to the projector and the ECP 2 Make sure that the image signal is compatible with the projector see Video format compatibility on page 27 3 If your projector still doesn t sho...

Page 66: ...ed image 1 Select Start Control Panel 2 Double click Display The Display Properties window appears 3 Click Settings 4 Verify that your display resolution setting is lower than or equal to 1024 768 SMA...

Page 67: ...their defaults Your image has a vertical flickering bar If the projector displays a vertical flickering bar you could have different frequency settings on your input source I I MP OR TA N T Write dow...

Page 68: ...installation wall is plumb and square and doesn t move or vibrate excessively l Make sure that there are no obstructions behind the projector s wall mount bracket and that the bracket is firmly secur...

Page 69: ...DIN connector is properly connected to the projector and the power connector is properly connected to the pen tray The interactive whiteboard doesn t recognize touch The ECP s status light is green T...

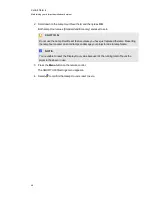
Page 70: ...me point during troubleshooting you might need to reset all projector settings I I MP OR TA N T This option is irreversible g To reset all projector settings 1 Using the remote control press the follo...

Page 71: ...The ECP serial number is located on the bottom of the ECP T TI P You can also access the projector s serial number through the on screen menu For more information see Information menu on page 20 C H...

Page 72: ...packaging was designed to provide optimal shock and vibration protection If you no longer have your original packaging purchase the same packaging directly from your authorized SMART reseller smartte...

Page 73: ...mand methods 73 Absolute values and adjustment values 73 Video source specification values 73 Powerstate controls 74 Source selection controls 74 General source controls 75 Additional VGA source contr...

Page 74: ...view the IP address by accessing the projector s Network Settings menu page see Network settings on page 68 g To use the management web page 1 Start your Internet browser 2 Type the IP address in the...

Page 75: ...nal languages such as French or Spanish depending on television channel or media setup Display Mode Adjusts the display output to SMART Presentation Bright Room Dark Room sRGB and User modes so you ca...

Page 76: ...er finishes when the projector enters Standby mode Select 0 to turn off the timer Zoom Adjusts the zoom to the center of the image in or out from 0 to 30 H position RGB input Moves the projected image...

Page 77: ...lect the S video input Composite Assigns an alternative name to your composite video input which appears when you select the composite video input Emergency Alert Turns the on screen alert broadcast m...

Page 78: ...imum 12 characters Projector Name Displays the projector s name maximum 12 characters Location Displays the projector s location maximum 16 characters Contact Displays the contact name or number for p...

Page 79: ...then press Submit N N OTE The projector sends an alert e mail SMART Alert to your e mail address Press E mail Alert Test to confirm your e mail address by sending a test e mail SMART Alert Test Mail...

Page 80: ...terface settings The serial interface of the SMART UF65 or SMART UF65w projector acts as a Data Communications Equipment DCE device and its settings can t be configured You must configure your compute...

Page 81: ...onnect your computer to the serial connection cable you previously attached to the ECP 3 Configure your serial interface settings using the values from the table in the previous section and then press...

Page 82: ...see a list of valid commands in the projector s current power state type and press ENTER N N OTE S l Send a command after the projector sends a command prompt l Commands aren t case sensitive Type com...

Page 83: ...65 brightness 65 set brightness 5 brightness 70 set brightness 15 brightness 55 Video source specification values You can use the source input field described in Source selection controls on next page...

Page 84: ...10 seconds to completely turn off the projector off now Shuts down the projector immediately You can t delay or cancel this command get powerstate Indicates the projector s current powerstate The foll...

Page 85: ...de General source controls The following source controls apply to all input sources These controls are unavailable when the projector is off You can specify custom color values for all inputs These co...

Page 86: ...an value set magenta value 0 to 100 magenta value set yellow value 0 to 100 yellow value set videofreeze target on off videofreeze target Additional VGA source controls Your VGA source supports all th...

Page 87: ...omposite video source is disconnected N N OTE Some of these commands are invalid with VGA video sources These commands inform you of the current composite video source settings Command Response get sa...

Page 88: ...OTE Typically cc1 displays American English subtitles while cc2 displays other regional languages such as French or Spanish depending on television channel or media setup Network controls These comman...

Page 89: ...projectorid current projector ID number get hposition hposition current horizontal position setting get vposition vposition current vertical position setting get aspectratio aspectratio current projec...

Page 90: ...syshrs syshrs current projector hours of operation get fwverddp fwverddp current projector firmware version get fwvernet fwvernet current network firmware version get fwvermpu fwvermpu current proces...

Page 91: ...ness target on off highbrightness target set autopoweroff value 0 to 240 autopoweroff value set zoom value 0 to 30 zoom value set projectorid value 0 to 99 projectorid value set hposition value 0 to 1...

Page 92: ...description set locationinfo description Enter a descriptor no more than 16 characters long locationinfo description set contactinfo description Enter a descriptor no more than 16 characters long con...

Page 93: ...GA Out and Network settings features are off by default Select On to activate these features Simple Network Management Protocol SNMP SMART UF65 or SMART UF65w projectors support a list of SNMP command...

Page 94: ......

Page 95: ...ire further information please contact your reseller or SMART Technologies for information on which recycling agency to contact Restriction of Certain Hazardous Substances RoHS directive This product...

Page 96: ...ducts complies with applicable packaging laws China s Electronic Information Products regulations China regulates products that are classified as EIP Electronic Information Products SMART Technologies...

Page 97: ...tacting SMART Support Your local reseller can resolve most issues without delay N N OTE To locate your local reseller visit www smarttech com wheretobuy All SMART products include online telephone fax...

Page 98: ...91 U S Canada Fax 1 403 228 2500 E mail info smarttech com Warranty Product warranty is governed by the terms and conditions of SMART s Limited Equipment Warranty that shipped with the SMART product a...

Page 99: ...composite video connections 30 67 75 77 connection diagrams ECP 25 projector 22 consumer product safety 86 contact information 88 contact person 68 D DHCP 68 78 display modes 65 DNS 68 78 documentatio...

Page 100: ...e indicator lights letterboxing 28 29 light sources 8 Limited Equipment Warranty 88 lithium ion batteries 85 location 8 68 Low Power mode 25 M MAC address 78 MAC support 28 mounting template 9 mute co...

Page 101: ...board SMART Notebook software 11 SMART Product Drivers 11 SMART Support 87 SMART UF65 or UF65w projector See projector SMTP 69 SNMP 83 sound See audio startup screen 66 subnet mask 68 78 SVGA support...

Page 102: ...X XGA support 28 Z zoom 66 I N D E X 92...

Page 103: ......

Page 104: ...Toll Free 1 866 518 6791 U S Canada or 1 403 228 5940 www smarttech com...

Reviews: