38
Maintaining Your 600i2 Interactive Whiteboard System
99-00850-21 B0
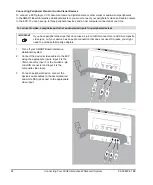
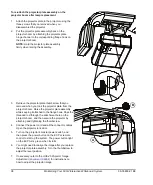
To re-attach the projector plate assembly on the
projector boom after lamp replacement
1.
Attach the projector plate to the projector using the
three screws that you removed when you
disassembled the projector.
2.
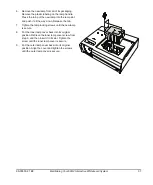
Put the projector plate assembly back on the
projector boom by attaching the projector plate
hinge channel to the corresponding flange hook on
the projector boom.
NOTE:
Hold the projector plate assembly
firmly when raising the assembly.
3.
Retrieve the projector plate thumbscrew that you
removed when you took the projector plate from the
projector boom. Raise the projector plate assembly
while keeping it attached to the flange hook. Pass the
threaded rod through the attachment hole on the
projector boom, and then secure the projector by
attaching and tightening the thumbscrew.
4.
Connect the power cord and all the connector cables.
Open the projector lens door.
5.
Turn on the projector’s master power switch, and
then press the power button on the ECP or remote
control to start up the system. The power button light
on the ECP turns green when it starts.
6.
You might need to realign the image after you replace
the projector plate assembly. Turn the thumbscrew to
adjust the level position.
7.
If necessary, refer to the
Unifi 45 Projector Image
Adjustment
for instructions on
how to adjust the projector image.
B
A
Summary of Contents for SmartBoard 600i2
Page 1: ...Configuration and User s Guide SMART Board 600i2 Interactive Whiteboard System...
Page 8: ...vi Important Information 99 00850 21 B0...
Page 16: ...6 About Your 600i2 Interactive Whiteboard System 99 00850 21 B0...
Page 30: ...20 Before Installing Your 600i2 Interactive Whiteboard System 99 00850 21 B0...
Page 50: ...40 Maintaining Your 600i2 Interactive Whiteboard System 99 00850 21 B0...
Page 64: ...54 Remote Management of Your 600i2 Interactive Whiteboard System 99 00850 21 B0...
Page 72: ...62 Index 99 00850 21 B0...
Page 73: ......

