Assemb
ly I
nst
ruc
tio
ns
ASSEMBLY INSTRUCTIONS
Please read these instructions carefully before assembling.
1.
Assemble this product in an open space with room to move. There are five modules
—
1 x Left Arm, 1 x
Right Arm, 1 x 2 Seat Armless and 2 x Consoles.
2.
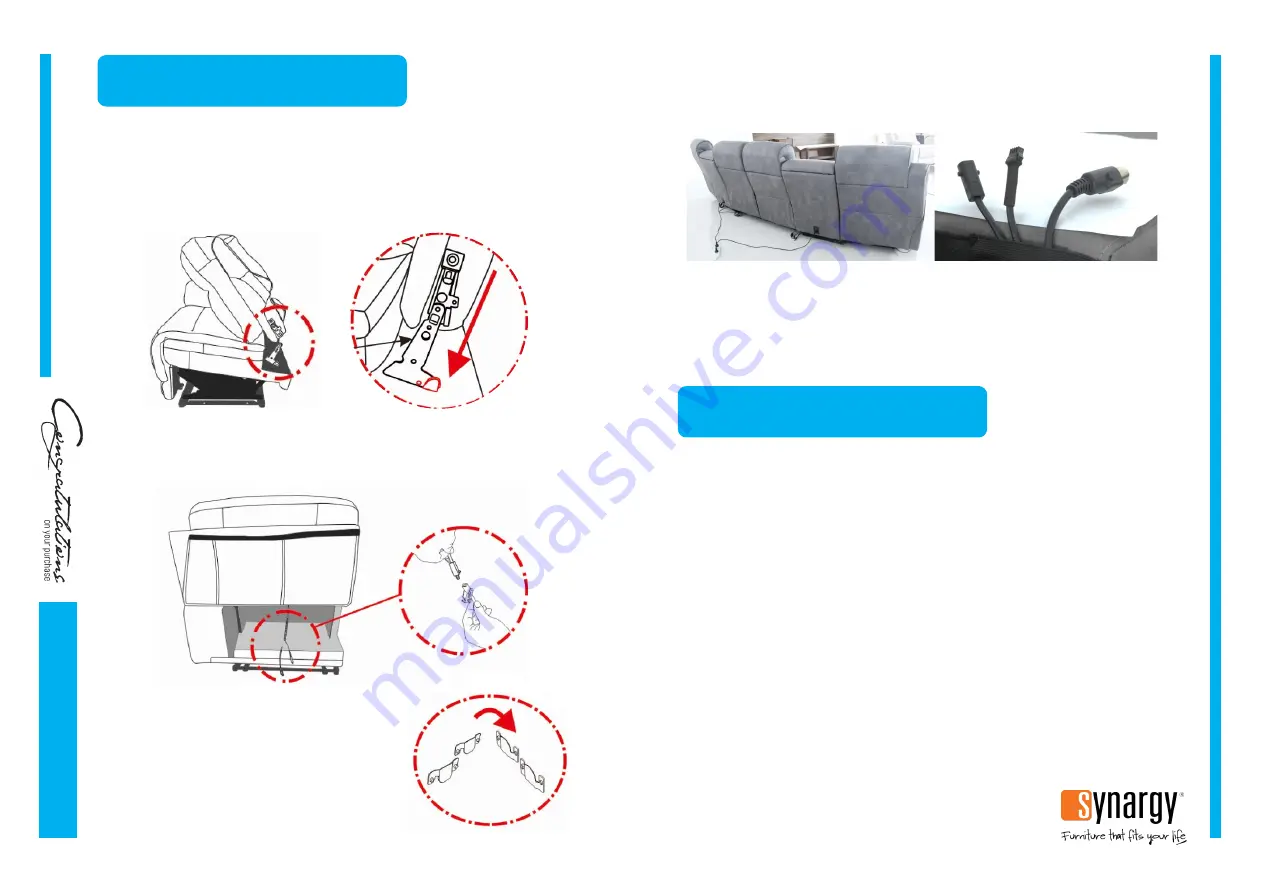
Connect the seat backs to the bases of each module by sliding the metal receivers on the seat back
into the metal posts on the base. Ensure the correct seat back has been selected and that both sides
align before pushing down firmly into place (Figure 1).
3.
On all seats, connect the two power cables for the Power Headrest (Figure 2). Velcro all backs down
onto the base.
4.
Using the brackets down the side of each module
(Figure 3), connect the Left Arm and Left side of the
2 Seat Armless to one Console. Connect the Right
Arm and Right side of the 2 Seat Armless to the
remaining Console.
Figure 3
Figure 1
Figure 2
5.
Connect the 3 power cables at the back of each module with the corresponding 3 power cables of the
adjacent module. Connections are required at the 4 points where the individual modules meet (Figure 4).
PLEASE NOTE: There are only 2 connections required at location 3.
6.
Connect the 2 power supply cables to the 2 Consoles. Plug into a power outlet and switch on. Ensure
the red switches at the rear of the consoles are switched on.
7.
Your suite assembly is complete.
TROUBLE SHOOTING
If you are having any issues please try the following solutions.
•
Push and hold the LIGHT button to change the base and cup holder light colours.
•
Unplug the suite for 5 minutes to reset all electrical components.
•
Check that all plugs are plugged into the power outlet and are secure. Please check that the power
outlet is switched on.
•
Check to ensure that all connection cords are properly connected, as per the step by step instructions.
There are multiple connections, any of which being too loose may cause performance issues.
•
Ensure no cords are pulled too tight. If the cord does not reach its destination with ease you may be
trying to plug it into the wrong location. Please refer back to the step by step instructions to double
check. If it is still is too short/tight, please contact the store you purchased the suite from.
•
Ensure there is nothing obstructing the recliner movement.
•
Try plugging the suite into a different power outlet.
•
Ensure the correct back is on the correct base
–
Eg: left back is on left base.
•
Please check all connections before contacting the store for more help.
If the suite continues to fail please contact the store from which it was
purchased from.
Figure 4
1
2
3
4
V4
Synargy is a registered responsible supplier on ERAC. Electrical components within our products have
been tested and comply with all legal requirements imposed for electrical safety and EMC.


