background image

Page 

1

Page 

2

SAVE THESE INSTRUCTIONS! 

SAVE THESE INSTRUCTIONS! 

Fig. 1

IMPORTANT SAFETY INSTRUCTIONS

Understanding Hazard Signal Words:

WARNING

 indicates a potentially hazardous situation that, if not 

avoided, could result in death or serious injury.

CAUTION

 indicates a potentially hazardous situation that, if not 

avoided, may result in damage to the product.

READ ALL INSTRUCTIONS!

WARNING

:  BE EXTREMELY CAREFUL WHEN USING THIS 

DEVICE. 

Improper use of this work light can result in injury or death. 

Follow all safeguards stated in this manual in addition to normal safety 

precautions in working with electrical devices. DO NOT attempt to 

service this device.  When using outdoor portable work lights, always 

follow basic safet

y precautions to reduce the risk of fire, electric shock 

and personal injury.

WARNING

: Failure to observe the following safety rules may 

result in FIRE, ELECTRICAL SHOCK, INJURY or EXPOSURE TO 

EXCESSIVE ULTRAVIOLET RADIATION.

1)

  Use only 3-wire UL listed outdoor extension cords that have 

3-prong grounded plugs and grounded receptacles that accept the 

work light’s plug.

2)

  Use only with a 16-gauge (AWG) extension cord of cord type SW-

A, SOW, SOW-A, STW, STW-A, STOW, STOW-A, SJW, SJW-A, SJOW, 

SJOW-A, SJTW-A or SJTOW, SJTOW-A.

3)

  To avoid electrical shock, do not use near water or in areas where 

water may accumulate. Keep work light at least 16 ft. from pools or 

spas. Keep plugs dry. Use only Ground Fault Circuit Interrupter (GFCI) 

protected receptacles when using this work light in wet or damp 

locations. Receptacles are available with built-in GFCI protection and 

are to be used for this measure of safety.

4)

  Always unplug work light and allow lamp head to cool before 

replacing bulb.

• Estimated Assembly Time: 10 minutes

• 

Tools Required for Assembly:

# 2 Phillips screwdriver (not included)

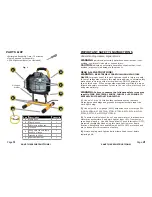
PARTS LIST

U-shaped 

bracket

D

B

A

F

E

G

C

Part Description

Quantity

A

Lamp head

1

B

Floor H-stand

1

C

Metal wire grill guard

1

D

Tilt knob 

2

E

Wing nuts connect lamp 

head to H-stand

2

F

Light bulb 300W

3

G

Spare bulb holder

1

Summary of Contents for 3705414

Page 1: ...hin three 3 years from the date of purchase return it along with the proof of date of purchase to place of purchase and it will be replaced with the same or comparable model free of charge This warranty gives you specific legal rights and you may have other rights that vary from state to state This warranty is void if damage or defect has resulted from accident abuse misuse or faulty repair IN NO E...

Page 2: ...O EXCESSIVE ULTRAVIOLET RADIATION 1 Use only 3 wire UL listed outdoor extension cords that have 3 prong grounded plugs and grounded receptacles that accept the work light s plug 2 Use only with a 16 gauge AWG extension cord of cord type SW A SOW SOW A STW STW A STOW STOW A SJW SJW A SJOW SJOW A SJTW A or SJTOW SJTOW A 3 To avoid electrical shock do not use near water or in areas where water may ac...

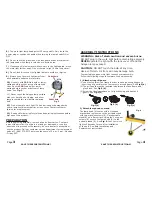
Page 3: ...remain in light if skin feels warm 8 Do not look directly at the lighted lamps to avoid eye injuries 9 Always keep the work light away from any flammable surfaces or materials 10 Use only with 300 Watt bulb or lower wattage bulb in socket at top of lamp head Use only with 300 Watt bulb or lower wattage bulb in socket at bottom of lamp head See Fig 2 11 Never touch the halogen lamp surface with your...

Page 4: ...clean cloth or tissue to handle the bulb 3 4 Insert the other ceramic end of the bulb into the other lamp holder socket Make sure that the bulb F makes secure contact at both lamp holder sockets When properly installed the bulb can be rotated about 45 1 8 of a turn on its axis with very little or no resistance Replace the hinged front frame with glass lens Then replace and tighten the center screw...

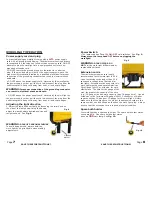
Page 5: ...d Using the handle adjust the lamp head to desired position and retighten knob See Fig 8 WARNING RISK OF PERSONAL INJURY To avoid being burned always hold the work light by its grip handle when making adjustments Power Switch The lamp head has Two 2 ON OFF style switches See Fig 9 Always turn the lamp head OFF before unplugging the worklight WARNING RISK OF FIRE DO NOT aim the work light at flammab...

Page 6: ...ere may be a poor connection between lamp holder and bulb Bulb needs replacement Try re installing the bulb Refer to Halogen Bulb Installation section of this manual Remove bulb and check for a break in the filament wire Replace bulb if necessary Refer to Halogen Bulb Installation section of this manual The work light comes on but the lights are dimmed Improper voltage or power supply The work ligh...

Reviews: