background image

11

10

MEASUREMENT

Tie the Cuff

2~3cm

BEFORE YOU START

Tip: 

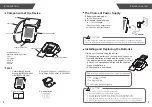
Replace the battery or connect 

AC adapter, 

the symbol       and       will be 

shown on the LCD, indicating pair-up is proceeding alternatively.

You can press “ START/STOP ” button at any time to stop pair-up.

If SUCCEED

, symbol          will be shown on the LCD.

1.

2.

3.

4.

5.

6.

7.

8.

9.

10.

11.

If FAIL, 

the monitor will turn off automatically.

Plug the connector on cuff tube into the 
device. 

Expose your upper arm by removing or 
adjusting clothing and jewelry. Make 
sure blood flow is not constricted by a 
rolled up sleeve.

Open the cuff and loosen fully.

Orient the cuff so that the tube exits 
towards the hand.

Place your arm through the cuff loop, 
with your palm facing up.

Position the cuff's edge about an inch 

(2–3 cm) above the elbow.
Align the Ф marker (located to the right 

of the tube exit) with the center of your 

arm. 

Tighten the cuff evenly around your arm 

by pulling on the end—make sure the Ф 

marker stays aligned with the center of 
your arm.

Wrap the end of the cuff over your arm 
to secure it in place. Don't make it too 
tight—allow a finger to fit between the 
cuff and your arm. 

If possible, relax and rest for at least 5 
minutes before taking a measurement.

Lay your arm on a table with your palm 
facing up. The cuff should be at the 
same height as your heart. Sit up 
straight and rest your feet flat on the 
ground. Make sure the tube is not kinked 
or pinched.

Summary of Contents for iBloodPressure SMBP802-GS-003

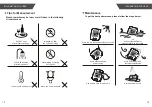
Page 1: ...04 User Manual To use the monitor correctly and safely please read the manual thoroughly Please keep this manual in order to reference in future Manufactured for Smart Meter LLC 5501 W WATERS AVE STE...

Page 2: ...a Measurement INFORMATION FOR USER 14 Tips for measurement Maintenances ABOUT BLOOD PRESSURE 16 What are systolic pressure and diastolic pressure What is the standard blood pressure classification Irr...

Page 3: ...rate with arm circumference ranging from 22cm to 45cm about 8 17 The device can be used to detect irregular heartbeat It is intended for adult indoor use only Contraindications Warranty Smart Meter L...

Page 4: ...al emergencies or operations INTRODUCTION INTRODUCTION To avoid measurement errors avoid electromagnetic field radiated interference signals or electrical fast transient burst signals Wireless communi...

Page 5: ...vironments may affect the performance of the unit Please use a soft cloth to clean the whole unit before and after use Don t use abrasive or volatile cleaners Do not wash the cuff in a washing machine...

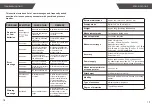
Page 6: ...lay dims The display does not light up Do not use new and used batteries together Do not use different types of batteries together Do not dispose of the batteries in fire Batteries may explode or leak...

Page 7: ...so that the tube exits towards the hand Place your arm through the cuff loop with your palm facing up Position the cuff s edge about an inch 2 3 cm above the elbow Align the marker located to the rig...

Page 8: ...on the LCD indicates data is transmitting Taking a Measurement Transmitting results Tip You can press START STOP button at any time to stop measuring during the process 3 If the data is successfully t...

Page 9: ...y place and avoid the sunshine Avoid intense shaking and dropping Use a damp cloth to remove dirt Avoid contact with water clean exterior with a dry cloth Avoid dusty places and unstable temperatures...

Page 10: ...t the day due to weather emotion exercise etc Also there is the white coat effect which means blood pressure usually increases in clinical settings It is okay to measure on either arm however there ma...

Page 11: ...fasten the cuff and then measure again The measurement process does not detect the pulse signal Loosen the clothing on the arm and then measure again Not able to calculate measurement failed Relax for...

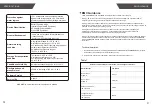
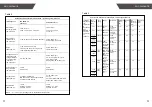
Page 12: ...RMANCE with regard to electromagnetic disturbances for the excepted service life 2 Guidance and manufacturer s declaration electromagnetic emissions and immunity Table 1 Guidance and manufacturer s de...

Page 13: ...ds between 0 15 MHz and 80 MHz 6V For AC power port 3 Vrms 6 Vrms in ISM and amateur radio bands 80 AM at 1 KHz 10 V m 80 MHz 2 7 GHz 80 AM at 1 kHz 10 V m 80 MHz 2 7 GHz 80 AM at 1 kHz Radiated RF IE...

Page 14: ...interference to radio or television reception which can be determined by turning the equipment off and on the user is encouraged to try to correct the interference by one or more of the following mea...

Reviews: