background image

-13-

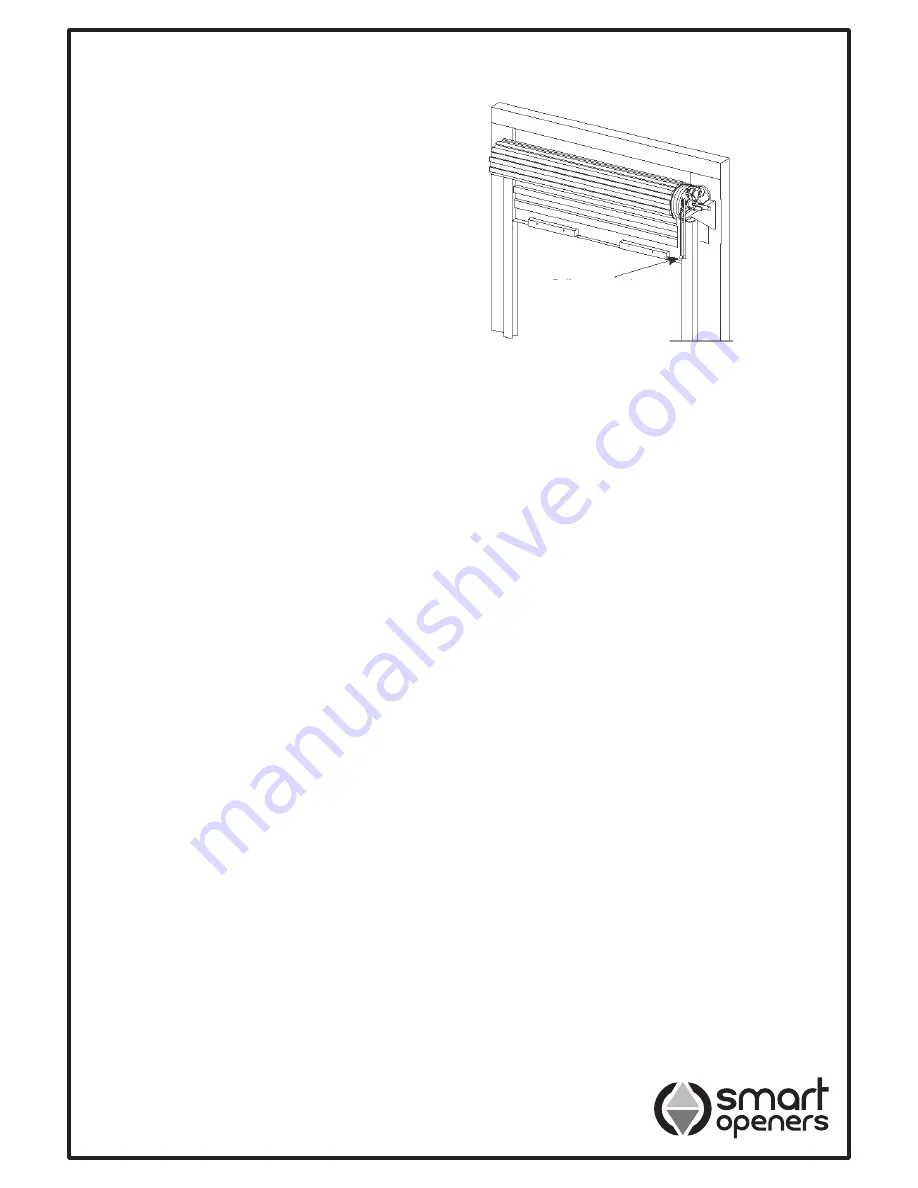
To switch the door to manual operation pull on the red 

cord to disengage the motor. To re-engage the motor pull 

on the green cord. (See Fig. 16).
For situations where a pedestrian door is not present it is 

recommended that an external disengagement device is 

fitted.

Manual Disengagement

Fig. 16

Important Information for  

the User

Once the Smart Roller Duo opener has been installed, 

the user must be informed about how it works and all the 

risks that can arise if it is used improperly. The user must 

avoid placing himself/herself in dangerous situations such 

as standing within the door’s operating range when it is 

moving. 

Do not

 let children play near the door and keep the 

remote controls out of their reach.
All servicing, repairs or checks must be carried out 

by professionally qualified personnel and noted on a 

maintenance register kept by the user.
Information for the user is found in the USERS/OWNERS 

MANUAL included with this opener.

IMPORTANT: 

Please make sure the USERS/OWNERS 

MANUAL is passed on to the owner prior to leaving the 

installation.

IMPORTANT: 

In the case of a malfunction the user must 

call an authorized Smart Opener Pty Ltd installer and 

should not attempt to repair the opener. 

Final Notes

This manual is only for use by technical personnel 

qualified to carry out the installation.
No information given in this manual can be considered of 

any interest to the end user.
No setting or adjustments contained in this manual can 

be carried out by the end user.
It is important for the installer to show their clients correct 

operational use of the Smart Roller Duo including the use 

of the manual disengagement cord.
Inform the owner about the need for regular and accurate 

maintenance, especially regarding a regular check of the 

safety and reversing devices.

Pull red cord to release. 

Pull green cord to 

engage.

Summary of Contents for SMART ROLLER DUO

Page 1: ... INSTALLING AND USING THIS OPENER TO FOLLOW THE INSTALLATION INSTRUCTIONS AND SAFETY WARNINGS FAILURE TO COMPLY MAY RESULT IN SERIOUS PERSONAL INJURY AND OR PROPERTY DAMAGE AND FAILURE OF THE OPENER SYSTEM INSTALLATION MANUAL SMART ROLLER DU ROLL UP DOOR OPENER duo ...

Page 2: ... be lawfully excluded Smart Openers Pty Ltd hereby expressly excludes all conditions and warranties statutory or otherwise which may be implied by law as conditions or warranties of purchase of a Smart Openers Pty Ltd Garage Door Opener Smart Openers Pty Ltd hereby further disclaims and rejects to the maximum extent permitted by law any liability or responsibility whatsoever for any direct indirec...

Page 3: ... expense or claim whatsoever suffered by any person as a result whether directly or indirectly from failure to install the system correctly and in accordance with the relevant safety standards and installation manual For a more detailed list of the Safety Warnings and Safety Issues associated with the installation and use of a Smart Roller Duo roll up door opener refer to the safety warnings in th...

Page 4: ... 4 Operating Controls MIN Lrn Run Prog MAX 24V GND PE PE DIP GND PB 6 7 8 1 2 3 4 10 9 5 11 12 6 13 15 16 17 18 19 20 7 8 1 2 3 4 WHT BWN GRN RED YLW ...

Page 5: ... auto close function 1 min set close time 8 Right Hand Left Hand Dipswitch used during installation Dipswitch is factory preset for RH for LH installation set dipswitch up 9 24 Volt AC Input 5 10 24 Volt Battery Input 11 Learn Button used to store transmitter into memory 12 Learn LED indicates learn operate mode of transmitter 13 Fuse main fuse 240V 3A 14 LED Light 15 Operate Button Open Stop Clos...

Page 6: ...h the control unit parts may be subject to damage if abused 10 Make sure you have all the necessary materials and that they are suitable for this kind of use 11 Read all the instructions thoroughly and make sure they are understood before attempting to install the Smart Roller Duo 12 Before starting the installation carefully analyse all the risks relating to automating the door Verify that the do...

Page 7: ...ight Hand Installation The Smart Roller Duo is shipped from the factory ready for installation on the RIGHT SIDE of the door when viewed from inside the garage If you are installing this opener on the RIGHT SIDE then proceed to the next step If installing on the LEFT SIDE then the dip switch No 1 must be shifted up as per Fig 4 Fixing The Door Curtain To Drum Wheel The door curtain has to be secur...

Page 8: ...he right hand door bracket from the wall 6 Hold the drive unit assembly and try to rotate the drive gear by pushing the fork If it does not turn switch the opener into manual mode by pulling the red cord downwards 7 Slide the drive unit over the door shaft and make sure that the fork engages one of the spokes of the door drum wheel 8 Refit the door bracket to the wall In some cases it may need to b...

Page 9: ...gage the drive unit by pulling the red cord see Fig 14 Open Limit Adjustment 1 Press the Operate Button on the Control Box The door should start moving 2 If the door stops at the desired open limit position then the limit adjustment is complete 3 If the door has not reached or has gone past the desired position adjust the UP LIMIT CAM clockwise to open the door more or to open the door less adjust...

Page 10: ... unit by pulling the red cord see Fig 14 Open Limit Adjustment 1 Press the Operate Button on the Control Box The door should start moving 2 If the door stops at the desired open position then the limit adjustment is complete 3 If the door has not reached the desired position adjust the UP LIMIT CAM anticlockwise to open the door more or to open the door less adjust the cam clockwise Close Limit Ad...

Page 11: ... the door is closing turn the DOWN FORCE shaft slowly anticlockwise until the door stops momentarily then reverses to the open position 4 Turn the DOWN FORCE shaft 10 degrees clockwise 5 Press the Operate Button again to close the door If the door reverses by itself re adjust the DOWN FORCE shaft a further 5 degrees clockwise Keep adjusting in this manner until the door can complete the full close...

Page 12: ... deleted transmitters It is recommended to delete all transmitters and re coding when one of the stored transmitters is lost Maintenance No particular maintenance is required for the logic circuit board At least twice a year check that the door is properly balanced and that all working parts are in good working condition IMPORTANT A poorly operating door can effect the life of the automatic opener...

Page 13: ... a maintenance register kept by the user Information for the user is found in the USERS OWNERS MANUAL included with this opener IMPORTANT Please make sure the USERS OWNERS MANUAL is passed on to the owner prior to leaving the installation IMPORTANT In the case of a malfunction the user must call an authorized Smart Opener Pty Ltd installer and should not attempt to repair the opener Final Notes Th...

Page 14: ...g from wear and tear c blown fuses loss or damage caused by electrical surges power surges or power spikes d loss or damage due to theft fire flood rain water lightning storms any acts of God contamination or pollution e door or gate not in safe and correct working order and condition f evidence of unauthorised repairs g any cost relating to damage caused deliberately or by misuse negligence or fail...

Page 15: ... 15 Notes ...

Page 16: ...uct quality and innovation smart openers reserves the right to change and alter specifications and model numbers and types without notice D N SRIM011107 Smart Openers Pty Ltd PO Box 6666 GCMC Qld 9726 Tel 1300 366 547 Fax 1300 366 972 Email enquiries smartopeners com Web www smartopeners com ...

Reviews: