18 |
INSTALLING AND SECURING YOUR SMART BOARD V280 INTERACTIVE
WHITEBOARD
Preparing the Pens
Refer to the following procedure to prepare the included interactive whiteboard pens
for use.
To prepare the pens
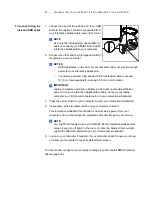
1. Pull back the battery cover of each pen to open
the battery compartment, and then insert
an AAA battery, as illustrated.
2. Press the tip switch on the nib of each pen
with your finger to check that the pen is working
properly. The LED light beside each battery
compartment illuminates green. Place the pens
on the pen tray.
NOTES
–
A green LED light indicates that the
pen is operating properly. A red LED
light indicates that less than one hour
of battery operating time remains.
–
If the pen’s LED light doesn’t illuminate when you press the tip switch
on the nib, see page 60.
After you install your interactive whiteboard, connect your digital projector to your
computer by following the manufacturer’s instructions included with your projector.
+
–
Summary of Contents for SMART Board V280
Page 10: ...viii CONTENTS...
Page 18: ...8 INTRODUCING YOUR SMART BOARD V280 INTERACTIVE WHITEBOARD...
Page 30: ...20 INSTALLING AND SECURING YOUR SMART BOARD V280 INTERACTIVE WHITEBOARD...
Page 52: ...42 GETTING STARTED WITH SMART NOTEBOOK SOFTWARE...
Page 72: ...62 MAINTENANCE AND TROUBLESHOOTING...
Page 86: ...76 HARDWARE ENVIRONMENTAL COMPLIANCE...
Page 92: ......
Page 93: ......
Page 94: ...Toll Free 1 866 518 6791 U S Canada or 1 403 228 5940 www smarttech com...


