background image

Chapter 1

About the stand

smarttech.com/kb/171627

9

Accessories

The following accessories are available for your wall stand:

Accessory

Description

Laptop shelf

The laptop shelf is a convenient place to place your laptop or keyboard when
you’re using a stand-mounted display.

CAUTION

The maximum allowable load is 13 lb. 3 oz. (6 kg).

Power bar

The power bar, mounted on the side of the stand, has surge protection and can be
used for connecting a display and accessories to power.

CAUTION

Use only the included six outlet power bar (model TPL615B) with the stand.

More information

See the following resources for more information:

l

WSE-410 specifications:

smarttech.com/kb/171628

l

WSE-410 illustrated installation instructions:

smarttech.com/kb/171619

These documents are available in the Support section of the SMART website:

smarttech.com/support

.

Summary of Contents for 1034166

Page 1: ...Was this document helpful smarttech com docfeedback 171627 SMART electric height adjustable wall stand USER GUIDE WSE 410 S410 2 ...

Page 2: ...ther countries All third party product and company names may be trademarks of their respective owners Copyright notice 2020 SMART Technologies ULC All rights reserved No part of this publication may be reproduced transmitted transcribed stored in a retrieval system or translated into any language in any form by any means without the prior written consent of SMART Technologies ULC Information in th...

Page 3: ... not fit into the outlet consult an electrician for replacement of the obsolete outlet l Do not alter or remove the grounding prong from the power cord l Improper use of the grounding plug can result in electric shock l Do not use a mains power adapter plug l The stand must be grounded to reduce the riskof electric shockin the event of an electricalshort circuit l To prevent injury the stand must ...

Page 4: ... been spilled or objects have fallen into the stand the stand has been exposed to rain or moisture does not operate normally or has been dropped l Use only originalaccessories and replacement parts Using other accessories or parts willvoid the warranty guarantee l Make sure the stand s power cord is easily accessible at alltimes CAUTION l Operate the stand only indoors l Protect the power cord fro...

Page 5: ...Important information smarttech com kb 171627 5 Subassemblies Laptop shelf FSE 400 LS 6 outlet power bar ModelTPL615B Wallmount bracket WM SBID 200 ModelW200 1 ...

Page 6: ...ries 9 More information 9 Chapter 2 Assembling the stand 10 Environmental requirements 10 Considerations when assembling the stand 11 Chapter 3 Using the stand 13 Raising and lowering the stand 13 Chapter 4 Troubleshooting the stand 18 Resolving general issues 18 Using the status light 19 Factory resetting the stand 19 ...

Page 7: ...from hitting objects that are in the height adjustment path Safety bounce back mechanism The stand features a safety mechanism to prevent injury and damage when raising and lowering a display If an obstruction is encountered while the stand is being raised or lowered the stand will stop and reverse direction briefly Power bar The power bar mounted on the side of the stand has surge protection and ...

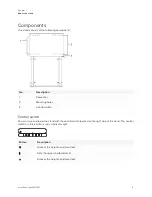
Page 8: ...r bar 2 Mounting holes 3 Control switch Control switch You can raise and lower the stand with the control switch located on the right side of the stand The control switch has three buttons and an indicator light Button Description Unlocks the height adjustment lock Sets the upper and lower limits Unlocks the height adjustment lock ...

Page 9: ... 3 oz 6 kg Power bar The power bar mounted on the side of the stand has surge protection and can be used for connecting a display and accessories to power CAUTION Use only the included six outlet power bar model TPL615B with the stand More information See the following resources for more information l WSE 410 specifications smarttech com kb 171628 l WSE 410 illustrated installation instructions sm...

Page 10: ...llation instructions included with the stand could result in personal injury or product damage CAUTION Ensure any display you install on the stand weighs between 92 lb 42 kg and 200 lb 91 kg Environmental requirements Before installing the stand refer to the following environmental requirements CAUTION l Do not operate the stand immediately after moving it from a cold location to a warm location A...

Page 11: ...nt that is supplied with some SMART display models Model s Recommendation SBID MX265 V1 2 The wall mount supplied with these models is not compatible with the stand The wall mount isn t required SBID MX275 V1 2 SBID MX286 V1 2 Ease of installation may be improved by using the wall mount but the wall mount isn t required SBID 6065S SBID 6075S SBID 6086S SBID 7075R SBID 7086R The wall mount is requi...

Page 12: ...Chapter 2 Assembling the stand smarttech com kb 171627 12 NOTE Please contact SMART Support smarttech com contactsupport if you need a WM SBID 200 wall mount ...

Page 13: ...htened before operating the stand l Do not allow children or people who are not able to safely operate the stand to use it l To prevent injury keep hands and people away from crush and pinch locations on the stand l Operating the stand can create a hand crushing or hand pinching hazard To prevent injury keep hands and people away from crush and pinch locations on the stand l Allow adequate clearan...

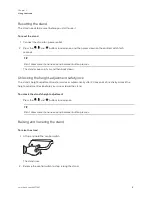
Page 14: ...he stand moves up 1 cm and then back down Unlocking the height adjustment safety lock The stand s height adjustment mechanism locks automatically after 20 seconds of inactivity Unlock the height adjustment lock before you raise or lower the stand To unlock the stand s height adjustment Press the and buttons in sequence TIP Don t allow more than one second between button presses Raising and lowerin...

Page 15: ...nt the stand from hitting the object To set the upper height limit 1 Raise the stand to the height you want to use as the upper limit 2 While pressing and holding the button lift the control switch up until the indicator light flashes 3 Release the button and the control switch The upper limit is set To set the lower height limit 1 Lower the stand to the height you want to use as the lower limit 2...

Page 16: ...height you want to set as the favorite position 2 Press the button for two seconds The status light flashes white two times After the stand saves the position the status light appears solid white To raise or lower the stand to a favorite position 1 Lift up and hold the control switch to raise the stand OR Press down and hold the control switch to lower the stand The stand rises or lowers until it ...

Page 17: ...control switch from the bottom to raise the stand or from the top to lower it The stand rises or lowers until it reaches a favorite position TIP To stop the stand from rising or lowering tap the control switch once To erase all favorite positions from the stand s memory Press the button for eight seconds The status light flashes red ...

Page 18: ...ged l Ensure the switch on the power bar is turned on l Ensure the actuators and the control panel are connected to the control box l Unplug the power cable for the stand Wait 15 minutes and then reset the stand The display doesn t fit on the stand l Ensure you re using the mounting plate supplied with the SMART display l If you re using the stand with a third party display ensure the stand suppor...

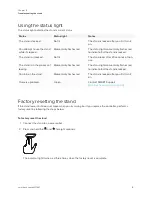
Page 19: ... stand is in the process of locking Momentarily flashes red The status light momentarily flashes red to indicate that the stand is locked You turn on the stand Momentarily flashes red The stand is locked after you first turn it on There is a problem Green Contact SMART Support smarttech com contactsupport Factory resetting the stand If the stand lowers but does not move when you try raising it or ...

Page 20: ...SMART TECHNOLOGIES smarttech com support smarttech com contactsupport smarttech com kb 171627 ...

Reviews: