background image

99-00724-00 D0

Chapter 2

Installing the 

Interactive Pen 

Display

This chapter tells you how to:

determine the best location for the interactive pen display (page 4)

change the angle of the interactive pen display (page 4)

connect the interactive pen display (page 5)

integrate a monitor or a projector (page 5)

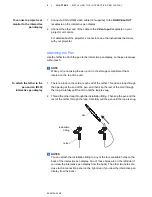
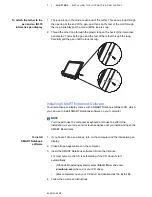
attach the pen (page 6)

install SMART Notebook software (page 7)

match your computer’s and interactive screen’s resolutions (page 8)

adjust the screen settings (page 9)

orient the screen (page 11)

secure the interactive pen display (page 12)

remove the interactive pen display’s stand (page 12)

Summary of Contents for Podium ID350

Page 1: ...SMART Podium ID350 ID370 Installation Guide...

Page 2: ...kely to cause harmful interference in which case the user will be required to correct the interference at his own expense Trademark Notice The SMART logo and smarttech are trademarks or registered tra...

Page 3: ...lass cleaner an organic solvent such as alcohol or even a mild detergent to the screen If you use these cleaners you may damage the screen s finish or the unit s electronics Also you ll void the warra...

Page 4: ...ve the interactive pen display hold it on the sides or the back Don t apply pressure to the screen The Tethered Pen The tethered pen is a sealed unit that contains electronics but no batteries If you...

Page 5: ...n to replace the power outlet Don t modify the power plug Place the interactive pen display in a location where users will have clear and direct access to the main power plug as they must be able to u...

Page 6: ...99 00724 00 D0 iv IMPORTANT INFORMATION...

Page 7: ...e of the Interactive Pen Display 4 Connecting the Interactive Pen Display 5 Integrating a Monitor or a Projector 5 Attaching the Pen 6 Installing SMART Notebook Software 7 Matching the Resolution 8 Ad...

Page 8: ...ing Problems 24 Hardware Environmental Compliance 25 Waste Electrical and Electronic Equipment Regulations WEEE Directive 25 Restriction of Certain Hazardous Substances RoHS Directive 25 Packaging 25...

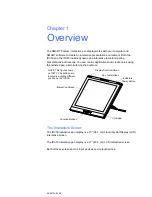
Page 9: ...s using the tethered pen all while facing the audience The Interactive Screen The ID350 interactive pen display is a 15 38 1 cm Liquid Crystal Display LCD interactive screen The ID370 interactive pen...

Page 10: ...play you can set the current function of the pen instantly activate programs and configure the display settings Use the pen tool buttons to control the function of the pen tool You can select from dif...

Page 11: ...ctive pen display page 4 connect the interactive pen display page 5 integrate a monitor or a projector page 5 attach the pen page 6 install SMART Notebook software page 7 match your computer s and int...

Page 12: ...tive pen display because the pen won t function until you install the SMART software and the SMART Board drivers are running You should also keep your computer within 19 6 6 0 m of the unit This dista...

Page 13: ...y to the DC IN receptacle on the interactive pen display and then connect the power cable to the power supply 5 Turn on the computer and the interactive pen display NOTE If you must install drivers fo...

Page 14: ...top of the unit To attach the tether to the pen and an ID350 interactive pen display 1 There is a loop in the cord at each end of the tether Thread one loop through the opening at the end of the pen a...

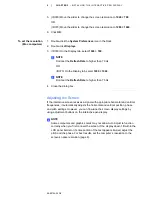
Page 15: ...ive pen display comes with a SMART Notebook software CD which you can use to install SMART Notebook software on your computer NOTE You ll need to use the computer s keyboard or mouse to perform the in...

Page 16: ...of the pen If it doesn t you may need to orient the screen page 11 or see the Troubleshooting section of this guide page 21 Matching the Resolution Before the image output of the computer can display...

Page 17: ...to higher than 75 Hz 4 Close the dialog box Adjusting the Screen If the interactive screen receives a signal with appropriate horizontal and vertical frequencies it automatically adjusts the horizonta...

Page 18: ...decreases image contrast Brightness Increases or decreases image brightness Phase Reduces or eliminates horizontal distortion lines To automatically adjust select Reset Pitch Reduces or eliminates ve...

Page 19: ...ears directly beneath the tethered pen when you touch the interactive screen the computer needs to know the exact location of the image on the screen You can ensure the accuracy of the pointer by orie...

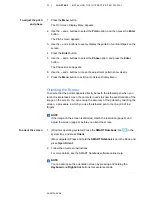
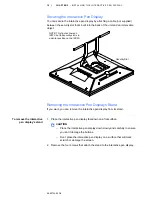
Page 20: ...the interactive pen display from its stand To remove the interactive pen display s stand 1 Place the interactive pen display facedown on a flat surface CAUTION Place the interactive pen display down...

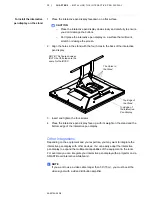
Page 21: ...splay face up with its weight on the stand and the bottom edge of the interactive pen display Other Integrations Depending on the equipment and your expertise you may want to integrate the interactive...

Page 22: ...14 CHAPTER 2 INSTALLING THE INTERACTIVE PEN DISPLAY 99 00724 00 D0...

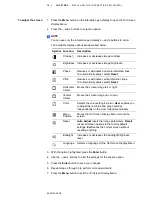
Page 23: ...styluses from other products can damage the protective coating of the display NOTE You can use SMART Notebook software to make your presentations interactive and dynamic For further information on wh...

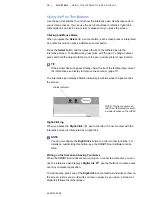
Page 24: ...rient the interactive pen display to improve the accuracy page 11 The interactive pen display s Status indicator glows blue when the pen touches the screen Right Clicking When you press the Right Clic...

Page 25: ...ws applications such as Microsoft Word and Excel you can select additional toolbar options such as saving your note into a SMART Notebook file or saving your note as text If the interactive pen displa...

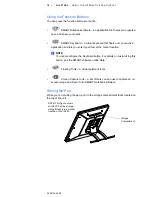
Page 26: ...cursor location NOTE You can reconfigure the Keyboard button For details on customizing this button see the SMART software online Help Floating Tools a virtual palette of tools Screen Capture tools a...

Page 27: ...to liquids Don t apply glass cleaner any organic solvent such as alcohol or even a mild detergent to the screen If you use these cleaners you may damage the screen s finish or the unit s electronics...

Page 28: ...If you require more replacement tips contact your local SMART Reseller page 27 NOTE If you misplace your o ring tool you can use a pair of tweezers or pliers to remove the old tip To replace the pen...

Page 29: ...display and the computer the video cable isn t bent or broken and doesn t have bent or broken pins in either connector NOTE If you re using a video cable adapter check those connections as well the c...

Page 30: ...able is properly connected to an active port on the computer and to the interactive pen display you re using the correct pen not one from another display If you touch the pen to the interactive screen...

Page 31: ...n there may be some anomalies in the image appearance The following irregularities aren t necessarily indications that the screen is defective A very small number of pixels are permanently illuminated...

Page 32: ...t be running on the attached computer You ll know that the SMART Board drivers are running if you can see the SMART software icon in the system tray Windows operating systems or the Dock Mac computers...

Page 33: ...or electronic equipment including SMART Technologies products we strongly encourage you to properly recycle the electronic product when it has reached end of its life If you require further informatio...

Page 34: ...l Applicable SMART Technologies products meet the requirements of the Covered Electronic Devices regulations China s Electronic Information Products Regulations China regulates products that are class...

Page 35: ...before contacting SMART Technical Support Your local reseller can resolve most issues without delay NOTE To locate your local reseller visit www2 smarttech com st en US Where to Buy All SMART product...

Page 36: ...Equipment Warranty that shipped with the SMART product at the time of purchase Registration To help us serve you register online at www smarttech com registration Address SMART Technologies 3636 Resea...

Page 37: ......

Page 38: ...Toll Free 1 866 518 6791 U S Canada or 1 403 228 5940 www smarttech com 99 007274 00 D0...

Reviews: