background image

service@smartbaby.info

Summary of Contents for SM510

Page 1: ......

Page 2: ...service smartbaby info service smartbaby info ...

Page 3: ...service smartbaby info ...

Page 4: ... 3 USING THE BABY MONITOR 7 9 4 FUNCTION OVERVIEW 10 4 1 Lullaby setting 10 4 2 VOX setting 11 4 3 Digital zoom 12 4 4 Split screen setting 13 4 5 Pairing the camera and monitor 14 4 6 Delet the camera 15 4 7 Setting 16 21 5 TECHNICAL DATA 22 5 1 System general 22 6 TROUBLE SHOOTING 23 24 FCC STATEMENTS 25 CONTENT service smartbaby info ...

Page 5: ...service smartbaby info ...

Page 6: ...service smartbaby info ...

Page 7: ...service smartbaby info ...

Page 8: ...ase the brightness To right the camera in the Pan Tilt mode OK Press the OK key to view scan camera or to con rm Volume Down key Press Volume to decrease the volume To down the camera in the Pan Tilt mode Brightness Left key Press the Brightness to decrease the brightness To left the camera in the Pan Tilt mode Talk to baby To talk press and hold the talk key on the front of the monitor release to...

Page 9: ...LED displays shows green after the battery is fully charged Volume LED When the baby unit detects the voice the indicator light will be on The louder the detected sound the more lights will light up LCD screen Display the baby s picture and the adjustment of each button function Speaker Hear the sound from the baby Stand Monitor placement stand Reset key under the stand Long press the reset button...

Page 10: ...ht sensor Speaker infrared LEDs Pair key CMOS sensor DC Jack Power LED Temperature sensor MIC Antenna 1 8 3 9 2 5 4 6 7 1 3 2 5 4 8 8 9 6 7 80 Alert volume Setting Time format service smartbaby info Alert ...

Page 11: ...C adapter included in this package to the monitor and a socket It takes about 4 hours for the monitor to be fully charged Step2 Use the provided AC adapter included in this package to connect the wall outlet with the baby unit Charging Red orange Fully charged Green service smartbaby info ...

Page 12: ... large metal object like a refrigerator a mirror a ling cabinet metallic doors or reinforced concrete between the baby and parent unit may block the radio signal The signal strength may also be reduced by other solid structures like walls or by radio or electrical equipment such as TV computers cordless or mobile phones uorescent lights or dimmer switches When using the other 2 4GHz product such a...

Page 13: ...e a icon will be displayed at the bottom left corner of the screen for 8 seconds The camera switch icon will displayed on the top of the screen Each camera s video will be stay on the LCD around 18 seconds Short press the OK key to quit the scan mode Note This function is only avilable when two or more cameras are paired Scan mode on service smartbaby info ...

Page 14: ...lullaby from the baby unit Step1 Press Menu Exit key and the menu will pop up Step2 Select the lullaby you want to play through the NAVIGATION key and OK key Step3 Set playback duration and volume through the NAVIGATION key and OK key Step4 Press the Menu Exit key to Exit service smartbaby info ...

Page 15: ...uder than set sensitivity level it will start transmitting the signal to the monitor again change the VOX level please follow the next instructions Step1 Press the Menu Exit key and the menu will pop up Press UP key or DOWN key to select VOX setting Step2 Set the VOX level through the NAVIGATION key and OK key Step3 Press the Menu Exit key to Exit NOTE To resume the video and audio signal manually...

Page 16: ...enu Exit key and the menu will pop up Step2 Press UP key or DOWN key to select digital zoom setting Step3 Set the zoom scale through the NAVIGATION key Press OK key to con rm Step4 Press the Menu Exit key to Exit service smartbaby info ...

Page 17: ... UP key or DOWN key to select split screen setting Step3 Choose single screen display or dual screen display through the NAVIGATION key Press OK key to con rm Step4 Press the Menu Exit key to Exit NOTE This function is only available when two or more cameras are paired service smartbaby info ...

Page 18: ...e camera to be paired through the NAVIGATION key Press OK key or right key to to start the pairing While the screen shows pairing then long press the PAIR button on the back of camera Once paired then the screen will display the image from the camera Step3 If unsuccessful please repeat above steps Step4 Press menu key to exit menu 7 service smartbaby info ...

Page 19: ...ep1 Press Menu Exit key and the menu will pop up Step2 Press UP key or DOWN key to select the delete camera icon Step3 Select YES and press ok key to delete the camera Step4 Press menu key to exit menu service smartbaby info ...

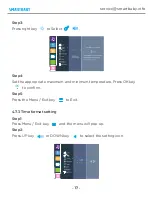
Page 20: ...y or DOWN key to select the setting icon Step3 Press right key to Select Step4 Select or Press OK key to con rm Step5 Press the Menu Exit key to Exit 4 7 2 Temperature alert setting Step1 Press Menu Exit key and the menu will pop up Step2 Press UP key or DOWN key to select the setting icon service smartbaby info ...

Page 21: ...iate maximum and minimum temperature Press OK key to con rm Step5 Press the Menu Exit key to Exit 4 7 3 Time format setting Step1 Press Menu Exit key and the menu will pop up Step2 Press UP key or DOWN key to select the setting icon service smartbaby info ...

Page 22: ...to Exit 4 7 4 Language setting Step1 Press Menu Exit key and the menu will pop up Step2 Press UP key or DOWN key to select the setting icon Step3 Select the language Press OK key to con rm Step4 Press the Menu Exit key to Exit 4 7 5 Timer setting Step1 Press Menu Exit key and the menu will pop up service smartbaby info ...

Page 23: ...n Step3 Select the alarm timer Press OK key to con rm Step4 Press the Menu Exit key to Exit 4 7 6 Warning alert volume setting Step1 Press Menu Exit key and the menu will pop up Step2 Press UP key or DOWN key to select the setting icon service smartbaby info ...

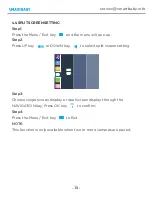
Page 24: ... Exit key and the menu will pop up Step2 Press UP key or DOWN key to select the setting icon Step3 Select 60Hz if you are in North Ameriva select 50Hz if you are in EUROPE Press OK key to con rm Step4 Press the Menu Exit key to Exit 4 7 8 Night vision setting Step1 Press Menu Exit key and the menu will pop up service smartbaby info ...

Page 25: ... Press OK key to con rm Step4 Press the Menu Exit key to Exit The default setting is AUTO If you choose OFF the item will not enter the night vision mode even in darkness If you choose ON the item will always in the night vision mode It will show black and white picture all the time service smartbaby info ...

Page 26: ...service smartbaby info ...

Page 27: ... them from battery and electrical power Wait about 15 seconds then reconnect Large metallic objects including doors refrigerators mirrors ling cabinets and also reinforced concrete may block the radio signal if between the Camera and Monitor Unit The signal strength may be reduced when in close proximity to radio or electrical equipment such as TVs computers cordless or mobile phones uorescent lig...

Page 28: ... Bluetooth systems or microwave ovens may cause interference with this product Keep Camera and Monitor Unit at least 5ft 1 5m away from these items or turn them o if they appear to cause interference Noise interference on your Monitor Unit Volume may be set too high on the Monitor Unit Lower volume The Camera and Monitor Units may be too close Move them further apart The Camera Unit may be too far...

Page 29: ...service smartbaby info ...

Page 30: ...problems in the process of using the product please feel free to contact us we will reply to you within 24 hours and resolve the issue in a way that satis es you Customer service e mail address service smartbaby info service smartbaby info ...

Page 31: ......

Page 32: ...https www smartbaby info service smartbaby info ...

Reviews: