background image

15


©2012 Smarter Tools, Inc. All Rights Reserved 

9500 Generator 

Installation (cont’d) 

_________________________________________________________________________________________________ 

 
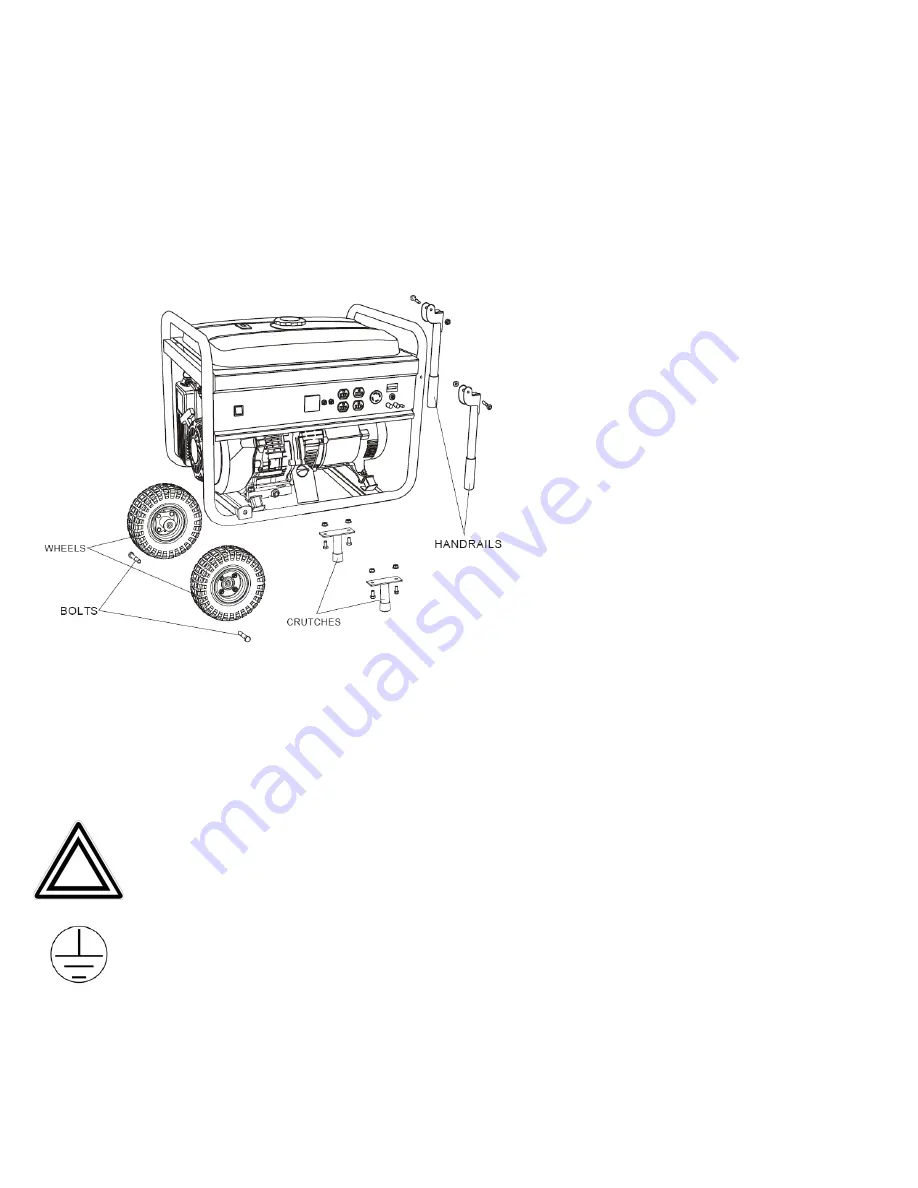
Wheel and Handle Kit Installation 

(Installation requires a socket wrench with 10mm, 14mm, and 17mm sockets). 


1.  Before adding oil or gasoline to the engine, 

tip the generator slowly so that the recoil 
and air filter are up. 
 

2.  Install the two wheels on the generator 

using the (2) 17mm 2 ½” bolts provided. 
Make sure the valve stem is facing 
outward. 


3.  Tip the generator slowly so that the recoil 

and air filter are down.  

 
4.  Install the crutches on the under frame with 

the (4) nuts and 14mm 1” bolts provided. 


5.  Tip the generator slowly so that is sits on 

both the wheels and crutched. 

 
6.  Install the handrails on the right side of the 

frame using the (2) nuts and 10mm 1 ¾” 
bolts provided. 


Support and Mounting 

Mount the generator on a concrete slab capable of supporting the weight of the generator. The slab must extend on all 
sides beyond the frame by at least one foot. Contact a cement contractor for slab specifications if necessary. Attach the 
frame to the concrete slab using 3/8” diameter expansion anchor bolts (not supplied). 
 

Grounding 


Note:

 It is recommended that only a trained and licensed electrician perform this procedure. 


Connect a #6 AWG grounding wire (not included) from the ground connector on the generator to a grounding 
rod (not included) that has been driven at least 24 inches deep into the earth. The grounding rod must be an 
earth-driven copper or brass rod (electrode) which can adequately ground the generator. 


Summary of Contents for ST-GP9500

Page 1: ...wner s Manual ST GP9500 ST GP9500 ST GP9500E ST GP9500EB WARNING To Reduce Risk of Injury User Must Read and Understand Owner s Manual Prior to Use NOTE Retain Original Sales Receipt as Proof of Purchase ...

Page 2: ... Your Power Needs 19 Inspection Cleaning and Maintenance 20 Changing Oil 20 Spark Plug 21 Air Filter 21 Spark Arrester optional 21 Cleaning 21 Maintenance Schedule 21 Storage 22 Transporting 22 Specifications 23 Parts Lists 24 Crankcase Assembly 24 Crankshaft Assembly 24 Crankshaft Assembly and Piston 25 Cylinder Head Assembly 25 Camshaft Assembly 26 Centrifugal Timing Implement Assembly 27 Inflam...

Page 3: ...electrical power for lighting appliances tools and similar equipment This Booklet Every effort has been made to ensure the accuracy and completeness of the information in this manual We reserve the right to change alter and or improve the product and this document at any time without prior notice For the most up to date information regarding your Smarter Tools product please visit us at www usesma...

Page 4: ...ty instructions Be sure to retain them for future use WARNING WARNINGS INDICATE A CERTAINTY OR STRONG POSSIBILITY OF PERSONAL INJURY OR DEATH IF INSTRUCTIONS ARE NOT FOLLOWED CAUTION CAUTIONS INDICATE A POSSIBILITY OF EQUIPMENT DAMAGE IF INSTRUCTIONS ARE NOT FOLLOWED PROPERLY Note Notes give helpful information WARNING IMPROPER OPERATION OR MAINTENANCE OF THIS PRODUCT COULD RESULT IN SERIOUS INJUR...

Page 5: ... an enclosed area NEVER use a generator inside homes garages crawlspaces or other partially enclosed areas Deadly levels of carbon monoxide can build up in these areas Using a fan or opening windows and doors does NOT supply enough fresh air ONLY use a generator outdoors and far away from open windows doors and vents These openings can pull in generator exhaust Even when you use a generator correc...

Page 6: ... with known leaks in the fuel system Excessive buildup of unburned fuel gases in the exhaust system can create a potentially explosive condition This buildup can occur after repeated failed start attempts valve testing or hot engine shutdown If this occurs open exhaust system drain plugs if equipped and allow the gases to dissipate before attempting to restart the generator Use only engine manufac...

Page 7: ...he outlet reverse the plug If it still does not fit contact a qualified electrician to install a polarized outlet Do not change the plug in any way Double insulation eliminates the need for the three wire grounded power cord and grounded power supply system Before servicing equipment powered by the generator disconnect the equipment from its power input The generator must be earth grounded for fix...

Page 8: ...sories or storing the generator Such preventive safety measures reduce the risk of starting the generator accidentally Store idle generators out of reach of children and other untrained persons Generators are dangerous in the hands of untrained users Maintain generators with care Do not use a damaged generator Tag damaged generators Do not use until repaired Check for misalignment or binding of mo...

Page 9: ...face should be level and strong enough to safely hold the weight of the generator If the floor grounded surface is not level strong cross members should be placed under the full length of the generator frame at its low side For trailer installation the generator should be mounted on the center point of the trailer over the wheels The trailer must be capable of supporting the weight of the generato...

Page 10: ...llowed For skin contact immediately wash with soap and water For eye contact immediately flush eyes with clean water and seek medical attention Noise Prolonged exposure to noise levels above 85dBA is hazardous to hearing Always wear ANSI approved ear protection when operating or working around the Generator when it is running Extension Cords If an extension cord not included is used make sure to u...

Page 11: ...e Generator 1 Fuel Gauge Indicates amount of fuel in tank 2 Fuel Tank 7 gallon capacity 3 Choke Used to start engine 4 Fuel Valve Turn this valve to the on position to supply fuel to the engine 5 Air Filter Protects the engine by filtering dust and debris from the intake air 6 Recoil Starter Used to start the engine 7 Low Oil Shutdown Senses the level of oil in the crankcase and shuts the engine d...

Page 12: ...120 volt AC single phase 60 Hz loads requiring up to 20 A or 2400 Watts of power 5 120 240V 30A Twist Lock Protected by a 30A circuit breaker on each 120 Volt leg of the receptacle This receptacle powers 240 Volt AC 60 Hz single phase loads requiring up to 30A or 7200 Watts of power If an L14 30P plug is wired for only one 120 Volt leg 3 wire connection then this receptacle powers 120 Volt AC 60 H...

Page 13: ...BE OPERATED ON A LEVEL SERVICE DO NOT OPERATE GENERATOR ON LOOSE GROUND OR OBVIOUS INCLINES THE LOW OIL SHUT DOWN FEATURE MAY BE PREMATURELY ACTIVATED IN THESE CASES CAUSING THE UNIT TO NOT START Make sure to locate and install the generator outdoors where cooling air is readily available Install the generator so that the air inlets and outlets are not blocked by obstructions such as bushes trees ...

Page 14: ...r slowly so that is sits on both the wheels and crutched 6 Install the handrails on the right side of the frame using the 2 nuts and 10mm 1 bolts provided Support and Mounting Mount the generator on a concrete slab capable of supporting the weight of the generator The slab must extend on all sides beyond the frame by at least one foot Contact a cement contractor for slab specifications if necessar...

Page 15: ...d Negative lead is marked with a 5 Attach the negative lead to the negative terminal marked with a on the battery with the phillips head cap screw and secure with 8mm nut CAUTION PRIOR TO FIRST USING THE GENERATOR THE ENGINE MUST BE FILLED WITH APPROXIMATELY 1 QUART OF HIGH QUALITY SAE 10W 30 GRADE ENGINE OIL Add Engine Oil 1 Place the generator on a flat and level surface 2 Remove oil fill cap di...

Page 16: ...old Surge Protection CAUTION ATTEMPTING TO POWER SENSITIVE ELECTRONIC EQUIPMENT WITHOUT THE USE OF AN APPROVED LINE CONDITIONER MAY CAUSE DAMAGE TO THE EQUIPMENT Electronic devices including computers and many programmable appliances use components that are designed to operate within a narrow voltage range and may be affected by momentary voltage fluctuations While there is no way to prevent volta...

Page 17: ... If powering exceeds the generator s capacity it may be necessary to group one or more of the tools and or equipment for connection to a separate generator 3 Once the generator is running simply connect the power cords of 110 120 volt AC powered tools and equipment into the 110 120 volt AC dual outlets and or the power cord of a 12V DC powered tool to the DC terminals CAUTION MAKE SURE TO CONNECT ...

Page 18: ...ication plate ratings Your Power Needs Tool or Appliance Running Watts Starting Watts 1 2 3 4 5 Total Running Watts Highest Starting Watts Total Running Watts Highest Starting Watts Item Running Watts Starting Watts Essentials Light Bulb 100 100 Refrigerator Freezer 1200 2400 Sump Pump 600 1800 Well Pump 1HP 2000 4000 Water Heater 4000 Security System 180 AM FM Radio 300 Garage Door Opener HP 500 ...

Page 19: ...GED OR DEFECTIVE GENERATOR Before each use make sure the engine s oil level is at manufacturer s specification If necessary fill the crankcase until the oil level is even with the oil fill hole Make sure there is gas in the unit Before each use remove all debris with a soft brush rag or vacuum Lubricate all moving parts using a premium quality lightweight machine oil CAUTION DO NOT ATTEMPT TO ADJU...

Page 20: ...l 1 Allow the engine to cool completely before servicing the spark arrester 2 Remove the two screws holding the cover plate which retains the end of the spark arrester to the muffler 3 Remove the spark arrester screen 4 Carefully remove the carbon deposits from the spark arrester screen with a wire brush 5 Replace the spark arrester if it is damaged 6 Position the spark arrester in the muffler and...

Page 21: ...e 2 Turn off the fuel supply at the fuel valve 3 Drain all fuel completely from the fuel line and carburetor to prevent gum from forming 4 Add a fuel stabilizer into the fuel tank 5 Change the oil 6 Remove the spark plug and pour about ounce of oil into the cylinder Crank the engine slowly to distribute the oil and lubricate the cylinder 7 Reattach the spark plug 8 Slowly pull the starter grip unt...

Page 22: ...ting Watts 9500w Rated Frequency 60HZ Rated Voltage 120V 240V Rated Current 60A Run Time 10hrs at 50 load Receptacles qty 4 120V AC 1 240V 120 AC 1 120V 30A AC 1 12V 10A DC Net Gross Weight 185 187lbs Noise Level dB 73dB Fuel Type Unleaded gasoline Fuel Capacity gal 7 Oil Level Meter Yes Oil Type SAE 10W 30 Start Type Recoil Electric on E and EB models AC Volt Meter Yes Frame Construction Tubular ...

Page 23: ... generator on a flat level surface before starting Generator cannot supply enough power or overheating Generator is overloaded Review load and adjust See Power Management Insufficient ventilation Check for air restriction Move to a well ventilated area No AC output Cable not properly connected Check all connections Connected device is defective Replace defective device Circuit breaker is open Rese...

Page 24: ...l to the right of the power switch Note The Hour Meter is tied directly to the product warranty Attempting to disable or otherwise tamper with the Hour Meter will VOID the manufacturer s warranty Identification Plate The product s Identification Plate can be found on the lower frame cross arm just behind the air filter See figure below Note Properly registering your product with Smarter Tools is t...

Reviews: