background image

Understanding the Local Control Feature

Local control allows a user to turn on a lamp without having to send a signal to the

LampLinc module.  A lamp can be turned on and off manually by the switch on the

lamp and the LampLinc will respond to this.  There are three possibilities:

The load control feature can be used safely with any incandescent or filament type

lamp.  However, using the load detect feature with a lamp with a built in dimmer

(such a Torchier halogen), ballast transformer or other electric/electronic controls may

result in false triggering.  For non-incandescent bulbs, it is recommended that the

load detect feature be turned off, (by sending an OFF during the setting of the pri-

mary address).

About LampLinc’s Certification

LampLinc has been thoroughly tested by ITS ETL SEMKO, a

nationally recognized independent third-party testing laboratory.

Products bearing North American ETL Listed mark signifies that

the product has been tested to and has met the requirements of

a widely recognized consensus of U.S. and Canadian product

safety standards, that the manufacturing site has been audited,

and that the manufacturer has agreed to a program of quarterly

factory follow-up inspections to verify continued conformance.

Installation Tips

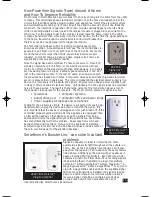
Due to the size of LampLinc, it will block the bottom outlet of a duplex wall receptacle

if plugged into the top outlet.  If possible, use the bottom outlet for the lamp module

so that the other outlet is accessible for other use.  For convenience, a pass through

receptacle has been supplied on the lamp module so you don’t lose a receptacle.
If the LampLinc is plugged into a receptacle controlled by a wall switch, consider

leaving the switch on at all times.  This will ensure that the LampLinc never loses

power and is always functioning.  If the outlet is switched off, the LampLinc will turn

the light back on to the last dim level before power was switched off.
A new LampLinc or one that has been Factory Reset (see page 8) will be set to

address A-1. If other 2-way modules are set to A-1, The LampLinc may may come on

when the other unit is activated.
If the lamp being controlled by the LampLinc has a dimmer, turn that dimmer to full

on and allow the LampLinc to control the lamp’s brightness.
Never stack LampLinc and/or ApplianceLinc modules together.  

The internal heat

generated by the units when controlling a load may cause them to overheat or

catch fire.

9

Move the switch on the lamp to the “OFF” position

and then back to the “ON” position.  The lamp will

turn on 

Move the switch on the lamp to the “ON” position.

The lamp will turn on.

Move the switch on the lamp to the “OFF” position.

The lamp will turn off.

Turning on a lamp locally

when it was turned off

remotely

Turning on a lamp locally

when it was turned off locally

Turning off a lamp locally while

it’s turned on

LampLink Plus& PLC for web (Mar04).qxd  3/15/2004  9:59 AM  Page 9

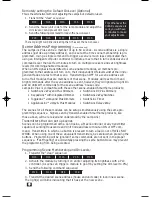
Summary of Contents for LampLinc Plus 2000SLS

Page 1: ...LampLincTM Intelligent lamp modules packed with features For models 2000SLS LampLinc Plus 2000SLS3 LampLinc Plus with ground pin 2000SHL LampLinc PLC 2000SHL3 LampLinc PLC with ground pin ...

Page 2: ...0 watts Responds to 65 different X10 PLC PowerLine Carrier signals Plus models only 32 levels of dimming and 32 fading on off rates No tools or hardwiring into the electrical system Pass through receptacle on the front for other un controlled electrical devices Green Status LED indicator shows powerline activity Codes are electronically set no code wheels and remembered even if unplugged Two year ...

Page 3: ...2 Send the X10 PLC signal from any transmitter within 30 seconds 3 Send an ON to enable local control OR 4 Send an OFF to disable local control see page 4 for more detailed instructions Setting the Fade On Off Rate 1 Turn on the lamp 2 Seconds 2 Adjust the dim level Brighter faster dimming 3 Double tap the Set Button press it TWICE quickly see page 4 for more detailed instructions Setting the On D...

Page 4: ...een Status LED will stop flashing Controlling the Lamp Remotely The LampLinc responds to any of the 256 PLC X10 addresses The LampLinc will respond to ON OFF ALL LIGHTS ON ALL UNITS OFF PRESET DIM BRIGHT and DIM commands The LampLinc can be controlled remotely from any compatible transmitter by sending its base address e g M6 and the command Setting the Fade On Off Rate Optional The Fade On Off is...

Page 5: ...ault On Level can be remotely set using a ControLinc Duo Smarthome 4071 a Maxi Controller 4020 or an equivalent transmitter capable of sending Housecode and Unit Code without ON or OFF These procedures and all the following ones will not work with a transmitter that sends the address with a command Transmitters in which one button is pressed to turn on or off a load will not work Remotely Setting ...

Page 6: ... Smarthome products SwitchLinc 2 Way and Plus Dimmers SwitchLinc RX Plus Dimmers KeypadLincTM with Integrated Dimmer SwitchLinc 2 Way Switches ToggleLincTM 2 Way and Plus Dimmers SwitchLinc Timer ApplianceLincTM 2 Way Plus Modules SwitchLinc Relay 2 Way The scenes for all these modules can be setup simultaneously using the same pro gramming sequence Signals sent by transmit enabled Smarthome produ...

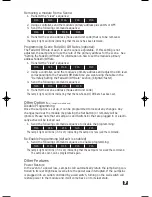
Page 7: ...new Fade On Off Rate has been set Other Options All LampLinc models only Disable Programming Once the LampLinc is set up it can be programmed to lockout any changes Any changes made at the module by pressing the Set Button or remotely will be ignored Please note that all LampLinc and SwitchLinc that are plugged in or electri cally active will be locked out 1 Send the following command sequence to ...

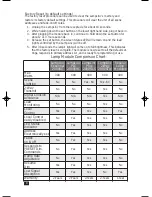
Page 8: ...t the factory reset is complete The module is now reset to all the default set tings responds to primary address A 1 and is ready for programming or use LampLinc Essential 2000SC LampLinc PLC 2000SHL LampLinc Plus 2000SLS LampLinc 2 Way 2000STW Regular Lamp Modules Max Watts 300 400 400 400 300 Scene Lighting No No Yes 64 Yes 64 No 2 Way Transmit No No No Yes No Signal Collision Avoidance N A N A ...

Page 9: ...t of a duplex wall receptacle if plugged into the top outlet If possible use the bottom outlet for the lamp module so that the other outlet is accessible for other use For convenience a pass through receptacle has been supplied on the lamp module so you don t lose a receptacle If the LampLinc is plugged into a receptacle controlled by a wall switch consider leaving the switch on at all times This ...

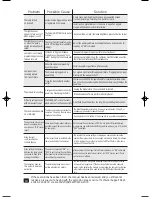
Page 10: ... in my North American wall outlet Problem Solution Check scene membership and remove any unwanted scenes from LampLinc or perform a Factory Reset to clear it Install an PLC Signal Blocker in the home to keep PLC signals from neighboring homes from interfering Set a new fade on rate Increase brightness press set button twice Re set the primary address by sending the house and unit code fol lowed by...

Page 11: ... design power supplies build in traps to filter out and kill electrical noise Unfortunately the PLC signals looks like electrical noise to these devices The result is that a large percent of the transmitted signal is lost to these devices leaving less for the receivers The most common sources of signal loss are Televisions Computer systems Audio Video gear Computer UPS s and power strips Power sup...

Page 12: ... of Seller s liability with respect to this product For repair or replacement during the warranty period call Smarthome customer service to receive an RA return authorization number properly package the product with the RA clearly printed on the outside of the package and send the product along with all other required materials to Smarthome Inc ATTN Receiving Dept 16542 Millikan Ave Irvine CA 9260...

Reviews: