8
DE5457P
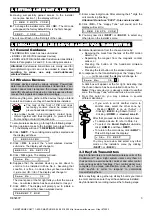
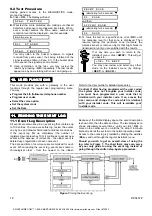
B. Gaining access to the “Define Panel” Memory
Locations
To reach the DEFINE PANEL mode, proceed as follows:
&
&
&
&
Upon gaining access to the installer menu (see Section
1), the display will read “
1. NEW INSTL CODE
”.
&
&
&
&
Click <
NEXT
> until the 4th mode is displayed:
4 . D E F I N E P A N E L
&
&
&
&
Click <
OK
>. The first memory location will be selected
and displayed:
0 1 : E N T R Y D E L A Y 1
&
&
&
&
Click <
NEXT
> or <
BACK
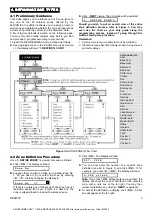
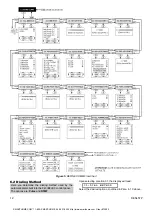
> until you reach the memory
location you wish to access (see rectangles
01
to
25
in
Figure 4).
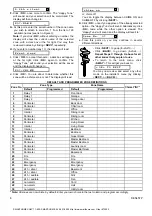
C. Programming Method
The ”multiple choice” programming method is applied
here. Once a memory location is selected, its number and
name are displayed as shown in the following example:
0 3 : E X I T D E L A Y
When you click <
OK
>, the currently saved option will be
displayed with a
dark selection box
at the far right of the
display:
e x i t d e l a y 4 5 s
If you approve of this option, click <
OK
>. The “Happy
Tune” will sound and the display will revert to the number
and name of the presently selected memory location.
If you do not approve, review the other options by clicking
<
NEXT
> or <
BACK
> repeatedly. Options that are not
saved will have a clear space at the far right, as shown:
e x i t d e l a y 9 0 s
To select an option, click <
OK
>. A dark box will appear at
the far right of the display.
Clicking <
OK
> once more will cause your selection to be
saved - the “Happy tune” will sound and the number and
name of the presently selected memory location will be
re-displayed. Click <
NEXT
> or <
BACK
> to select
another memory location.
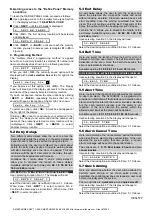
5.2 Entry Delays
Two different entry delays allow the user to enter the
protected site (while the system is in the armed state) via
2 specific doors and routes without causing an alarm.
Following entry, the user must disarm the control panel
before the entry delay expires. Slow-rate warning beeps
will start sounding once the door is opened. This will
continue until the last 10 seconds of the delay, through-
out which the beeping rate will increase.
Locations No. 1 (entry delay 1) and 2 (entry delay 2)
allow you to program the length of these delays.
Available options for each delay are:
00
,
15
,
30
,
45
,
60
,
180
and
240
seconds.
In UL installations, these delays must be 45 s max.
Upon selecting Location No. 01,
The display will read:
0 1 : E N T R Y D E L A Y 1
select the desired option as outlined in Para. 5.1 C above.
When done, Click <
NEXT
> to select Location No. 2.
Continue the same way as in location 1. When done, Click
<
NEXT
> to select Location 3.
5.3 Exit Delay
An exit delay allows the user to arm the system and
leave the protected site via specific routes and doors
without causing an alarm. Slow-rate warning beeps will
start sounding once the arming command has been
given. This will continue until the last 10 seconds of the
delay, throughout which the beeping rate will increase.
Location No. 3 allows you to program the length of the
exit delay. Available options are:
30
,
60
,
90
,
120
,
180
and
240
seconds.
Upon selecting Location 03, the display will read:
0 3 : E X I T D E L A Y
Select the desired option as outlined in Para. 5.1 C above.
5.4 Bell Time
Here you select the length of time the bell (or siren) is
allowed to function upon alarm. The bell time starts upon
activation of the siren. Once the bell time expires, the
siren is automatically shut down.
Available options:
01
,
04
,
08
,
10
,
15
and
20
minutes.
In
UL
installations, set bell time to 4 minutes minimum.
Upon selecting Location 04, the display will change to:
0 4 : B E L L T I M E
Select the desired option as outlined in Para. 5.1 C above.
5.5 Abort Time
Here you select the length of time allowed by the system
to abort an alarm. The
SECURELINC
is programmed to
provide an “abort interval” that starts upon detection of an
alarm. During this interval, the buzzer sounds a warning
but the siren remains inactive and the alarm is not
reported. If the user disarms the system within the
allowed abort interval, the alarm will be aborted.
Available options:
00
,
15
,
30
,
45
,
60
,
180
,
240
seconds.
Upon selecting Location 05, the display will change to:
0 5 : A B O R T T I M E
Select the desired option as outlined in Para. 5.1 C above.
5.6 Alarm Cancel Time
Here you determine the ”cancel alarm” period that starts
upon reporting an alarm to the central station. If the user
disarms the system within that time period, a “cancel
alarm” message will be sent to the central station.
The options are:
1
,
5, 15, 60 minutes
,
4 hours
and also
cancel inactive
.
Upon selecting Location 06, the display will change to:
0 6 : A L A R M C A N C E L
Select the desired option as outlined in Para. 5.1 C above.
5.7 Quick Arming
Here you determine whether the user will be allowed to
perform quick arming or not. Once quick arming is
permitted, the control panel does not request a user code
before it actually arms the system.
The two options are:
quick arm on
and
quick arm off.
Upon selecting Location 07, the display will change to:
0 7 : Q U I C K A R M
Select the desired option as outlined in Para. 5.1 C above.
SMARTHOME.COM™ 1-800-SMART-HOME 949-221-9200 http://www.smarthome.com Order #73902


