background image

VISITE WWW.SMART-POND.COM PARA INFORMACIÓN DEL PRODUCTO Y CONSEJOS.

SP

POR FAVOR LLAME ATENCIÓN AL CLIENTE ANTES DE DEVOLVER EL ARTÍCULO A LOWE’S: 1-888-755-4497

11

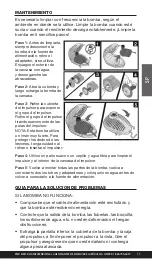
MANTENIMIENTO

Es necesario limpiar con frecuencia la bomba, según el 
ambiente en donde se la utilice. Limpie la bomba cuando esté 
sucia o cuando el rendimiento decaiga notablemente. ¡Limpie la 
bomba en 5 sencillos pasos!

Paso 1

: Antes de limpiarla, 

siempre desconecte la 
bomba de la fuente de 
alimentación. retire el 
adaptador, si se utiliza. 
Enjuague el exterior de 
la carcasa con agua, 
y desenganche las 
abrazaderas.

Paso 2

: Abra la cubierta y 

luego extraiga la bomba de 
la carcasa.

Paso 3

: Retire la cubierta 

del impulsor para exponer 
el grupo del impulsor. 
Retire el grupo del impulsor 
tirando suavemente de las 
palas del impulsor. 
NOTA: Esta bomba utiliza 
un imán muy fuerte. Para 

proteger los dedos de las 

lesiones, tenga cuidado al 

retirar o insertar el impulsor.

Paso 5

: Vuelva a montar todas las partes de la bomba, vuelva a 

conectar todos los tubos y adaptadores y colóquelo en agua antes de 
volver a conectarlo a la fuente de alimentación.

Paso 4

: Utilice un paño suave o un cepillo y agua tibia para limpiar el 

impulsor y el interior de la carcasa del impulsor.

GUIA PARA LA SOLUCION DE PROBLEMAS

SI LA BOMBA NO FUNCIONA:
•   Compruebe que el cable de alimentación esté enchufado y  

  que la bomba esté recibiendo energía.

•   Controle que la salida de la bomba, las tuberías, las boquilla,  

  los surtidores de agua, etc. no estén deformados ni tengan  
  obstrucciones.

•   Extraiga la pantalla interior, la cubierta de la bomba y la caja  

  del propulsor, a fin de poner el propulsor a la vista. Gire el  
  propulsor y asegúrese de que no esté dañado ni contenga  
  alguna pieza atascada.

Summary of Contents for PWP2000

Page 1: ...00 PWP3600 PWP5100 Thank you for choosing smartpond BEFORE RETURNING TO LOWE S Contact Customer Care 1 888 755 4497 Gracias por elegir smartpond ANTES DE DEVOLVER A LOWE S Contacte Atención al Cliente 1 888 755 4497 ...

Page 2: ...nce 4 5 Troubleshooting and Replacement Parts 5 Limited Warranty 6 7 English Atención de cliente 7 Advertencias y precauciones 8 Contenido del paquete 9 Preparación 9 Instrucciones de funcionamiento 9 10 Rendimiento de la bomba 10 Mantenimiento 11 Solución de problemas y piezas de repuesto 11 12 Garantía limitada 12 13 Español TABLA DE CONTENIDO ...

Page 3: ...d beautiful finish to your water feature the the Waterfall Foam Sealant Model WFFS WFFS WARNINGS AND CAUTIONS IMPORTANT SAFETY INFORMATION Please read these instructions carefully prior to starting up the unit The water system on which the operation of this product is based requires utmost care and maintenance possibly also the use of chemicals in order to prevent and keep the occurrence of micro ...

Page 4: ...Pump must be completely submerged for proper operation and cooling Operate in freshwater only Avoid heavily chlorinated water and water with high pH levels Do not lift the pump by its power cord It is the responsibility of the owner of the water system and its attendant units to ensure their maintenance and care in compliance with the laws directives and instructions laid down for this purpose In ...

Page 5: ...ggested for your pump skip to step 2 Step 1 If using the largest tubing size recommended for your pump trim the tubing adapter using a hacksaw at the location indicated Step 2 Connect the adapter to the pump and connect the tubing to the adapter NOTE Tubing is not included Step 3 Place the pump into the water and connect to a properly grounded electrical outlet 3 1 2 PUMP PERFORMANCE PWP2000 Pump ...

Page 6: ...320 4 1 980 3 160 4 480 3 2 060 3 280 4 660 2 2 130 3 430 4 830 1 2 200 3 560 5 000 0 2 300 3 700 5 150 PWP2000 PWP3600 PWP5100 PUMPS Regular cleaning of the pump may be necessary depending upon the environment in which it is operated Clean the pump when it is visibly soiled or when a drop in performance is detected Clean your pump in 5 easy steps See P 10 for metric data Step 1 Before cleaning al...

Page 7: ... cord is plugged in and the pump is getting power Check the pump outlet and any tubing nozzles spitters etc for kinks or obstructions Unlatch the clamps open cover then bring the pump out Remove the impeller housing to expose the impeller Turn the impeller to ensure that it is not broken or jammed Also check to make sure that the ceramic shaft or bearings are not broken IF THE PERFORMANCE OF THE P...

Page 8: ...ctive part s freight pre paid along with proof of purchase DISPOSITION The manufacturer will make a good faith effort for prompt disposition regarding all warranty claims Returned product will be inspected to determine cause of failure before warranty is applied Warranty does not cover any costs associated with the shipping handling installation or removal of products or parts subject to this warr...

Page 9: ...o them Before using the buyer and user shall determine the suitability of the product for the intended use and assume all risk and liability whatsoever in connection therewith The warranty and remedy described in this limited warranty is an exclusive warranty and remedy in lieu of any other warranty or remedy expressed or implied All other warranties and remedies are hereby expressly excluded incl...

Page 10: ...del mantenimiento y cuidado así como todas las pruebas de agua que se ejecutaron en relación con los efectos de fuente Sólo el propietario es el único responsable de la seguridad de los efectos de fuente GeoGlobal Partners no tiene ninguna influencia en el uso o el mantenimiento de los equipos vendidos y el sistema De GeoGlobal Partners sólo se puede reclamar la responsabilidad de los errores de f...

Page 11: ...te ensamblar ni utilizar el producto Póngase en contacto con el servicio al cliente para obtener las piezas de reemplazo Tiempo calculado para el ensamblaje 5 minutos Herramientas necesitan para el ensamblaje sierra para metales INSTRUCCIONES DE FUNCIONAMIENTO Cut ring Adapter before cut Adapter after cut Para un flujo máximo de agua se recomienda utilizar el tamaño de tubería más grande recomenda...

Page 12: ...H en 0 3m de altura Altura máxima de bombeo 6 4m 0 LPH Consumo de fuerza 170 vatios 1 8 amperios Especificaciones de bomba Flujo máximo 18 925 LPH en 0 3m de altura Altura máxima de bombeo 7m 0 LPH Consumo de fuerza 230 vatios 2 5 amperios Mejor zona de operatión FLUJO LPH ALTURA metros 5 5 1 211 2 574 6 359 5 2 1 817 3 445 7 419 4 9 2 385 4 353 8 555 4 6 2 953 5 223 9 653 4 3 3 558 6 057 10 486 4...

Page 13: ... NOTA Esta bomba utiliza un imán muy fuerte Para proteger los dedos de las lesiones tenga cuidado al retirar o insertar el impulsor Paso 5 Vuelva a montar todas las partes de la bomba vuelva a conectar todos los tubos y adaptadores y colóquelo en agua antes de volver a conectarlo a la fuente de alimentación Paso 4 Utilice un paño suave o un cepillo y agua tibia para limpiar el impulsor y el interi...

Page 14: ...ame a Atención al Cliente 1 888 755 4497 www smart pond com replacement parts Lunes a viernes 8am 6pm HORA DEL ESTE GARANTÍA DE 5 AÑOS 3 AÑOS 2 AÑOS ADICIONAL PARA INSCRIPCIÓN EN LÍNEA Esta bomba de calidad viene con una garantía de 3 años Al registrarse en línea smartpond agrega 2 años adicional a la garantía www smart pond com register Para registrar use el número de serie de 14 dígitos ubicado ...

Page 15: ...porciona al comprador y al usuario derechos legales específicos Además el comprador y el usuario pueden tener otros derechos que varían según cada estado Algunos estados no permiten la exclusión o la limitación de los daños imprevistos o derivados por lo tanto es posible que las limitaciones o las exclusiones antes mencionadas no se apliquen GARANTÍA LIMITADA Todas smartpond productos eléctricos s...

Page 16: ...stered trademark of GeoGlobal Partners LLC smartpond Need help Call Customer Care at 1 888 755 4497 US or visit www smart pond com Show us your ponds and projects Share with us Use smartpondProject for a chance to be featured by smartpond 09 17 ...

Reviews: