Note:
The mounting hardware is sold separately. See page X for available kit options.
Setup and Positioning
• Allow the collectors to lay in the sun for 30 minutes to relax the material and
flatten the panels.
• Ensure there is at least 1’ around all sides of the collector(s) for adequate space for
connectors and plumbing.
• Install the collectors on a slight angle toward and end cap for draining and
winterization.
• The panels can be placed on either side of a roof vent up to 3” in diameter.
• Ensure the collectors will have at least 6 hours of direct sun exposure.
Installation
Note:
Below instructions are for mounting purposes only. For full collector
installation, please see the appropriate system layout provided in this manual.
1) Once positioning is established, locate the manufactured slots in the collector (5
slots in a 20’ collector).
2) Place the bracket in place and pre-drill a 1/8” pilot hole
for the screw.
3) Insert the screw using a Phillips head screwdriver to hold
the bracket in place (as shown).
Important
: If installing on a roof, use a silicone sealant to prevent water leakage
into structure. Apply adequate amounts of
sealant to both the pre-drilled hole and over the screw head once installed.
4) Install a bracket on the bottom side of the panel
(as shown), ensuring that the bottom bracket is in line
with the top bracket.
Note:
(15) brackets are provided with each kit, which will
support up to (2) 2’x20’ collectors. (10) brackets are used
for the top end of each 2’ panel and (5) are used for the
bottom of the second 2’ collector.
5) Once all brackets are installed, use the provided strapping to hold the collectors in
place. Tie a knot in the top bracket and feed the strap through the middle bracket
before tying the strap the bottom bracket (as shown).
www.smartpool.com
6
ROOF/RACK/FENCE INSTALLATION
R
E
TUR
N
F
R
O
M SO
LAR
FEED TO SOLAR
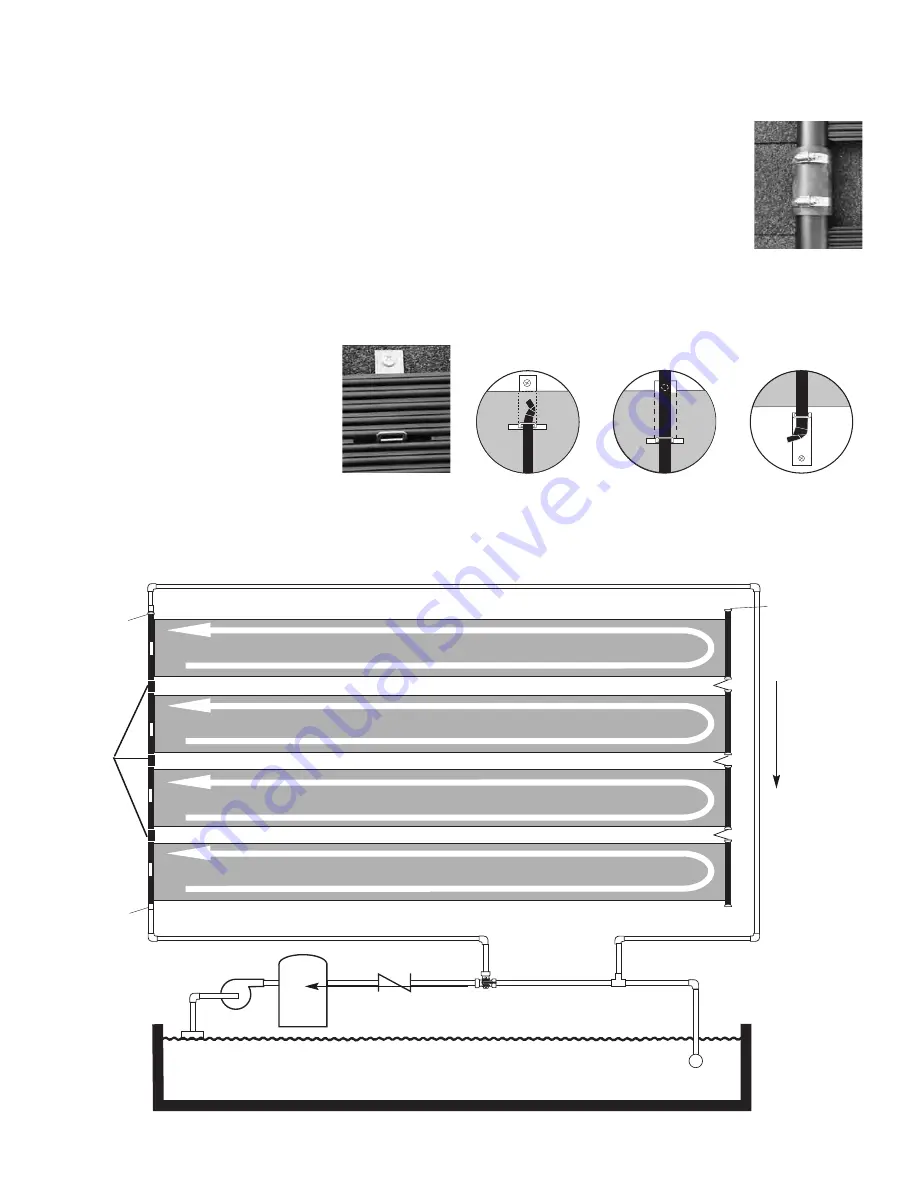
Cool Water Feed
Warm Water Return
Filter
Check Valve
Diverter Valve
Pipe
Adapter
Bla
ck R
ub
be
r Conne
ctor
H
ose
Vacuum Relief
End Cap
End Cap
Pump
End Cap
End Cap
Pipe
Adapter
HARD PLUMB SYSTEM LAYOUT
Note:
The SK22 (not included) is required for the following installation. See page 7 for available kit options.


