background image


Page 12 of 32 

Chapter 4: RPM Environment Control Management 

4.1 Introduction 

After you have setup the hardware and set an IP address for RPM, you will then be able to 
go to RPM web site to monitor and control the devices.  All you have to do is enter the new 
IP address into any standard web browser. 

 
1.  Start the Web Brower (Netscape or Internet Explore) 
 
2.  Enter the RPM IP Address that was set earlier using Netility (e.g. 211.21.67.51) and 

press [ENTER] 


Enter RPM IP address 

 
3.  A login screen will appear, press [ENTER]. By default the username and password is 

left blank. 


RPM Login screen 


4.2 Environmental Control Management 

The RPM webpage main menu is divided into two sections.  The selections menu on the left 
and display menu on the right.  The selection menu consists of the following options: 
 

™

 Information 

™

 Configuration 

™

 Log 

Information 

™

 Device 

Selection 

 
When using RPM for the first time, you must first set the necessary parameters in the 
“Configuration” menu. This will ensure that the RPM will work properly. 

Summary of Contents for Distribution Unit

Page 1: ...User s Manual Version 04 12 Smart Power Distribution Unit Remote Power Manager RPM Copyright Smart Power Systems All rights reserved Reproduction without permission is prohibited ...

Page 2: ...2 3 Download Firmware 10 3 2 4 About 11 3 2 5 Refresh 11 Chapter 4 RPM Environment Control Management 12 4 1 Introduction 12 4 2 Environmental Control Management 12 4 2 1 Information 13 4 2 2 Configuration 14 4 2 3 Log Information 24 Chapter 5 Connected Device 25 5 1 Environment Monitor ENV 25 Chapter 6 Remote Monitoring Using Telnet 26 6 1 Accessing RPM using Telnet 26 6 2 Control and Setup RPM u...

Page 3: ... superiority of the RPM over other power management products is RPM gives you control through a telephone tone signals with no need of a modem connection So even if networks lock up or Internet crashes there is always a back up telephone control option for administrators to control devices With such powerful features administrators can be sure that they will always gain access to their devices no ...

Page 4: ... events log list to server Daisy Chain expandable up to 16 units Available in 115VAC 230VAC models When events occur RPM can notify user by email and trap according to the pre set conditions Allows users to configure the sequence in which power is turned on or off for each outlet This helps avoid in rushes at start up which can cause overloaded circuits and dropped loads Sequencing also allows use...

Page 5: ... the middle of a U slot 5 Align the mounting holes of brackets with the notched hole on the vertical rail and attach with the retaining screws 6 If installing more than one RPM repeat process 3 5 7 Connect all input and output connectors Refer to section 5 0 for daisy chain configuration 8 Connect Ethernet cable to RPM 9 Program the IP address using Netility Refer to section 6 0 for IP configurati...

Page 6: ... Windows 2000 Control Panel by clicking on Start Setting Control Panel 2 Double click on the Control Panel s Administrative Tools icon 3 Double click the Services icon 4 Double click on the Uninterruptible Power Supply service ...

Page 7: ...iate account information and then click OK 6 Double click on the Control Panel s Power Options icon 7 Select the UPS page and then click on Select 8 Choose the correct manufacturer from the Select manufacturer pull down list choose the correct COM port and then click on Next ...

Page 8: ...nt Card be installed Follow the procedure below to Daisy Chain the RPMs Figure 1 First RPM 1 Make sure that the Terminator is plugged into the first RPM s iLink port see Figure 1 2 Plug the first RPM s power cord into utility power 3 Turn the master power switch on 4 Setup the RPM see Setup Procedure page 9 5 Configure the first RPM s ID number each RPM must have it s own unique ID the default ID ...

Page 9: ...second and third RPM together with the iLink cable 16 Plug the third RPM s power cord into utility power 17 Turn the master power switch on 18 Configure the third RPM s ID number each RPM must have it s own unique ID the default ID is 0 19 If there are only three RPMs required for this application then this completes the Daisy Chaining procedure and the RPMs are ready for use 20 If your applicatio...

Page 10: ...are and IP addresses of all RPM connected to the LAN are displayed on the right Netility Main Menu 3 2 1 NetWork Selection Once Netility starts up it will automatically search for the computer s Network card If not click on Network Selection on the main menu to start the search A pop up window will show the available Network Adapter Next select the Network Adapter which is connected to the interne...

Page 11: ...dress When using RPM for the first time the IP address subnet mask and gateway will have to be set Enter the IP Address of your choice Netility Set an IP Address for RPM Address Configuration Once the IP address is set you will be able to connect to the RPM webpage from a standard browser Obtain an IP address by DHCP or BOOTP the IP address Subnet Mask and Gateway is acquired directly from the sys...

Page 12: ...number 80 for HTTP and 23 for Telnet Function If set to other port values the full IP Address must be entered in order to Telnet or access the Website For example a Set a value of 81 as the HTTP port number then http 192 168 0 177 81 must be typed as the web address in order to access the RPM website b Set a value of 24 as Telnet port number then 192 168 0 177 24 must be typed at Telnet in order t...

Page 13: ...irmware to avoid complete data loss Repeat the above firmware upgrade procedure if your upgrade process was interrupted 3 2 4 About This section displays the current Netility version Netility version examined 3 2 5 Refresh Netility automatically search for any RPM connected to the LAN However the user can do a manual search by click the Refresh icon ...

Page 14: ... using Netility e g 211 21 67 51 and press ENTER Enter RPM IP address 3 A login screen will appear press ENTER By default the username and password is left blank RPM Login screen 4 2 Environmental Control Management The RPM webpage main menu is divided into two sections The selections menu on the left and display menu on the right The selection menu consists of the following options Information Co...

Page 15: ... the information 1 System Status This section shows you the System Information and Network Status such as the Firmware Version the system name uptime IP Address Gateway PPP Server Login IP and the like These values are either provided by RPM i e MAC address or set by user 2 RPM Status This section gives you remote control over the RPM unit and its individual devices Click on the individual power i...

Page 16: ...PM Status Menu 4 2 2 Configuration Please ensure that each of the following option is set correctly Otherwise RPM may not work properly Network SNMP Email PPP Web Telnet System Time RPM Setting RPM Schedule 1 Network ...

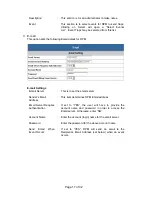
Page 17: ...IP This section is to set SNMPIV secondary DNS Server IP address SNMPIV will use the secondary DNS Server IP address when the Primary DNS Server IP address is not working Ethernet Connection Type This item sets the communication speed between SNMPIV and the Network If you change the Connection Type settings SNMPIV will reboot 2 SNMP This page is to configure the SNMP settings so that the RPM can b...

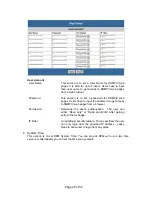
Page 18: ...ess for banning restricting access from certain IP Address Description This section is for an administrator to make notes Trap Notification Receiver IP Address This section is to set receivers IP address for receiving traps sent by RPM It is valid for up to 8 IP Addresses Community This section is to set a Community name for NMS The community name has to be as the same as the setting in NMS Severi...

Page 19: ...l Server This is to set the email server Sender s Email Address This item determines RPM Email address Email Server Requires Authentication If set to YES the user will have to provide the account name and password in order to access the Email server Otherwise enter NO Account Name Enter the account login name for the email server Password Enter the password for the above account name Send Email Wh...

Page 20: ...g The user can determine which 8 email addresses will receive warning email when an event occurs Event Selection This section determines the type of event Click on Select to open the Select Events List and choose the appropriate event for the respective email accounts Event Selection List ...

Page 21: ...This section determines the modem dial in settings for RPM PPP Dial in Login Name Determine the username of visitors who can log in Login Password Set a password for the visitor s account PPP Server IP Default set at 10 0 0 1 Login IP Default set at 10 0 0 2 Modem Script Default Standard modem script 5 Web Telnet This section is to set the Web Telnet options for RPM Once set a user will have to en...

Page 22: ... password to get access to SNMPIV web pages from a browser Permission Determine the user s authorization The user can either Read only or Read and Write after gaining entry to the webpage IP Filter An additional security feature Once specified the user can only login from the specified IP address Leave blank to allow user to login from any place 6 System Time This section is to set RPM System Time...

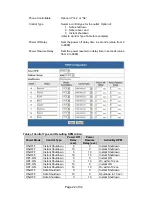
Page 23: ...s section is to set RPM System Time manually The format is pre determined to mm dd yyyy hh mm ss 7 RPM Settings This section determines the setting to the individual device connected to RPM Select RPM Select the RPM that is currently connected and switched on Address Change Use this to assign a new number or change the currently assigned number for the RPM unit You have a choice of 00 to 16 Note Y...

Page 24: ...e and Resulting RPM Action Power Mode Control Type Power Off Delay sec Power Resume Delay sec Action By RPM ON OFF Instant Shutdown 0 0 Instant Shutdown ON OFF Instant Shutdown 10 0 Instant Shutdown ON OFF Instant Shutdown 0 10 Instant Shutdown ON OFF Instant Shutdown 10 10 Instant Shutdown OFF ON Instant Shutdown 0 0 Instant ON OFF ON Instant Shutdown 0 10 On within 10 sec OFF ON Instant Shutdown...

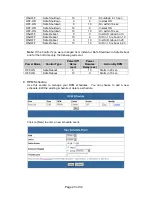
Page 25: ...eboot in 20 ON OFF Safe Reboot 10 10 S D in 10 reboot in 20 Note If the Control Type were changed from Instant or Safe Shutdown to Safe Reboot and for the first time only the following will occur Power Mode Control Type Power Off Delay sec Power Resume Delay sec Action By RPM OFF ON Safe Reboot 0 10 Starts in 20 sec OFF ON Safe Reboot 10 0 Starts in 10 sec 8 RPM Schedule Use this section to manage...

Page 26: ...ng new events RPM Events List RPM Communication Lost Outlet On Outlet Off Outlet Reboot Outlet Fault ENV Events List Environmental Temperature Overrun Environmental Temperature Underrun Environmental Humidity Overrun Environmental Humidity Underrun Data Log This page is a UPS data log It shows a record of all data log in certain interval time it includes Date Time Input Volt Output Volt Freq Loadi...

Page 27: ...the interval 2 5 10 30 seconds or 1 minute at which the status is refreshed DiDo01 Status will show the Security sensor status and Smoke01 Status will show Smoke sensor status if these are connected You can connect to another 7 sensors and their status will be indicated on MiMo01 to MiMo07 2 ENV Settings This section sets the lower and upper limits for Humidity and Temperature If the temperature o...

Page 28: ...on and have assigned an IP to the RPM you will be able to use Telnet to monitor and control the RPM To access RPM using the telnet option follow these steps 1 Select Start from Windows click Run to key in RPM s IP Address 2 Double click on the Control Panel s Administrative Tools icon 3 Successful link up display For first time login only press Enter for User Name and Password 4 Main screen is as ...

Page 29: ... RPM the IP address of the PC must be added in this list Note The configuration of Set SNMP Trap Receiver is only used for SNMP Network Manager 5 Set UPS Properties Choose only RPM Note Other functions are not available for RPM 6 Set UPS Devices Connected This allows you to setup the System Name Rating in and shows if the device is connected or not 7 Set System Time Time Server This allows you to ...

Page 30: ...tput receptacle is programmed for remote control The momentary switch is active and the receptacle may be turned on or off by pressing and releasing the switch Pressing and holding the momentary switch for three seconds will change the state from remote to local control RED The receptacle is on and providing power to devices The receptacle is off and doesn t provide power The receptacle has intern...

Page 31: ...ff Solid Off Solid On Power ON Flashing Solid On Solid On System initial Solid On Solid Off Solid On Normal Operation Solid On Flashing Solid On No Connection to UPS Flashing Flashing Solid On Writing data to flash memory Green Light Power state Red Light Connection state with UPS ...

Page 32: ...bout 166 hours or 6 94 days 6 Use the key to cancel a command at any time 7 The RPM will acknowledge the receipt of the commands by issuing 2 short beeps A long beep indicates a failure or a non recognizable command 8 To change the password The default password is 123456789 The user has to enter the previous password in order to change their password i NOTE The Password has to have a minimum of 7 ...

Page 33: ... port off 18 0191 to turn every port on 19 0192 to reset every port with a delay of 8 minutes which will allow safe shutdowns The delay can be changed by command 888911XXXX where XXXX can range from 1 to 9999 minutes 20 The user enters 000 that can force to break connection with RPM ...

Page 34: ...erver cable on the RPM and the NT server is properly secured All the LEDs are off and all of the output receptacles are dead 1 Turn the master power switch ON 2 Reset the AC circuit breaker The RPM will not communicate and all of the LEDs on the web card are ON There has been a collision of the packets The RPM needs to be reset Turn the RPM off and wait for approximately one minute then turn it ba...

Reviews: