background image

1. Technical Characteristics

Motor: 24VDC motor with mechanical release
Gear type: Worm gear
Max absorbed power: 144W
Peak thrust: 3500N
Nominal thrust: 3000N
Stroke length: 300mm
Power supply: 24VDC
Nominal input power: 2A
Maximum operating current: 5.5A for maximum 10 seconds
Maximum gate weight: 300kg per leaf
Maximum gate length: 3meters
Duty cycle: 20%

2. Product Description and Applications
2.1 Applications

This model is applied for residential automation of single or dual leaf gate. It has to be operated
with electricity and it’s forbidden to be operated by back-up batteries for normal use. Back up
batteries are only allowed for emergent operation when there is a power failure, and the gear
motors can be released by special keys to move the gate manually.

2.2 Description of the Automation

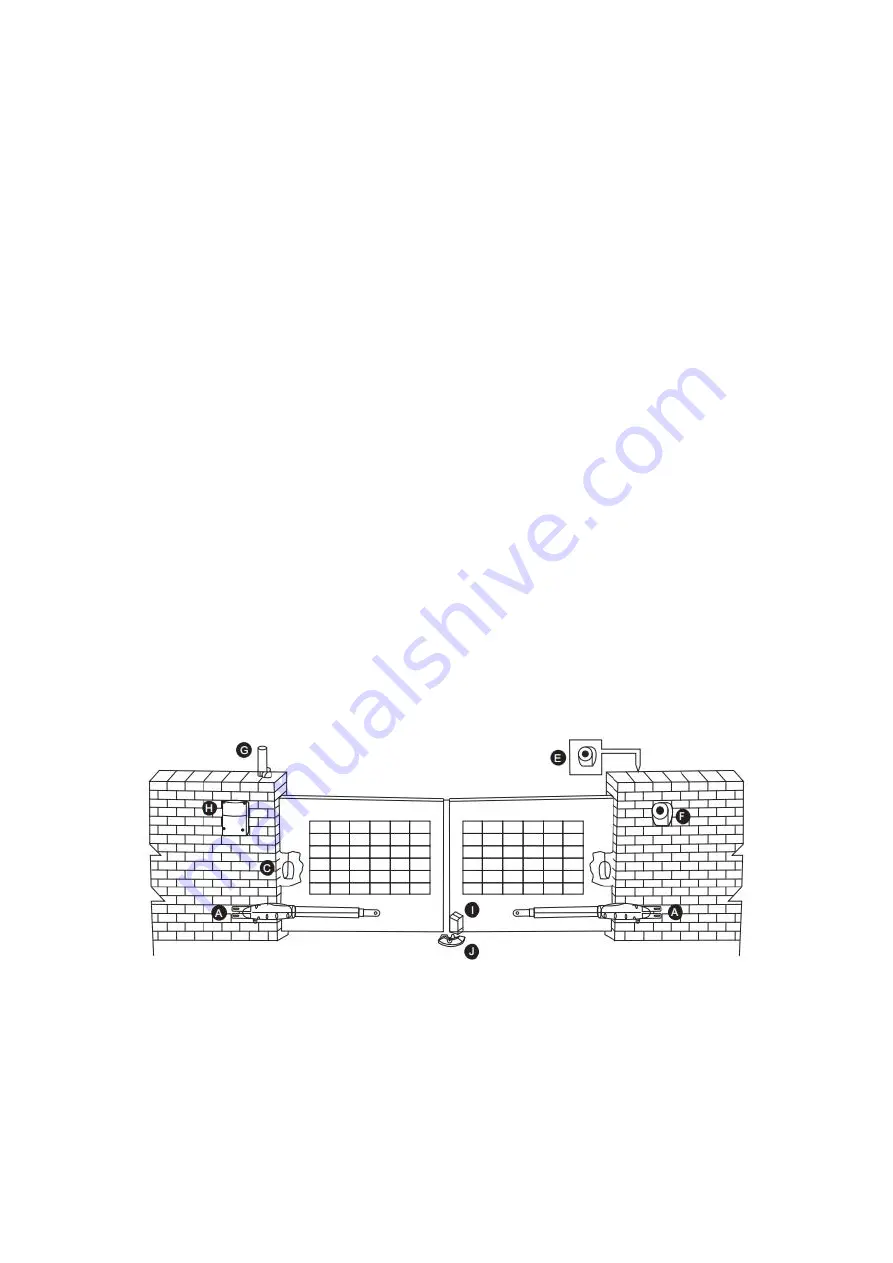
The following diagram of typical installation describes some terms and accessories of a gate
automation system.

3. Motors, Components and Its Installation in Illustraion

The isntallation procedure maybe changed due to various accessories and quantities installed. The
basic wiring diagram is shown in below photo.

Summary of Contents for SP-SWG-ARM-350

Page 1: ...for the application Do not let children operate or play with the gate automated system Do not cross the path of the gate automated system when operating Please keep all the control devices and any other pulse generator away from children to avoid the gate automated system being activated accidentally Do not make any modifications to any components except that it is mentioned in this manual Do not ...

Page 2: ...ion of single or dual leaf gate It has to be operated with electricity and it s forbidden to be operated by back up batteries for normal use Back up batteries are only allowed for emergent operation when there is a power failure and the gear motors can be released by special keys to move the gate manually 2 2 Description of the Automation The following diagram of typical installation describes som...

Page 3: ...e going installtion or maintenance 4 Installation 4 1 Preparation for Motor Installation The gate motor is not applicable to a gate which is ineffcient or unsafe neither to solve the defects due to incorrect installation nor poor maintenance Check the following items before going for installtion 1 Make sure the weight and dimension of the gate conform to the operation range of the gate motor Don t...

Page 4: ...he two ends of receiving and transmitting corresponded to each other 7 Check the dimensions of the motors as below 8 Make sure to leave enough space when the gate is opening 4 2 If the gate is OPENED OUTWARD please leave at least 70mm between the post brackets and the gate ...

Page 5: ...the gate easily 3 A C D 4 The value of B can be calculated from the value of A and the leaves opening angle Ex If A 160mm with the leaves opening angle of 100 degrees then the value of B is approximate 190mm NOTE Please make sure B and A are similar or the same in value that the leaves can be operated smoothly Also to reduce the burden of the motor ...

Page 6: ...he back cover of the motor as shown in photo 6 Place the leaves in the closed position Figure 18 Figure 19 Figure20 7 Refer to the distance of B in figure 17 place the rear plate in the coorect position on the mounting surface Inspect if the distance is proper as shown in Figure 23 i e the position the front plate of the motor to be installed 8 Place two post brackets on the surface to be installe...

Page 7: ...12 Lift up the motor and insert the screws into the front plate 13 Open the gear motor cover and release the screws then take out the bolt as below Figure 25 Lift the motor overhead and push the gate to the end until the screw holes of the motor end matches the holes on the rear plate as shown in Figure 25 1 and fasten the motor to the rear plate with bolt and screw as shown in Figure 25 2 ...

Page 8: ... Fully tighten the screw 16 Connect the motor power cable as shown in Figure 27 17 Close the gear motor cover by tightening the two screws as shown in Figure 28 Figure 27 Figure 28 18 Gear Motor Release A Turn the round plate on the release part to OPEN position See Figure 29 B Push out the release part to the end See Figure 30 C Use the release key to turn the pin ani clockwise to the end See Fig...

Page 9: ...Figure29 Figure30 Figure31 Gear motor release fork series ...

Reviews: