


SMARTRG INC. PROPRIETARY AND CONFIDENTIAL. ALL RIGHTS RESERVED. COPYRIGHT © 2016
5
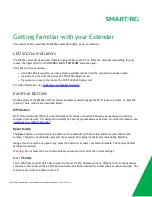
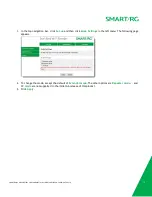
Getting Familiar with your Extender
This section briefly describes the WE65ac extender's lights, ports, and buttons.
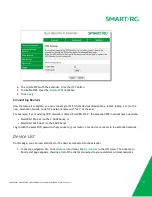
LED Status Indicators
The WE65ac extender has several indicator lights (LEDs) on the front. When the extender is searching for your
router, the lights scroll from
TOO FAR
to
OK
to
TOO CLOSE
and back again.
The LEDs function as follows:
l
If the OK LED glows white, you have found a suitable location and the connection has been made.
l
If you are
too far
from the router, the TOO FAR LED glows red.
l
If you are
too close
to the router, the TOO CLOSE LED glows red.
For more information, see
"Installing your WE65ac Extender"
.
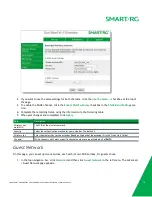
External Buttons
On the bottom of the WE65ac Wi-Fi extender are buttons used to toggle the Wi-Fi radio on and off, or reset the
product. These controls are described below.
WPS Button
Wi-Fi Protected Setup™ (WPS) is a standard means for secure connection between your gateway and various
wireless client devices. It is designed to simplify the pairing process between devices. For more information, see
"Installing your WE65ac Extender"
.
Reset Button
The
Reset
button is a small hole in the bottom of the extender with the actual button mounted behind the
surface. This style of push-button prevents the extender from being inadvertently reset during handling.
Using a thin wire (such as a paper clip), press the button for at least 1 second and release. The factory default
settings are restored.
Warning:
Do not press the
Reset
button unless you want to clear
all
of the current settings.
2.4 - 5 Slider
The
2.4-5
slider controls which band is used to connect to the wireless network. When set to
2.4
, the extender
connects to the router on the 2.4GHz band and extends a 5GHz network for clients (devices such as laptops). The
reverse is true when the slider is set to
5
.


