background image

APPENDIX A

USING THE SMART KAPP APP

50

smarttech.com/kb/171166

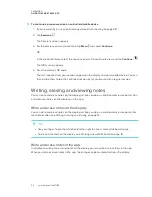
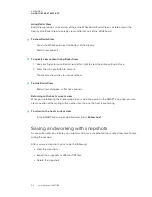
To continue a previous session on an Android mobile device

1. If you’re currently in a session, disconnect (see

Disconnecting

on page 48).

2. Tap

Sessions

.

The

Sessions

screen appears.

3. For the session you want to continue, tap

Menu

and select

Continue

.

OR

In the snapshot library, select the session you want to continue to view and tap

Continue

.

The QR scanner appears.

4. Scan the display’s QR code.

The last snapshot from your session appears on the display and your mobile device. You can

then invite others to join the continued session just as you would with a regular session.

Writing, erasing and viewing notes

You can write and erase notes on the display just like you do on a traditional dry-erase board. You

can view your notes on the display or in the app.

Write and erase notes on the display

You can write and erase notes on the display just like you do on a traditional dry-erase board. For

more information, see

Writing, drawing and erasing

on page 12.

TIPS

l

Use your finger to pan the whiteboard left or right to access more whiteboard space.

l

To erase all content on the display, see

Starting a new Whiteboard

on page 19.

Write and erase notes in the app

In addition to writing and erasing notes on the display, you can write or erase them in the app.

When you write or erase notes in the app, the changes appear automatically on the display.

Summary of Contents for SPNL-6265-V2

Page 1: ...smarttech com docfeedback 171166 SMART Board 6000 series with iQ interactive displays USER S GUIDE FOR MODELS SPNL 6265 V2 AND SPNL 6275...

Page 2: ...ft Corporation in the United States and or other countries Apple Mac OS X iPhone iPad iPod touch AirPlay and Safari are trademarks of Apple Inc registered in the U S and other countries Google Google...

Page 3: ...they could touch dangerous voltage points and cause electric shock fire or product damage which may not be covered by the warranty l Do not place heavy objects on the power cable Damage to the cable c...

Page 4: ...etoxil tot tartalmaz ragaszt t haszn lnak Ez az anyag az 1907 2006 EKREACH rendelet rtelm ben k l n s aggodalomra okot ad Le penne diquesto prodotto utilizzano un adesivo contenente etossilato dinonil...

Page 5: ...located or operating in conjunction with any other antenna or transmitter 5 15 5 25 GHz frequency band operation is restricted to indoor use only Outdoor operations in the 5150 5250 MHz are prohibite...

Page 6: ...e gain maximald antenne permis pour les dispositifs utilisant la bande 5 725 5 825 MHz doit se conformer la limite de p i r e sp cifi e pour l exploitation point point et non point point selon le cas...

Page 7: ...put 9 Interacting with content 11 Writing drawing and erasing 12 Adjusting audio 13 Freezing the screen 13 Chapter 3 Using apps on the display 15 Using the launcher 16 Using the Whiteboard 17 Using Le...

Page 8: ...66 Appendix A Using the SMART kapp app 45 Installing the app and starting it for the first time 45 Connecting and disconnecting the app 47 Writing erasing and viewing notes 50 Saving and working with...

Page 9: ...display with iQ This guide is intended for individuals who use displays in their organizations Other documentation and resources are available for those who install and maintain displays see More inf...

Page 10: ...t least four simultaneous touches enables you and other users to interact with objects on the screen at the same time Writing and drawing support You can write over any application in digital ink usin...

Page 11: ...75 see the SMART Board 6000 series interactive display pages in the Support section of the SMART website Components The display consists of the following components No Name More information Pictured 1...

Page 12: ...cm 16 9 Cameras in the corners of the screen track finger and pen positions across the display The screen is surrounded by a channel that contains reflective tape CAUTION l Keep the reflective tape dr...

Page 13: ...tons No Name Procedure 1 Standby l Press to enter or exit Standby mode l Press and hold to reset the display 2 Input Select Press to switch inputs 3 Mute l Press to mute or unmute the volume l Press a...

Page 14: ...sence detection sensor l If Wake to Touch is enabled touch the screen Flashing amber No USB connection from the connected computer l Verify the connections to the computer l Switch to the computer s i...

Page 15: ...ll mount installation instructions smarttech com kb 170599 If the wall can t support the display s weight you can use the SMART wall stand model WS SBID 500 along with the SMART wall mount to transfer...

Page 16: ...stallation instructions smarttech com kb 171145 SMART Board 6075 interactive display with iQ Specifications smarttech com kb 171143 Installation instructions smarttech com kb 171155 iQ appliance Speci...

Page 17: ...nsor can detect people up to 16 5 m away when the display is in Standby mode When the sensor detects people the display turns on Touching the screen activates the display The display returns to Standb...

Page 18: ...connected to the iQ appliance see Using Input on page 26 l The display comes with a license of SMART Learning Suite which might be installed on the room computer or on guest laptops SMART Learning Sui...

Page 19: ...nteracting with content By touching the display s surface you can do everything on the display that you can do at your computer You can also use an array of gestures within applications NOTE Not all g...

Page 20: ...rms and any loose clothing don t touch the display surface as you write draw and erase l If you re viewing a connected computer s input SMART Ink enables you to write or draw in digital ink over appli...

Page 21: ...with sound you can use the buttons on the front control panel to increase decrease mute and unmute the volume see Front control panel on page 5 Freezing the screen You can temporarily freeze the scree...

Page 22: ......

Page 23: ...asked questions about the Lessons app on the display 23 Using Activities 24 Opening Activities 24 Using Activities 24 Using Workspaces 24 Opening Workspaces 25 Using Workspaces 25 Using Browser 25 Op...

Page 24: ...an clean up the display for the next user Using the launcher The launcher contains all your apps and settings Opening and closing the launcher To open the launcher Press the Home button on the screen...

Page 25: ...the Settings window open the launcher and select an app Using the Whiteboard You can view and erase notes continue a Whiteboard session from the Library and share your Whiteboard using the SMART kapp...

Page 26: ...llation and maintenance guide smarttech com kb 171167 for more information Device The display is connected to a mobile device Capture Press the button to save snapshots of the whiteboard to your mobil...

Page 27: ...ou selected To hide Panoramic View Panoramic View disappears after five seconds Starting a new Whiteboard To start a new whiteboard 1 Press the New Whiteboard icon Your notes are saved in the Library...

Page 28: ...ation and maintenance guide smarttech com kb 171167 Deleting a session from the Library To delete a session from the Library 1 Press the Library icon 2 Select a session by tapping the session s check...

Page 29: ...The USB receptacle may be covered with a dust cap Remove the dust cap before inserting the USB drive 3 Open the launcher 4 Tap Lessons The Library shows all the notebook files on the USB drive The fi...

Page 30: ...ction to begin Drag to create a rectangle surrounding the objects you want to select To stop using the Marquee Select tool press the icon Page sorter Tap the icon to sort and move file pages as requir...

Page 31: ...seconds and other files take longer TIP Press Library to return to the Library and then tap the file s thumbnail to open the file again This may make a file load more quickly Where has the Flash cont...

Page 32: ...ng your SMART kapp iQ system and AM30 appliance version Opening Activities To open Activities 1 Open the launcher 2 Press Activities Using Activities See Using SMART lab for more information Using Wor...

Page 33: ...rowser You can use a web browser on the display NOTES l Displays with older models of the iQ appliance don t include Browser See Identifying your SMART kapp iQ system and AM30 appliance version l Brow...

Page 34: ...ed computers input on page 9 Showing content on the display To show content on the display 1 Make sure the input source is OPS HDMI see Viewing connected computers input on page 9 2 Connect a computer...

Page 35: ...the display Screen Share stops l To change the display s name see the SMART Board 6000 series interactive displays with iQ installation and maintenance guide smarttech com kb 171167 Sharing content fr...

Page 36: ...On the display open the launcher The launcher appears 2 Press Screen Share 3 On your computer open the Chrome browser 4 In the top right corner of your browser click the Cast icon 5 Click the drop do...

Page 37: ...o mirror your Mac computer s desktop to the display 1 On the display open the launcher The launcher appears 2 Press Screen Share 3 On your Mac computer click the AirPlay icon in the menu bar 4 Select...

Page 38: ...nd operating systems The following Apple operating systems support Screen Share l iOS 9 or later l OS X 10 11 El Capitan or later The following Apple devices support Screen Share l iPhone 4S or later...

Page 39: ...s MORE SETTINGS to show more displays To share your Android mobile device s screen on the display from the notification shade 1 On your device swipe down to open the notification shade 2 Press Cast 3...

Page 40: ...o disconnect appears 3 Press Yes Using the Clean Up button After you ve finished using the display you can press the Clean Up button in the launcher to clean up the display for the next user Pressing...

Page 41: ...CHAPTER3 USING APPS ON THE DISPLAY 33 smarttech com kb 171166 To clean up the display 1 Open the launcher 2 Press Clean Up The display cleans up...

Page 42: ......

Page 43: ...e l The apps and features available depend on the iQ appliance model See Identifying your SMART kapp iQ system and AM30 appliance version l The iQ system software may not include that feature or app S...

Page 44: ...uld be copied to the USB drive unmodified o Make sure the file is located in the root folder on the USB drive o Make sure the USB drive is inserted in the USB receptacle on the display s frame or to a...

Page 45: ...MI make sure your computer is connected to the iQ appliance See the SMART Board 6000 series interactive displays with iQ installation and maintenance guide smarttech com kb 171167 l The video signalfr...

Page 46: ...ed wirelessly l Make sure the display and mobile device are set to the correct date and time See the SMART Board 6000 series interactive displays with iQ installation and maintenance guide smarttech c...

Page 47: ...ee the SMART Board 6000 series interactive displays with iQ installation and maintenance guide smarttech com kb 171167 l Your mobile device may not be optimized for sharing its screen and is limited t...

Page 48: ...your mobile device can clear networkaddress information that your mobile device had cached Restarting the mobile device can also reinitialize audio and video encoders that might have stopped working p...

Page 49: ...r playing video games with frequent screen updates requires more networkbandwidth Try reducing the video quality to improve performance See the SMART Board 6000 series interactive displays with iQ ins...

Page 50: ...eries interactive displays with iQ installation and maintenance guide smarttech com kb 171167 l If you ve restarted your display and stilldon t see the display s name in the list of devices wait sever...

Page 51: ...your computer had cached Restarting the computer can also reinitialize audio and video encoders that might have stopped working properly l Restart your display See the SMART Board 6000 series interac...

Page 52: ...erformance See the SMART Board 6000 series interactive displays with iQ installation and maintenance guide smarttech com kb 171167 l Make sure the antenna is attached to the iQ appliance l Reduce your...

Page 53: ...eturning to the host s current view 52 Saving and working with snapshots 52 Saving snapshots to the app 53 Viewing snapshots 53 Exporting snapshots 54 Deleting snapshots 56 Sharing sessions 57 Sharing...

Page 54: ...MB of RAM 720p or better screen resolution Bluetooth 2 1 EDR NFC recommended 3 megapixel or better rear facing camera recommended Installing the app To install the app 1 Visit the Apple App Store or G...

Page 55: ...then do the following l View notes you write on the display on your mobile device l Save and export your notes l Start a session and invite others to join and collaborate Connecting Start a session by...

Page 56: ...ccept a pairing request to connect to the display Swipe down on the screen to access the notification drawer and accept the pairing request Disconnecting The app disconnects from the current session i...

Page 57: ...nce you disconnect from your continued session l When you continue a session all the snapshots from that previous session are also available However as the session s host these snapshots are only visi...

Page 58: ...you would with a regular session Writing erasing and viewing notes You can write and erase notes on the display just like you do on a traditional dry erase board You can view your notes on the displa...

Page 59: ...red ink Erase Pan and zoom using gestures see Viewing notes below 4 Tap Done to return to viewing mode Viewing notes During a session you can view the notes you ve written on the display on your mobil...

Page 60: ...esent The display shows the area you selected To hide Radar View Radar View disappears after five seconds Returning to the host s current view When you re following the presentation in your web browse...

Page 61: ...saved in the current session Viewing snapshots When you save a snapshot the app saves it to your session s library Access your current session or a previous session s library to view your saved snapsh...

Page 62: ...and then use a third party app on your phone to share your snapshots as a PDF or JPEG file To export a snapshot 1 View the snapshot you want to export see Viewing snapshots on the previous page 2 On a...

Page 63: ...n a previous session 1 If you re currently in a session disconnect see Disconnecting on page 48 2 On an Apple mobile device tap Sessions OR On an Android mobile device tap Sessions The Sessions screen...

Page 64: ...napshot you want to delete The session s snapshot gallery appears 4 Select the snapshot you want to delete 5 Tap Delete and then tap Delete To delete a previous session on an iOS mobile device 1 If yo...

Page 65: ...and use it to connect to your session As you make changes to your notes others see these changes in real time They can also zoom in or out and save view and export snapshots NOTE l The SMART kapp web...

Page 66: ...a dynamic link change the invitation link preferences in the app s settings To use a static link 1 If you re currently in a session stop sharing the session see Stopping sharing on the facing page 2...

Page 67: ...elect Sharing and then select Password The Enter Password screen appears 4 Clear the Require a Password option 5 Tap Done Stopping sharing You can stay connected to the display but stop sharing the cu...

Page 68: ...r person is sharing NOTE If the SMART kapp app isn t installed on your mobile device follow the on screen instructions to install it To connect to another session on a desktop 1 From your computer ope...

Page 69: ...connects your mobile device to the display The other person s shared notes appear on the display NOTE If the app doesn t connect your mobile device to the display move your mobile device closer to or...

Page 70: ...SMART TECHNOLOGIES smarttech com support smarttech com contactsupport smarttech com kb 171166...

Reviews: