background image

Smartwares

Specifications | 5

SH8-90604_IM

11

5 Specifications

– The appliance is suitable for domestic use only.

Dimensions

44.2 x 30.4 x 12.1 mm

Radio frequency

868.4 MHz

Range

40 m

Battery type

CR2450 3V, user replaceable

Battery life

8 years

Led indicator

Yes

Compatible with

Smartwares Link gateway, all bulbs from the
Smartwares PRO series, Smartwares PRO series
Energy Socket, Smartwares PRO series Dimmer
Socket

Summary of Contents for SH8-90604

Page 1: ...SH8 90604 SH8 99604 ...

Page 2: ...Table of Contents English iii Nederlands xii Deutsch xxii Français xxxiii ...

Page 3: ...re Safety 4 2 Introduction 5 3 Installation 6 3 1 Insert the switch battery 6 3 2 Pairing the wall switch convertor 6 3 2 1 Pairing additional lights 6 3 3 Single switch installation 7 3 4 Double switch installation 8 3 5 Hotel switch installation 8 4 Controlling your lights 10 4 1 HomeWizard App 10 4 2 Manual operation 10 5 Specifications 11 ...

Page 4: ... cover all possible conditions and situations that may occur It must be un derstood by the operator that common sense and caution are factors which can not be built into this product but must be supplied by the operator 3 Do not expose the Power Adapter of this product to rain or wet conditions Water entering the Power Adapter will increase the risk of electric shock 4 Do not abuse the Power Cord ...

Page 5: ...en installed you can control your smart bulbs with your smartphone even when the traditional wall switch is turned off If you have set timers or use geo fencing to switch your lights you will never have to worry that some of your lights are offline because the power has been turned off via the traditional wall switch This product is ideal if you have visitors or family members who are not too fami...

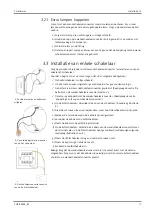
Page 6: ...ink gateway You can now start to add the wall switch converter to the Link gateway a In the HomeWizard Link app go to settings and tap add device b Select the Wall switch converter from the list and follow the steps in the app to successfully add the device ð You can now start with the installation of the Wall switch converter Pair converter to a light bulb Follow the procedure below to complete t...

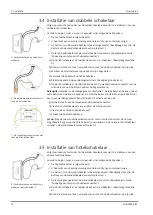
Page 7: ...stalled the battery in the wall switch converter See section Install the switch converter battery ü Paired the light bulb with the wall switch converter See section Pair light bulb to switch converter a On the light switch Remove the switch face plate See illustration 2 b Loosen and remove the screws holding the switch in place c Mark the terminals where the cables are connected d Remove the cable...

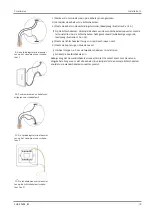
Page 8: ...ch Important Install as shown in illustration 7 Yellow cables on one side and white on the other of the light switch If white and yellow are mixed damage to the unit may occur g Repeat step f for the second wall switch converter h Put the light switch in place and fasten the screws i Put the face plate in place and press to fasten j Switch on the mains supply breaker Caution Do not let the wall sw...

Page 9: ...inal see illustration 9 and 10 f On the light switch Connect the cables of the wall switch converter to the termin als that you marked on the light switch any order see illustration 11 and 12 g Put the light switch in place and fasten the screws h Put the face plate in place and press to fasten i Repeat steps a h to install the second switch j Switch on the mains supply breaker Caution Do not let ...

Page 10: ... If you have paired the wall switch converter directly to the light bulb the following standard toggle mode is in use Toggle your wall switch once to turn the connected bulbs on or off Toggle your wall switch twice to switch between white and colour mode only works when you have coloured bulbs Toggle your wall switch three times to dim the connected bulbs Toggle the switch once when you have reach...

Page 11: ...only Dimensions 44 2 x 30 4 x 12 1 mm Radio frequency 868 4 MHz Range 40 m Battery type CR2450 3V user replaceable Battery life 8 years Led indicator Yes Compatible with Smartwares Link gateway all bulbs from the Smartwares PRO series Smartwares PRO series Energy Socket Smartwares PRO series Dimmer Socket ...

Page 12: ...nleiding 15 3 Installatie 16 3 1 De batterij van de schakelaarconverter plaatsen 16 3 2 De wandschakelaarconverter koppelen 16 3 2 1 Extra lampen koppelen 17 3 3 Installatie van enkele schakelaar 17 3 4 Installatie van dubbele schakelaar 18 3 5 Installatie van hotelschakelaar 18 4 Lampen bedienen 20 4 1 HomeWizard app 20 4 2 Handmatige bediening 20 5 Specificaties 21 ...

Page 13: ... gassen of stof Elektrisch aange dreven producten produceren vonken die stof of dampen tot ontbranding kunnen brengen 2 De waarschuwingen voorzorgsmaatregelen en instructies in deze gebruiksaanwij zing kunnen niet alle mogelijke omstandigheden en situaties dekken die zich kun nen voordoen Het moet de bediener duidelijk zijn dat gezond verstand en be hoedzaamheid factoren zijn die niet in dit produ...

Page 14: ...okken Het elektrische circuit is altijd ingeschakeld wanneer de wandschakelaarconver ter wordt gebruikt Volg de procedure hieronder als u een lichtarmatuur wilt vervangen a Schakel de stroom uit b Zoek in uw stoppenkast de stroomonderbreker voor de lichtarmatuur waar aan u gaat werken c Schakel de stroom uit ð U kunt de lichtarmatuur nu veilig vervangen ...

Page 15: ...e installatie kunt u uw slimme lampen bedienen met uw smartphone zelfs wanneer de traditionele wandschakelaar is uitgeschakeld Als u timers hebt ingesteld of geofencing gebruikt voor de bediening van uw verlich ting hoeft u nooit meer bang te zijn dat bepaalde lampen offline zijn omdat de voe ding ervan is uitgeschakeld via de traditionele wandschakelaar Dit product is ideaal wanneer u bezoek of g...

Page 16: ...gsprocedure is een voor bereidende stap voor de daadwerkelijke installatie Raadpleeg de installatiesecties De converter koppelen aan de Link gateway U kunt de wandschakelaarconverter nu toevoegen aan de Link gateway a Ga in de HomeWizard Link app naar Instellingen en tik op add device apparaat toevoegen b Selecteer de wandschakelaarconverter in de lijst en volg de stappen in de app om het apparaat...

Page 17: ... hebt met een spanningsmeter gecontroleerd of er geen restspanning is ü De batterij is in de wandschakelaarconverter geplaatst Raadpleeg de sectie De batterij van de wandschakelaarconverter plaatsen ü De lamp is gekoppeld met de wandschakelaarconverter Raadpleeg de sectie Koppeling van lamp en schakelaarconverter a Op de lichtschakelaar Verwijder de kap van de schakelaar Raadpleeg illustratie 2 b ...

Page 18: ...eerd Belangrijk Installeer zoals weergegeven in illustratie 7 Gele kabels aan de ene zijde en witte kabels aan de andere zijde van de lichtschakelaar Als de witte en gele kabels ver keerd om worden geplaatst kan dat leiden tot schade aan de unit g Herhaal stap f voor de tweede wandschakelaarconverter h Plaats de lichtschakelaar terug en draai de schroeven vast i Plaats de kap terug en druk deze va...

Page 19: ... in de verbindingsterminal Raadpleeg illustraties 9 en 10 f Op de lichtschakelaar Verbind de kabels van de wandschakelaarconverter met de terminals die u op de lichtschakelaar hebt gemarkeerd willekeurige volgorde raadpleeg illustraties 11 en 12 g Plaats de lichtschakelaar terug en draai de schroeven vast h Plaats de kap terug en druk deze vast i Herhaal stappen a h om de tweede schakelaar te inst...

Page 20: ...bt gekoppeld wordt de volgende standaardschakelmodus gebruikt Druk de wandschakelaar één keer in om de aangesloten lampen in of uit te schake len Druk de wandschakelaar twee keer in om te wisselen tussen de witte en de ge kleurde modus dit werkt alleen als u gekleurde lampen gebruikt Druk de wandschakelaar drie keer in om de aangesloten lampen te dimmen Druk de schakelaar één keer in als u de gewe...

Page 21: ...fmetingen 44 2 x 30 4 x 12 1 mm Radiofrequentie 868 4 MHz Bereik 40 m Type batterij CR2450 3V door de gebruiker te vervangen Levensduur batterij 8 jaar Led indicator Ja Compatibel met Smartwares Link gateway alle lampen uit de Smartwares PRO serie stekkers uit de Smart wares PRO serie dimmers uit de Smartwares PRO serie ...

Page 22: ...inführung 25 3 Montage 26 3 1 Setzen Sie die Batterie für den Wandschalter Konverter ein 26 3 2 Synchronisieren des Wandschalter Konverters 26 3 2 1 Zusätzliche Leuchten synchronisieren 27 3 3 Einzelschaltermontage 27 3 4 Doppelschaltermontage 28 3 5 Hotelschaltermontage 29 4 Beleuchtungssteuerung 31 4 1 HomeWizard App 31 4 2 Manueller Betrieb 31 5 Technische Daten 32 ...

Page 23: ...rei chen z B mit entflammbaren Flüssigkeiten Gase oder brennbarem Staub Elek trisch betriebene Produkte erzeugen Funken die Staub oder Dämpfe entzünden können 2 Die in diesem Handbuch erwähnten Warnungen Vorsichtsmaßnahmen und An weisungen können nicht alle möglicherweise auftretenden Bedingungen und Si tuationen abdecken Der Benutzer muss verstehen dass gesunder Menschenver stand und Vorsicht Fak...

Page 24: ...und des Wandschalter Konverters ist der elektrische Stromkreis immer eingeschaltet Um das Leuchtmittel auszuwechseln gehen Sie bitte wie folgt vor a Schalten Sie den Strom aus b Suchen Sie in Ihrem Schaltkasten den Trennschalter für das Leuchtmittel das Sie auswechseln wollen c Schalten Sie den Stromkreis ab ð Sie können das Leuchtmittel nun sicher auswechseln ...

Page 25: ...chalter Nach der Montage können Sie Ihre Smart Leuchten auch bei ausge schaltetem Wandschalter mit dem Smartphone steuern Falls Sie Zeitschaltpläne oder Geo Fencing verwenden brauchen Sie sich keine Gedan ken darüber zu machen dass einige Ihrer Leuchten nicht funktionieren weil sie mit dem herkömmlichen Wandschalter ausgeschaltet wurden Dieses Produkt ist ideal wenn sich Besucher oder Familienange...

Page 26: ...iche Synchronisation muss der Wandschalter Konverter nicht mit einem Lichtschalter verbunden sein Der Synchronisationsvorgang ist lediglich eine Vorbereitung für die eigentliche Montage Siehe Montageabschnitte Konverter und Link Gateway synchronisieren Sie können den Wandschalter Konverter jetzt zum Link Gateway hinzufügen a Gehen Sie in der HomeWizard Link App zu den Einstellungen und tippen Sie ...

Page 27: ...s ten Lichtschalter zu installieren Stellen Sie vor Beginn sicher dass Sie ü die Hauptsicherung ausgeschaltet haben ü mit einem Spannungsmesser geprüft haben dass keine Spannung mehr vorhanden ist ü die Batterie in den Wandschalter Konverter eingesetzt haben Siehe Abschnitt Batterie für den Wandschalter Konverter einsetzen ü das Leuchtmittel mit dem Wandschalter Konverter synchronisiert haben Sieh...

Page 28: ...Entfernen Sie die Schalterblende Siehe Abbildung 5 b Lösen und entfernen Sie die Befestigungsschrauben c Markieren Sie die Klemmen an denen die Kabel angeschlossen sind d Trennen Sie die Adern vom Lichtschalter ab e Führen Sie die Adern in die Anschlussklemmen ein Siehe Abbildung 6 f Am Lichtschalter Schließen Sie die Adern des Wandschalter Konverters an den zu vor markierten Klemmen an Wichtig Fü...

Page 29: ...rter synchronisiert haben Siehe Abschnitt Leuchtmittel und Schalter Konverter synchronisieren a Am Lichtschalter Entfernen Sie die Schalterblende Siehe Abbildung 8 b Lösen und entfernen Sie die Befestigungsschrauben c Markieren Sie die Klemmen an denen die Kabel angeschlossen sind d Trennen Sie die Adern vom Lichtschalter ab e Führen Sie die Adern in die Anschlussklemmen ein siehe Abbildung 9 und ...

Page 30: ...3 Montage Smartwares 30 SH8 90604_IM Abb 12 Verbinden Sie den Wand schalter Konverter mit dem Licht schalter Schalter 1 und 2 ...

Page 31: ...it dem Leuchtmittel synchronisiert ha ben wird der folgende Standard Schaltmodus verwendet Wandschalter einmal betätigen um die angeschlossenen Leuchtmittel ein oder auszuschalten Wandschalter zweimal betätigen um zwischen Weiß und Farbmodus umzuschal ten funktioniert nur bei farbigen Leuchtmitteln Wandschalter dreimal betätigen um die angeschlossenen Leuchtmittel zu dim men Wandschalter einmal be...

Page 32: ...ngen 44 2 x 30 4 x 12 1 mm Funkfrequenz 868 4 MHz Reichweite 40 m Batterietyp CR2450 3 V benutzerseitig austauschbar Batterielebensdauer 8 Jahre LED Anzeige Ja Kompatibel mit Smartwares Link Gateway alle Leuchtmittel der Smartwares PRO Reihe Energiestecker der Smartwares PRO Reihe Dimmer Schalter der Smartwares PRO Reihe ...

Page 33: ... 3 Installation 37 3 1 Insérez la batterie de l interrupteur 37 3 2 Couplage du convertisseur d interrupteur mural 37 3 2 1 Couplage d éclairages supplémentaires 38 3 3 Installation d un seul interrupteur 38 3 4 Installation d un double interrupteur 39 3 5 Installation d un interrupteur d hôtel 40 4 Commande de vos lumières 42 4 1 Appli HomeWizard 42 4 2 Fonctionnement manuel 42 5 Spécifications 4...

Page 34: ...iquides inflammables de gaz ou de poussières Les pro duits électriques créent des étincelles qui peuvent enflammer la poussière ou les vapeurs 2 Les avertissements précautions et instructions figurant dans ce mode d emploi ne peuvent pas couvrir toutes les conditions et situations susceptibles de se produire L opérateur doit bien comprendre que le bon sens et la prudence sont des facteurs qui ne p...

Page 35: ...ur mural le circuit électrique est tou jours sous tension Si vous voulez remplacer le dispositif d éclairage suivez la procédure ci dessous a Coupez l alimentation b Dans votre panneau de circuit électrique localisez la commande du disjonc teur pour le dispositif d éclairage sur lequel vous allez travailler c Coupez le circuit ð Vous pouvez remplacer en toute sécurité le dispositif d éclairage ...

Page 36: ...ules intelligentes avec votre smartphone même lorsque l interrupteur mural traditionnel est éteint Si vous avez réglé des minuteries ou si vous utilisez la géo clôture pour éteindre vos lu mières vous n aurez jamais à craindre que certaines de vos lumières soient éteintes parce que l alimentation a été coupée par l interrupteur mural traditionnel Ce produit est idéal si vous avez des visiteurs ou ...

Page 37: ...tant Il n est pas nécessaire de brancher le convertisseur d interrupteur mural à un interrupteur d éclairage pour que le couplage fonctionne La procédure de couplage prépare l installation même Voir les paragraphes sur l installation Coupler le convertisseur à la passerelle Link Vous pouvez maintenant commencer à ajouter le convertisseur d interrupteur mural à la passerelle Link a Dans l appli Hom...

Page 38: ... seul interrupteur d éclairage Avant de commencer assurez vous d avoir ü Coupé le disjoncteur d alimentation secteur ü Vérifié à l aide d un voltmètre qu il n y a pas d alimentation électrique ü Installé la batterie dans le convertisseur d interrupteur mural Voir le paragraphe Installer la batterie du convertisseur d interrupteur mural ü Couplé l ampoule avec le convertisseur d interrupteur mural ...

Page 39: ...ontale de l interrupteur Voir illustration 5 b Desserrez et retirez les vis en maintenant l interrupteur en place c Marquez les bornes à l endroit où les câbles sont connectés d Retirez les câbles de l interrupteur d éclairage e Insérez les câbles dans la borne de raccordement Voir illustration 6 f Sur l interrupteur Connectez les câbles du convertisseur d interrupteur mural aux bornes que vous av...

Page 40: ...upler l ampoule avec le convertisseur d interrupteur a Sur l interrupteur Retirez la plaque frontale de l interrupteur Voir illustration 8 b Desserrez et retirez les vis en maintenant l interrupteur en place c Marquez les bornes à l endroit où les câbles sont connectés d Retirez les câbles de l interrupteur d éclairage e Insérez les câbles dans la borne de raccordement voir illustrations 9 et 10 f...

Page 41: ...Smartwares Installation 3 SH8 90604_IM 41 Fig 12 Connectez le convertisseur d interrupteur à l interrupteur d éclairage interrupteur 1 2 ...

Page 42: ...vez directement couplé le convertisseur d interrupteur mural à l ampoule le mode de bascule standard suivant s applique Appuyez une fois sur l interrupteur mural pour allumer ou éteindre les ampoules connectées Actionnez deux fois votre interrupteur mural pour passer du mode blanc au mode couleur ne fonctionne que si vous avez des ampoules de couleur Actionnez l interrupteur mural trois fois pour ...

Page 43: ... x 30 4 x 12 1 mm Radiofréquence 868 4 MHz Portée 40 m Type de batterie CR2450 3V remplaçable par l utilisateur Autonomie de la batterie 8 ans Indicateur LED Oui Compatible avec Passerelle Smartwares Link toutes les am poules de la série Smartwares PRO prise de courant série Smartwares PRO prise pour gra duateur série Smartwares PRO ...

Page 44: ......

Reviews: