background image

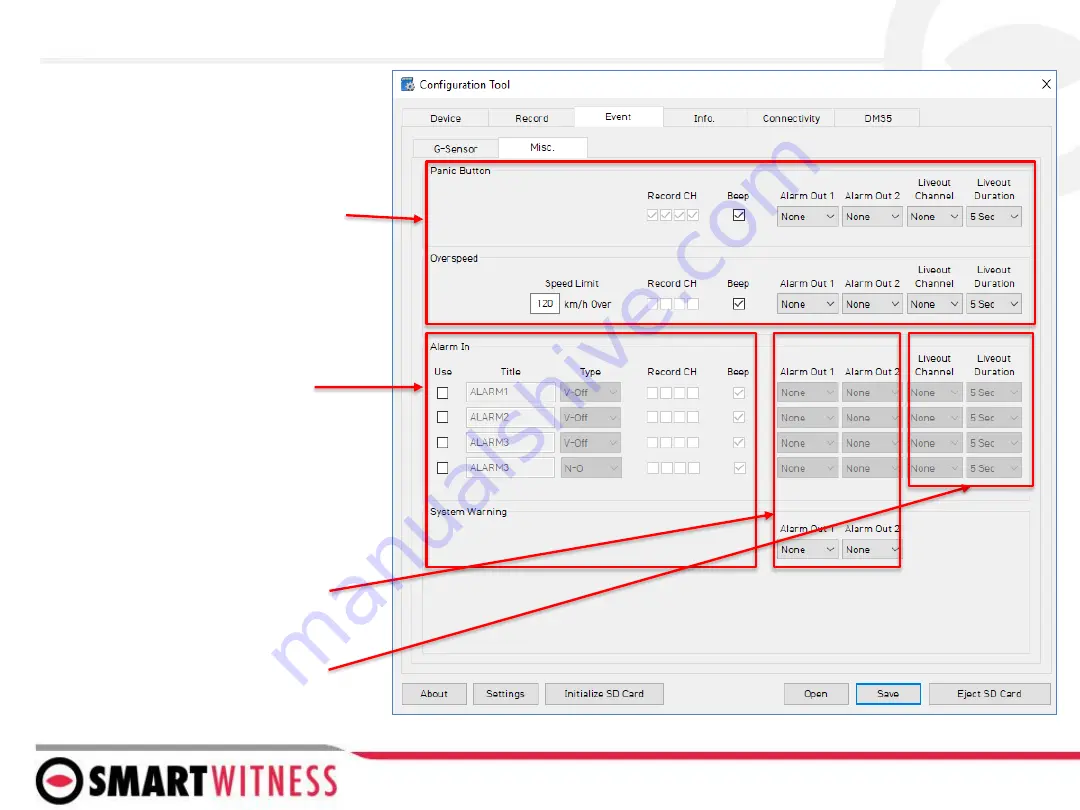
The Event tab will allow you to specify which 

events will trigger a recording (Event record 

mode or Dual record mode only).

If using the optional alarm input triggers 

(Alarm1: white, Alarm2: Purple, Alarm3: 

Green, Alarm4: Orange) then you need to 

check the box(s) here and label them 

according to the input type (i.e. horn, lights, 

door open, etc.)

Also the input type should be selected 

(NC/NO, or 12V ON/OFF).

NOTE: Alarm4 may not be supported by 

older versions of CP4 hardware. CP4 

devices shipping from August 2018 and 

forward will support this 4

th

alarm input. 

Alarm Out, if selected, will send a 5V output 

from the Yellow wire to a 3

rd

party device 

for the duration selected in the dropdown.

Liveout Channel: Which camera channel will 

be displayed on LCD when trigger is 

activated.

Liveout Duration: How long the camera 

view will stay displayed after trigger is off

Check the boxes next to each event you want 

triggered. 

You can also set speed thresholds here if 

you’d like to record over speed events. (This is 

raw vehicle speed and does not account for 

road/posted speed limits)

Check “Beep” if you’d like an audible chime to 

alert the driver when the event occurs

Event Tab - MISC

Summary of Contents for CP4

Page 1: ...SmartWitness CP4 Device Configuration Guide This is Video Telematics ...

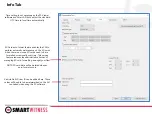
Page 2: ... card from File Explorer 4 Click Start to initialize 3 Apply your desired settings or click Open to load existing settings 4 Click Save to apply to SD card 5 Eject Card safely from your PC CLICK HERE FOR VIDEO DEMONSTRATION SD cards can also be removed from the CP4 to review video and data For this the SmartWitness PC viewer software is required which you can download here or visit Support smartwi...

Page 3: ... set see Liveout Channel setting on Event tab TV Out OSD set what information is displayed on the LCD monitor see here for more info Audible Camera Chime turn audible alert on or off audible alarms can be individually turned on off per event G Sensor Axis Set the CP4 s installed position This is Important for proper G Sensor calibration and accurate drive data reporting Delayed Power Shutdown Amou...

Page 4: ...Continuous Records video continuously no events events can still be sent to Smart API server if configured on the Server tab Dual Mode Records continuous at 1FPS events at the specified FPS If Dual Mode is set you can adjust the SD card partition for event and continuous video here Telematics Data DRV file is recorded and stored separately from video and events Set the local storage duration here ...

Page 5: ...higher vehicle speeds See pg 10 for more details on G Sensor thresholds When checked only Ecall and Shock events will trigger accel brake and turn events will be ignored Ecall is a severe impact G Sensor which can be configured to send emergency notifications separately from lower level shock events ...

Page 6: ...ng from August 2018 and forward will support this 4th alarm input Alarm Out if selected will send a 5V output from the Yellow wire to a 3rd party device for the duration selected in the dropdown Liveout Channel Which camera channel will be displayed on LCD when trigger is activated Liveout Duration How long the camera view will stay displayed after trigger is off Check the boxes next to each event...

Page 7: ...c maintenance on the SD cards when there is an issue SD cards need to be re formatted occasionally over time This unique feature reduces the administrative burden of managing SD card formatting amongst your fleet NOTE SD card data will be deleted when an auto format occurs Vehicle No Driver ID can be added here These values will be able to be watermarked on the AVI converted video using the PC sof...

Page 8: ...ing SW UK O2 Arkessa below Connectivity Tab You can enable WiFi connectivity instead of celluar connectivity with the use of an approved WiFi USB dongle The AP must be secure with WPA WPA2 encryption and have a password of at least 8 characters cannot be an open network You can set up to 10 WiFi SSIDs CP4 will scan for as many networks as are added here in its settings ...

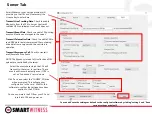
Page 9: ...ert into CP4 and power on You can also save the settings as default to the config tool software by clicking settings and Save current settings as default Server Tab Transmit Live Tracking Data Check to enable http posts from the CP4 to server Livetrack2 contains GPS coordinates LiveTrack3 does not Transmit Event Data Check to enable CP4 posting event notification and images to the server Transmit ...

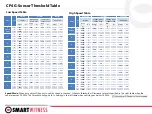
Page 10: ...Z 950 1 4 X 800 1 360 8 410 5 7 Y 800 1 310 15 Z 900 1 5 X 750 1 330 8 380 5 7 Y 750 1 300 20 Z 850 1 6 X 700 1 310 8 360 5 7 Y 700 1 280 20 Z 800 1 7 X 650 1 240 10 Y 650 1 230 20 Z 750 1 8 X 600 1 190 10 Y 600 1 190 15 Z 700 1 9 X 550 1 170 10 Y 550 1 170 15 Z 650 1 Level ax is ACCSENX ACCSENY ACCSENZ impact Sudden start sudden stop1 Sudden start sudden stop2 Quick Turn G m g Hz G mg Hz G m g Hz...

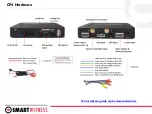
Page 11: ...CP4 Hardware CP4 Installation guide can be downloaded here ...

Page 12: ...SmartWitness USA 1016 Lunt Avenue Schaumburg IL 60193 USA SmartWitness UK Unit 2 Valley Point Beddington Farm Road Croydon CR0 4WP UK smartwitness com This is Video Telematics ...

Reviews: