background image


www.smartwitness.com 


Secondary Camera installation examples: 


6.


Connecting 3G Cellular Modem (optional) 


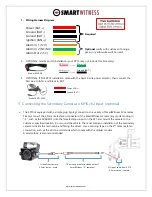
Connect the male USB port from the 3G Modem into the female USB port as seen in picture below. 
Secure the male/female USB connection with the provided silicone cold shrink tape. The tape is self-
fusing and does not require heat to be applied. It stretches 300% and is fully fused within 24 hours 
after application. It is best to stretch the tape, start from one end and overlap at an angle until you 
reach the other end of the connector. 
 

On windshield using adhesive 

On A-Pillar or headliner using screw mount 

Model # 

INT3-GB


Summary of Contents for KP1S

Page 1: ...uld be performed by a qualified individual or installation professional only Working with a vehicle s power system can be dangerous to both you and your vehicle This installation is intended only to b...

Page 2: ...ew of the road Vehicle Location Impact Force of Accident Audio and Driving Style speed acceleration braking and steering This evidence can protect a driver from many of the issues faced on the roads t...

Page 3: ...ders 2 KP1S Structure KP1S Recorder with locking cover Power Adaptor model INT1S 3M Windshield Adhesive Secondary Camera with 16 cable SD Card s 3G Cellular Modem Key set for Locking cover Driver Faci...

Page 4: ...is removed you can adjust the angle of the camera to comply with the angle of your windshield When you are happy with the angle on the windshield slide the case back onto KP1S If SD cards were provide...

Page 5: ...ehicle s interior panels This gives you an idea of where to route the cable and how much slack to leave on the way down to the vehicle s power source Secure the power cable extension into the headline...

Page 6: ...f the SmartWitness camera any model ending in S such as the SVA030 S into the female stereo input on the KP1 and mount the camera to the customer specified location in or around the vehicle The most c...

Page 7: ...ithin 24 hours after application It is best to stretch the tape start from one end and overlap at an angle until you reach the other end of the connector Secure the male female USB connection with the...

Page 8: ...error and you should contact your supplier Please see step 8 for more details on LED status indicators 1 After you ve set the camera angle locked the cover and removed the key press the G Sensor calib...

Page 9: ...ion of the cable and modem If Link LED is blinking and the KP1S Green LED is also blinking it may be a camera configuration issue or server issue Please contact SmartWitness The 3G modem Link LED is s...

Page 10: ...charging capacitor ON ON OFF 3rd step 31 60sec begin recording video to NAND memory ON ON ON OFF 4th step 61 89sec ON ON ON ON OFF 5th step 90sec 1sec ON ON ON ON IF SD card is blank not initialized...

Page 11: ...ad zone server down etc ON OFF slowly Recording by record mode Continuous Record mode ON Event Record mode ON Dual Record Mode ON Event Triggered Event mode Dual mode only ON OFF quickly Over speed ov...

Page 12: ...nsor Calibration After Power up sequence and small red button on KP1 is pressed ON and OFF Quickly Beep 3 seconds SD Format 1 minute after blank card is inserted into KP1 or when SD card auto format s...

Reviews: