background image

HRX-OM-X010 

Chapter  8    Appendix 


HRZ Series 

8.5 BAND/READY function 


8-17


8-17


8.5  BAND/READY function 

Sets BAND to TEMP SP value, and notifies TEMP PV value reaches within 
BAND range by the operation display panel or the communication.   
See section “Chapter 5 System Operation 5.3.21 Initial Setting screen 6” on page 
5-23,for the procedure of the setting. 


When the setting is ON 

Allows the setting of the BAND and REDY TIME. Allows the setting of the 
communication output. 


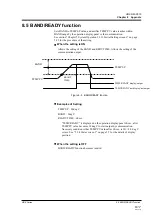
Figure 8-9    BAND/READY function 


Examples of Setting 

TEMP SP

20deg C 

BAND

2deg C 

READY TIME

60sec. 

”TEMP READY” is displayed on the operation display panel 60-sec. after 
TEMP PV value becomes 18 deg C to start output by communication. 
Necessary condition is that TEMP PV value after 60-sec. is 20+/-2.0 deg C 
or less. See “5.3.4 Status screen 3” on page 5-7 for the details of display 
position.   


When the setting is OFF 

BAND/READY function becomes invalid. 


BAND 

TEMP SP 

TEMP PV 

TEMP READY not display/not output 

TEMP READY display/output 

READY 
TIME 

Summary of Contents for HRZ002-W1S-F

Page 1: ...ler HRZ002 WS F HRZ004 WS F HRZ008 WS F HRZ008 L F HRZ002 W1S F HRZ004 W1S F HRZ008 W1S F HRZ008 L1 F HRZ002 W2S F HRZ004 W2S F HRZ008 W2S F HRZ010 WS F HRZ010 W1S F HRZ010 W2S F Save This Manual Carefully for Use at Any Time 2020 SMC CORPORATION All Rights Reserved ...

Page 2: ...on The contents of this manual and related documents supplied with this system shall be neither regarded as a provision of the contract nor utilized to correct or modify the existing agreements commitments and relations Copying duplicating or transferring any part of or whole contents of this manual without the prior written consent of SMC Corporation is strictly prohibited The Service Manual is s...

Page 3: ...otective equipment 1 12 1 6 Emergency Measures 1 13 1 6 1 Emergency off EMO switch 1 13 1 7 Waste Disposal 1 15 1 7 1 Disposal of refrigerant and compressor oil 1 15 1 7 2 Circulating fluid disposal 1 16 1 7 3 System disposal 1 16 1 7 4 Label 1 16 1 8 Material Safety Data Sheet SDS 1 16 1 8 1 Galden HT135 1 17 1 8 2 Fluorinert TM FC 3283 1 29 1 8 3 Galden HT200 1 38 1 8 4 Fluorinert TM FC 40 1 50 ...

Page 4: ... facility water piping 4 1 4 1 4 Operating signal from your system 4 1 4 1 5 Check emergency off EMO switch 4 1 4 2 Opening of Facility water Valve 4 1 4 3 Supply of Circulating Fluid 4 2 4 3 1 Preparation of circulating fluid 4 2 4 3 2 Supply of circulating fluid 4 3 4 4 Requirement for System Startup 4 4 4 4 1 Turning ON power 4 4 4 4 2 Circulating fluid temperature setting 4 5 4 5 System Startu...

Page 5: ... 5 27 5 3 26 Maintenance screen 2 5 28 5 3 27 Maintenance screen 3 5 29 5 3 28 Maintenance screen 4 5 30 5 3 29 Maintenance screen 5 5 31 5 3 30 Maintenance screen 6 5 32 5 3 31 Maintenance screen 7 5 33 5 3 32 Maintenance screen 8 5 34 5 3 33 System Information screen 5 35 5 4 Examples of System Operation 5 36 5 4 1 Example 1 Circulating fluid set temperature is changed from 20 0 deg C to 34 1 de...

Page 6: ...mmunication specification 8 7 8 1 4 Alarm signal selection 8 10 8 2 Outer Dimensions 8 11 8 2 1 Part 1 8 11 8 2 2 Part 2 8 11 8 3 Flow Chart 8 12 8 3 1 Part 1 8 12 8 3 2 Part 2 8 13 8 4 Offset Function 8 14 8 4 1 Example of offset function 8 15 8 5 BAND READY function 8 17 8 6 Anchor Bolt Mounting Position 8 18 8 6 1 Part 1 8 18 8 6 2 Part 2 8 19 8 7 Compliance 8 20 8 8 Thermo Chiller Daily Inspec...

Page 7: ...esponsible for observing safety standards Operators and maintainers however are to have individual responsibilies for complying with the safety standard in his her daily work Operators and maintainers must individually take account of safety and assure a proper working area and working environment The relevant personnel must receive proper safety education prior to work training on this system Oth...

Page 8: ...sk carries useful information the relevant tips are given as well 1 2 2 Definitions of Serious injury and Minor injury Serious injury This term describes injuries such as loss of eyesight wound burns frostbite electric shock fracture and toxication that leave aftereffects and or injury requiring hospitalization and or prolonged staying in a hospital Minor injury This term describes injuries that d...

Page 9: ...tand manner Symbol of electrical hazard Symbol of heat hazard Symbol of low temperature hazard Symbol of Don ts Symbol of Required Action This symbol denotes Don t item which you must not do in operation of this system This symbol denotes the obligation items which you must follow in operation of this system This symbol warns you of potential electrical shock This symbol warns you of potential bur...

Page 10: ...of hot cold surface hazard Hot cold surface hazard This warning label is affixed on the surface that is at high or low temperatures carrying potential burns or frostbite if touched Residual heat may cause burns despite the power being turned OFF Be sure of the surface reaching room temperature before work Figure 1 5 Hazard warning label No 5 Figure 1 6 Hazard warning label No 6 High voltage hazard...

Page 11: ... Hazard warning label No 4 Figure 1 7 High Voltage Hazard Confirm the locations of the hazard warning labels Read the contents of the hazard warning labels carefully and keep them in mind Do not peel off or deface the hazard warning labels Users are NOT allowed to change the locations of the hazard warning labels Make sure to affix a new label to exactly the same location of the replaced label upo...

Page 12: ...HRX OM X010 Chapter 1 Safety 1 3 Hazard Warning Label HRZ Series 1 6 Hot cold surface hazard Figure 1 8 Hot Cold Surface Hazard Front Rear Hazard warning label No 5 Hazard warning label No 6 ...

Page 13: ...el 1 7 1 7 1 4 Location of Model Label Information about the product such as Serial No and Model No can be found on the product label This information is needed when contacting an SMC sales distributor Figure 1 9 Location of Model Label Front Label Rear Model Serial ...

Page 14: ...your action Use appropriate tools and follow proper procedures See 1 5 4 Protective equipment on page1 12 to wear protective equipment properly Refer to your safety manual for emergency evacuation Use assistance to carry object over 20 kg Check that all parts and screws are returned to the pre work conditions at the end of work Do not work when intoxicated or feeling ill Accidents may occur if dis...

Page 15: ...ivated when improper operation or hazardous conditions occur System operation shall be terminated when a safety interlock is activated An alarm message is displayed on the LCD screen when a safety interlock is activated See Chapter 6 Error Message and Troubleshooting on page 6 1 for details on the alarms and remedies or see section Troubleshooting in a separate volume of the Service Manual Front p...

Page 16: ...this manual are required for system service Lockout is allowed only when the system come to a full stop A supervisor should be appointed to direct all personnel if multiple workers engage in system service The supervisor is to perform lockout based on a full understanding of overall process conditions Not only all personnel but new personnel that engage in service of this system should build an aw...

Page 17: ...h the padlock Releasing lockout 1 Remove the padlock from the lock mechanism part 2 Turn the breaker handle to RESET The lock mechanism part is closed The handle turns back to OFF if released Padlock Figure 1 12 Breaker Handle at OFF Figure 1 13 Breaker Handle at RESET Figure 1 14 Pushing of Lock Mechanism Part Figure 1 15 Breaker Lock All service personnel must observe the restrictions applied du...

Page 18: ...low according to work type For system transportation installation and removal Protective footwear Protective gloves Hard hat For handling circulating fluid Protective footwear Protective gloves Protective mask Protective apron Protective goggles For system operation Protective footwear Protective gloves Read and understand the relevant operation manual thoroughly prior to use of protective equipme...

Page 19: ...t The system comes to a halt if this button is pressed When press the emergency off EMO switch the control power for this system is shut off to bring the system to a stop The main breaker of this system however is designed not to trip which enables the motor circuit to remain partially energized 8 1 3Communication specification in Chapter 8 Appendix on page 8 7 to view the circuit diagram and see ...

Page 20: ...s eliminate the cause of activating the EMO before resetting Potential serious accidents may occur if disregarded When the system is in remote mode the remote mode is retained despite the power outage Thus the system operation is to resume as the start signal is issued from your system No automatic recovery is applied to the emergency off EMO switch Always eliminate the cause of activating the EMO...

Page 21: ... or those who are qualified are allowed to open the panel of this system Do not dispose of the compressor oil as domestic garbage Incineration is permitted only at an authorized incinerator Disposal of the compressor oil must be in accordance with regulations and rules of local authorities The release of refrigerant into the air is prohibited by law Recover the refrigerant with the refrigerant rec...

Page 22: ...ocarbon Collection and Destruction Law in Japan This product uses Fluorocarbon HFC as a refrigerant 1 It is strictly forbidden to emit Fluorocarbon to the atomosphere 2 When disposing this product Fluorocarbon must be collected in an appropriate manner 3 This kind of Fluorocarbon and the amount used in this product is printed on the name label 1 8 Material Safety Data Sheet SDS Any chemicals used ...

Page 23: ...HRX OM X010 Chapter 1 Safety HRZ Series 1 8 Material Safety Data Sheet SDS 1 17 1 17 1 8 1 Galden HT135 ...

Page 24: ...HRX OM X010 Chapter 1 Safety 1 8 Material Safety Data Sheet SDS HRZ Series 1 18 ...

Page 25: ...HRX OM X010 Chapter 1 Safety HRZ Series 1 8 Material Safety Data Sheet SDS 1 19 1 19 ...

Page 26: ...HRX OM X010 Chapter 1 Safety 1 8 Material Safety Data Sheet SDS HRZ Series 1 20 ...

Page 27: ...HRX OM X010 Chapter 1 Safety HRZ Series 1 8 Material Safety Data Sheet SDS 1 21 1 21 ...

Page 28: ...HRX OM X010 Chapter 1 Safety 1 8 Material Safety Data Sheet SDS HRZ Series 1 22 ...

Page 29: ...HRX OM X010 Chapter 1 Safety HRZ Series 1 8 Material Safety Data Sheet SDS 1 23 1 23 ...

Page 30: ...HRX OM X010 Chapter 1 Safety 1 8 Material Safety Data Sheet SDS HRZ Series 1 24 ...

Page 31: ...HRX OM X010 Chapter 1 Safety HRZ Series 1 8 Material Safety Data Sheet SDS 1 25 1 25 ...

Page 32: ...HRX OM X010 Chapter 1 Safety 1 8 Material Safety Data Sheet SDS HRZ Series 1 26 ...

Page 33: ...HRX OM X010 Chapter 1 Safety HRZ Series 1 8 Material Safety Data Sheet SDS 1 27 1 27 ...

Page 34: ...HRX OM X010 Chapter 1 Safety 1 8 Material Safety Data Sheet SDS HRZ Series 1 28 ...

Page 35: ...HRX OM X010 Chapter 1 Safety HRZ Series 1 8 Material Safety Data Sheet SDS 1 29 1 29 1 8 2 FluorinertTM FC 3283 ...

Page 36: ...HRX OM X010 Chapter 1 Safety 1 8 Material Safety Data Sheet SDS HRZ Series 1 30 ...

Page 37: ...HRX OM X010 Chapter 1 Safety HRZ Series 1 8 Material Safety Data Sheet SDS 1 31 1 31 ...

Page 38: ...HRX OM X010 Chapter 1 Safety 1 8 Material Safety Data Sheet SDS HRZ Series 1 32 ...

Page 39: ...HRX OM X010 Chapter 1 Safety HRZ Series 1 8 Material Safety Data Sheet SDS 1 33 1 33 ...

Page 40: ...HRX OM X010 Chapter 1 Safety 1 8 Material Safety Data Sheet SDS HRZ Series 1 34 ...

Page 41: ...HRX OM X010 Chapter 1 Safety HRZ Series 1 8 Material Safety Data Sheet SDS 1 35 1 35 ...

Page 42: ...HRX OM X010 Chapter 1 Safety 1 8 Material Safety Data Sheet SDS HRZ Series 1 36 ...

Page 43: ...HRX OM X010 Chapter 1 Safety HRZ Series 1 8 Material Safety Data Sheet SDS 1 37 1 37 ...

Page 44: ...HRX OM X010 Chapter 1 Safety 1 8 Material Safety Data Sheet SDS HRZ Series 1 38 1 8 3 Galden HT200 ...

Page 45: ...HRX OM X010 Chapter 1 Safety HRZ Series 1 8 Material Safety Data Sheet SDS 1 39 1 39 ...

Page 46: ...HRX OM X010 Chapter 1 Safety 1 8 Material Safety Data Sheet SDS HRZ Series 1 40 ...

Page 47: ...HRX OM X010 Chapter 1 Safety HRZ Series 1 8 Material Safety Data Sheet SDS 1 41 1 41 ...

Page 48: ...HRX OM X010 Chapter 1 Safety 1 8 Material Safety Data Sheet SDS HRZ Series 1 42 ...

Page 49: ...HRX OM X010 Chapter 1 Safety HRZ Series 1 8 Material Safety Data Sheet SDS 1 43 1 43 ...

Page 50: ...HRX OM X010 Chapter 1 Safety 1 8 Material Safety Data Sheet SDS HRZ Series 1 44 ...

Page 51: ...HRX OM X010 Chapter 1 Safety HRZ Series 1 8 Material Safety Data Sheet SDS 1 45 1 45 ...

Page 52: ...HRX OM X010 Chapter 1 Safety 1 8 Material Safety Data Sheet SDS HRZ Series 1 46 ...

Page 53: ...HRX OM X010 Chapter 1 Safety HRZ Series 1 8 Material Safety Data Sheet SDS 1 47 1 47 ...

Page 54: ...HRX OM X010 Chapter 1 Safety 1 8 Material Safety Data Sheet SDS HRZ Series 1 48 ...

Page 55: ...HRX OM X010 Chapter 1 Safety HRZ Series 1 8 Material Safety Data Sheet SDS 1 49 1 49 ...

Page 56: ...HRX OM X010 Chapter 1 Safety 1 8 Material Safety Data Sheet SDS HRZ Series 1 50 1 8 4 FluorinertTM FC 40 ...

Page 57: ...HRX OM X010 Chapter 1 Safety HRZ Series 1 8 Material Safety Data Sheet SDS 1 51 1 51 ...

Page 58: ...HRX OM X010 Chapter 1 Safety 1 8 Material Safety Data Sheet SDS HRZ Series 1 52 ...

Page 59: ...HRX OM X010 Chapter 1 Safety HRZ Series 1 8 Material Safety Data Sheet SDS 1 53 1 53 ...

Page 60: ...HRX OM X010 Chapter 1 Safety 1 8 Material Safety Data Sheet SDS HRZ Series 1 54 ...

Page 61: ...HRX OM X010 Chapter 1 Safety HRZ Series 1 8 Material Safety Data Sheet SDS 1 55 1 55 ...

Page 62: ...HRX OM X010 Chapter 1 Safety 1 8 Material Safety Data Sheet SDS HRZ Series 1 56 ...

Page 63: ...HRX OM X010 Chapter 1 Safety HRZ Series 1 8 Material Safety Data Sheet SDS 1 57 1 57 ...

Page 64: ...HRX OM X010 Chapter 1 Safety 1 8 Material Safety Data Sheet SDS HRZ Series 1 58 1 8 5 Ethylene glycol aqueous solution 60 ...

Page 65: ...HRX OM X010 Chapter 1 Safety HRZ Series 1 8 Material Safety Data Sheet SDS 1 59 1 59 ...

Page 66: ...HRX OM X010 Chapter 1 Safety 1 8 Material Safety Data Sheet SDS HRZ Series 1 60 ...

Page 67: ...HRX OM X010 Chapter 1 Safety HRZ Series 1 8 Material Safety Data Sheet SDS 1 61 1 61 ...

Page 68: ...HRX OM X010 Chapter 1 Safety 1 8 Material Safety Data Sheet SDS HRZ Series 1 62 ...

Page 69: ...HRX OM X010 Chapter 1 Safety HRZ Series 1 8 Material Safety Data Sheet SDS 1 63 1 63 ...

Page 70: ...HRX OM X010 Chapter 1 Safety 1 8 Material Safety Data Sheet SDS HRZ Series 1 64 1 8 6 Refrigerant R410A ...

Page 71: ...HRX OM X010 Chapter 1 Safety HRZ Series 1 8 Material Safety Data Sheet SDS 1 65 1 65 ...

Page 72: ...HRX OM X010 Chapter 1 Safety 1 8 Material Safety Data Sheet SDS HRZ Series 1 66 ...

Page 73: ...HRX OM X010 Chapter 1 Safety HRZ Series 1 8 Material Safety Data Sheet SDS 1 67 1 67 ...

Page 74: ...HRX OM X010 Chapter 1 Safety 1 8 Material Safety Data Sheet SDS HRZ Series 1 68 ...

Page 75: ...HRX OM X010 Chapter 1 Safety HRZ Series 1 8 Material Safety Data Sheet SDS 1 69 1 69 ...

Page 76: ...HRX OM X010 Chapter 1 Safety 1 8 Material Safety Data Sheet SDS HRZ Series 1 70 ...

Page 77: ...HRX OM X010 Chapter 1 Safety HRZ Series 1 8 Material Safety Data Sheet SDS 1 71 1 71 ...

Page 78: ...HRX OM X010 Chapter 1 Safety 1 8 Material Safety Data Sheet SDS HRZ Series 1 72 ...

Page 79: ...HRX OM X010 Chapter 1 Safety HRZ Series 1 8 Material Safety Data Sheet SDS 1 73 1 73 ...

Page 80: ...HRX OM X010 Chapter 1 Safety 1 8 Material Safety Data Sheet SDS HRZ Series 1 74 ...

Page 81: ...HRX OM X010 Chapter 1 Safety HRZ Series 1 8 Material Safety Data Sheet SDS 1 75 1 75 ...

Page 82: ...HRX OM X010 Chapter 1 Safety 1 8 Material Safety Data Sheet SDS HRZ Series 1 76 1 8 7 Refrigerant R448A ...

Page 83: ...HRX OM X010 Chapter 1 Safety HRZ Series 1 8 Material Safety Data Sheet SDS 1 77 1 77 ...

Page 84: ...HRX OM X010 Chapter 1 Safety 1 8 Material Safety Data Sheet SDS HRZ Series 1 78 ...

Page 85: ...HRX OM X010 Chapter 1 Safety HRZ Series 1 8 Material Safety Data Sheet SDS 1 79 1 79 ...

Page 86: ...HRX OM X010 Chapter 1 Safety 1 8 Material Safety Data Sheet SDS HRZ Series 1 80 ...

Page 87: ...HRX OM X010 Chapter 1 Safety HRZ Series 1 8 Material Safety Data Sheet SDS 1 81 1 81 ...

Page 88: ...HRX OM X010 Chapter 1 Safety 1 8 Material Safety Data Sheet SDS HRZ Series 1 82 ...

Page 89: ...HRX OM X010 Chapter 1 Safety HRZ Series 1 8 Material Safety Data Sheet SDS 1 83 1 83 ...

Page 90: ...HRX OM X010 Chapter 1 Safety 1 8 Material Safety Data Sheet SDS HRZ Series 1 84 ...

Page 91: ...HRX OM X010 Chapter 1 Safety HRZ Series 1 8 Material Safety Data Sheet SDS 1 85 1 85 ...

Page 92: ...HRX OM X010 Chapter 1 Safety 1 8 Material Safety Data Sheet SDS HRZ Series 1 86 ...

Page 93: ...HRX OM X010 Chapter 1 Safety HRZ Series 1 8 Material Safety Data Sheet SDS 1 87 1 87 ...

Page 94: ...HRX OM X010 Chapter 1 Safety 1 8 Material Safety Data Sheet SDS HRZ Series 1 88 ...

Page 95: ...HRX OM X010 Chapter 1 Safety HRZ Series 1 8 Material Safety Data Sheet SDS 1 89 1 89 ...

Page 96: ...HRX OM X010 Chapter 1 Safety 1 8 Material Safety Data Sheet SDS HRZ Series 1 90 ...

Page 97: ... brakes The disengagement of the brakes is required when transporting the system Caster w brake Rotates 360 Emergency off EMO switch Main breaker Power cable access Circulating fluid fill port Facility water outlet Circulating fluid return Circulating fluid level gauge Circulating fluid supply Drain pan port Facility water inlet Ventilating fan exhaust side Operation display panel Sub tank drain p...

Page 98: ...ition may cause damage to this system and personal injury through contact with the floor or steps during system transport Operation display panel Ventilating hole intake side Ventilating fan exhaust side Power cable access Circulating fluid fill port Facility water outlet Circulating fluid supply Facility water inlet Main tank drain port Drain pan port S u b a n k d r a i n p o r t Circulating flu...

Page 99: ... who have adequate knowledge and experiences with not only this system but associated equipment are allowed to perform transport installation and maintenance involving potential hazardous task For transporting with the forklift be sure to insert the fork into a designated position referring to 3 1 1 Transporting with forklift on page 3 2 Do not set this system on its side during transportation Oil...

Page 100: ...klift insertion positions are on either left or right side of this system Always insert the forks all the way through Becareful not to hit the casters and adjustable feet Do not set this system on its side for transportation Potential damage to this system carrying danger of personnel injury if disregarded Do not insert the fork from the back as well as front Rear Front Forklift insertion side For...

Page 101: ...th the casters Potential damage to piping and panels may occur if disregarded System installation should be kept from areas with the potential of flammable gas leak Ignition may occur if leaked gas is collected around the system This system is NOT designed for outside use Potential electric shock fire and system damage may occur if exposed to rain water and dust This system is to be installed on a...

Page 102: ...ng range In operation 10 to 35 deg C In storage 0 to 50 deg C with no water or circulating fluid in piping Location where relative humidity is out of the following range In operation 30 to 70 In storage 15 to 85 Location that is subjected to abrupt changes in temperature Location that is subjected to intense electromagnetic noise intense electric field intense magnetic field or surges Location tha...

Page 103: ... is recommended See Figure3 2 To save space this system can be installed to allow access only in front and back for daily operation and inspection For maintenance and repair work additional access space is required for the left and right side of the system We recommend a separate repair area without taking space from installation site to accommodate the needed extra space Daily inspection area Ope...

Page 104: ...tion should be on a vibration free stable level plane See Appendix 8 2 Outer Dimensions in Chapter 8 on page 8 11 for the dimensions of this system 3 3 2 Procedure for system securing 1 HRZ WS F HRZ W1S F HRZ W2S F 1 Transfer this system to the installation site 2 Lock the brakes on casters 2 pcs on the front 3 Using a13 mm open end wrench attach the anti seismic brackets to the front and back Fig...

Page 105: ... 24 mm open end wrench Level the system using a leveler by adjusting the adjustable feet All adjustable feet 4 pcs must touch the floor completely Casters need not be touching the floor 3 Attach the anti seismic bracket to the adjustable foot and tighten the nut upper of the adjustable foot to lock it 4 Secure the anti seismic bracket with the anchor bolts Repeat precedures for additional brackets...

Page 106: ...5 5 R22 8 R5 5 8 Earth bar R5 5 8 R5 5 8 R22 8 R5 5 8 Torque recommended Breaker 2 5N m 1 84 ft lbf 2 5N m 1 84 ft lbf 6N m 4 43 ft lbf 6N m 4 43 ft lbf Earth bar 12 5N m 9 22 ft lbf 12 5N m 9 22 ft lbf 12 5N m 9 22 ft lbf 12 5N m 9 22 ft lbf Main breaker This System 20A 30A 60A 30A Only designated personnel are allowed to install wiring Be sure to turn OFF the power prior to wiring to assure safe...

Page 107: ...aker of this product If the breaker with shorter operating time is connected the customer s equipment could be cut off du eto the inrush current of the motor of this product Current to the capacity of the main breaker of this product Figure 3 6 Breaker operating characteristics curve HRZ010 WS F HRZ010 W1S F HRZ010 W2S F HRZ002 WS F HRZ002 W1S F HRZ002 W2S F HRZ004 WS F HRZ004 W1S F HRZ004 W2S F H...

Page 108: ...RZ008 L1 F Current to the capacity of the main breaker of this product MIN Operating time MAX MAX MIN 4h 2h 1h 30min 20min 14min 10min 6min 4min 2min 1min 30s 20s 10s 5s 2s 1s 0 5s 0 2s 0 1s 0 05s 0 02s 0 01s 100 135 200 300 400500600700 1000 1500 2000 3000 4000 Figure 3 8 Breaker operating characteristics curve ...

Page 109: ...o not connect the cable with the factory side at this point 2 Turn OFF the main breaker of this system 3 Undo the screws 2 pcs to remove the front panel Be sure to use a Phillips screwdriver 4 Undo the screws 2 pcs or press claw to remove the breaker cover Be sure to use a Phillips screwdriver Tips Make sure the breaker is at the OFF position Otherwise the removal of the front panel is not possibl...

Page 110: ...r This System on page 3 8 for the recommended cable size and crimp contact Correct phase rotation is required when attach the power cable to the breaker terminal Do not drop a screw or washer in the electrical unit when attaching the breaker cover and terminal Do not leave it in the unit if dropped in Potential failure may occur if the power is turned ON without removing it Power cable Cap Figure ...

Page 111: ...inal M8 of the power cable to the earth bar Be sure to use a 13 mm open end wrench Recommended torque 12 5 N m 9 22 ft lbf Tips See Table 3 1 Power Cable and Main Breaker This System on page 3 8 for torque value 8 Attach the breaker cover to the breaker 9 Attach the front panel 10 Connect the power cable to the power breaker on customer side primary side Figure 3 11 Connection of Power Cable and G...

Page 112: ...d Installation 3 3 Procedure for Installation HRZ Series 3 14 11 Connect the communication cables with P1 and P2 Serial RS 485 communication cable P1 D sub 25P female P2 D sub 9P female Contact signal cable Figure 3 12 Signal line mounting ...

Page 113: ...d liquid as the circulating fluid do not use pipe tape Liquid leakage may occur around the pipe tape for sealant we recommend that you use the following sealant SMC Part No HRZ S0003 Silicone sealant Use clean pipes and pipe fittings free of particles oil and moisture Apply air blow to the parts before using The presence of particles oil or moisture in the circulating fluid circuit causes insuffic...

Page 114: ...ommended piping installation Table 3 4 Recommended Pipe No Name Size Material 1 Valve Rc3 4 Stainless steel 2 Y strainer 100 m Rc3 4 Stainless steel 3 Valve Rc1 2 Stainless steel 4 Y strainer 5 m Rc1 2 Stainless steel Figure 3 13 Pipe Tightening Figure 3 14 Recommended Piping Installation Pipe coupling section System on the customer side Circulating fluid supply Circulating fluid return Facility w...

Page 115: ...0 30 70 24 to 30 60 22 to 30 50 19 to 30 40 15 to 30 30 11 to 30 25 70 20 to 30 60 17 to 30 50 14 to 30 40 11 to 30 30 10 to 30 20 70 15 to 30 60 13 to 30 50 10 to 30 40 30 15 70 10 to 30 60 50 40 30 10 70 10 to 30 60 50 40 30 No thermal insulator is assigned to facility water circuit In order to avoid dew condensation of facility water circuit retain the facility water temperature inside the rang...

Page 116: ......

Page 117: ...re that no remote signal is being issued from your system System startup takes effect upon power ON if this system receives a remote signal and it is in remote mode 4 1 5 Check emergency off EMO switch Make sure of the location of the emergency off EMO switch before operating the system See section 1 6 1 Emergency off EMO switch in Chapter 1 Safety for details 4 2 Opening of Facility water Valve O...

Page 118: ...n the circulating fluid may cause system failure due to it being frozen in the system High concentration EG in the circulating fluid may cause circulating pump overload which triggers Return Low Flow FLT Potential cooling error may occur if the circulating fluid varies in concentration Make sure of no oil moisture and other foreign materials contaminate the circulating fluid Potential cooling erro...

Page 119: ...l in the level gauge will start to drop During initial priming of the external piping addition fluid is needed See section 8 1 1 System specification on page 8 1 for Sub Tank and Main Tank capacity When supplying the circulating fluid make sure that the fluid inside this system has dropped to room temperature for the prevention of burns Circulating fluid must be supplied to be in the range between...

Page 120: ...LCD screen The screen will change to the Status screen 1 in approx 20 seconds and the system is ready to run Tips It is normal if the System Information screen is not displayed See section 5 3 33 System Information screen in Chapter 5 System Operation on page 5 35 for details Figure 4 2 Main Breaker at ON Press the emergency off EMO switch immediately upon ocurrence of abnormal conditions Be sure ...

Page 121: ...ormation screen is not displayed See section 5 3 33 System Information screen in Chapter 5 System Operation on page 5 35 for details 4 5 2 System shutdown Press the START STOP key on the operation display panel The System Information screen is flashing on the LCD screen and the RUN lamp comes on The compressor comes to a halt approx 20 seconds after circulating pump stop for protection of the comp...

Page 122: ...HRX OM X010 Chapter 4 System Startup and Shutdown 4 5 System Startup and Shutdown HRZ Series 4 6 ...

Page 123: ...y Panel Using sharp object will damage the panel Operation Display Panel ENT key Used to determine a set value RESET key Used to stop an alarm buzzer and initialize the alarm REMOTE lamp This comes on when the system is in remote mode RUN lamp This comes on when the equipment is running SEL key Used to select the screen key Used to move the cursor and change set values LCD screen ALARM lamp This c...

Page 124: ...USTOM DIO OFF MAINTENANCE 1 VALVE OPEN 2 ALARM HISTORY 3 RUNNING DATA VALVE OPEN VALVE CLOSE ALARM HIST 0 11 Reservoir High Temp WRN DRV TIME 17520h RUN CNT 24 DRV TIME 17520h DISV CNT 1435 ALARM HIST 149 11 Reservoir High Temp WRN DRV TIME 17520h MAINTENANCE 4 MONITOR 5 AUTO PURGE 6 DI ACC RESET CONTROL SET TEMP SP 25 0 OFFSET 0 0 PUMP SP 15 0Hz PUMP FREQ SET RTN FLOW 0 0LPM PRESS 0 00MPa FREQ 15...

Page 125: ...arm number and alarm message are displayed in the event of an error in this system Not displayed if no error Page 5 9 Menu screen Allows setting screen selection Page 5 9 Setting screen Allows switching to Control Setting screen Alarm Setting screen and Initial Setting screen Page 5 10 Control screen 1 2 3 1 3 2 Allows the setting of pump frequency pressure or flow rate by pump inverter Page 5 11 ...

Page 126: ...ure 5 3 Model Indication Screen The Model Indication screen is displayed upon power ON of this system This screen remains ON for approx 5 seconds and is automatically switched to the Status screen 1 The Alarm Display screen is displayed if error occurs in this system Table 5 2 Model Indication screen No Item Descriptions 1 System model 2 System revision No 1 2 POWER ON ...

Page 127: ...circulating fluid A value derived according to the offset 1 if applied 2 TEMP SP Set value of circulating fluid discharge temperature 3 RTN FLOW Return flow rate of the circulating fluid 4 PRESS Discharge pressure of the circulating fluid Tips See Appendix 8 4 Offset Function in Chapter 8 on page 8 14 for details on offset 1 Unit of RTN FLOW and PRESS can be selected on Initial Setting screen 1 Se...

Page 128: ... 2 Table 5 4 Status screen 2 No Item Descriptions 1 TEMP PV Discharge temperature of the circulating fluid 2 TEMP SP Set circulating fluid temperature 3 TEMP READY Displays the BAND READY Displayed when set value conditions are satisfied 1 4 TEMP BAND Set value of BAND range 1 Tips See Appendix 8 5 BAND READ in Chapter 8 on page 8 17 on offset features 1 2 1 3 4 POWER ON ...

Page 129: ...5 7 OFFSET OFF OFFSET 0 0 5 3 4 Status screen 3 Figure 5 6 Status screen 3 Table 5 5 Status screen 3 No Item Descriptions 1 OFFSET The current offset mode 1 2 OFFSET Set offset 1 Tips See Appendix 8 4 Offset Function in Chapter 8 on page 8 14 on offset features 1 1 2 POWER ON ...

Page 130: ... 1 DI PV Circulating fluid electric resistivity 2 DI SP Set value of circulating fluid electric resistivity 3 DI ACC Accumulated time that the solenoid valve in DI circuit is activated 4 DI SV Open close status of solenoid valve in DI circuit Tips It is displayed only if the DI Control Kit optional is provided DI PV 0 0MΩ DI SP 0 0MΩ DI ACC 0h DI SV OFF 2 3 1 4 POWER ON ...

Page 131: ...Troubleshooting in Chapter 6 Error Message and Troubleshooting on page 6 2 for alarm numbers and messages 5 3 7 Menu screen MENU 1 SETTING 2 REMOTE MODE 3 MAINTENANCE Figure 5 9 Menu screen Table 5 7 Menu screen No Item Descriptions 1 SETTING Switches to the Setting screen with the press of the ENT key 2 REMOTE MODE Switches to the Mode Selection screen with the press of the ENT key 3 MAINTENANCE ...

Page 132: ...tting screen Table 5 8 Setting screen No Item Descriptions 1 CONTROL SET Switches to the Control Setting screen 1 with the press of the ENT key 2 ALARM SET Switches to the Alarm Setting screen 1 with the press of the ENT key 3 INITIAL SET Switches to the Initial Setting screen 1 with the press of the ENT key Tips or key is used for selecting Item 1 3 2 POWER ON ...

Page 133: ...Allows the setting of OFFSET value 1 20 0 to 20 0 deg C 0 0 deg C 3 PUMP SP Allows the setting of circulating fluid flow rate When PUMP IV on Initial Setting screen 3 is set to FLOW HRZ WS W1S W2S F 10 0 to 40 0LPM 2 6 10 6GPM HRZ008 L F 15 0 to 40 0LPM 4 0 10 6GPM HRZ008 L1 F 10 0 to 40 0LPM 2 6 10 6GPM HRZ WS W1S W2S F 20 0LPM 5 3GPM HRZ008 L F 30 0LPM 7 9GPM HRZ008 L1 F 20 0LPM 5 3GPM Allows th...

Page 134: ... 0 5MΩ 2 DI HYS Allows the setting of hysteresis for circulating fluid electric resistivity See Figure about hysteresis 0 0 to 0 9MΩ 0 3MΩ Figure 5 13 DI Hysteresis setting DI HYS Tips It is displayed only if the DI Control Kit optional is provided or key is used for selecting Item and move to the other Control Setting screens And pressing ENT key enabling changing the set point CONTROL SET DI SP ...

Page 135: ...f circulating fluid discharge temperature HRZ002 WS W1S F 10 0 to 90 0 deg C HRZ004 008 010 WS W1S F 20 0 to 90 0 deg C HRZ W2S F 10 0 to 60 0 deg C HRZ008 L L1 F 20 0 to 40 0 deg C 25 0 deg C 2 OFFSET Allows the setting of OFFSET value 1 20 0 to 20 0 deg C 0 0 deg C 3 PUMP SP Switched to the Control Setting screen 3 2 Pump frequency setting screen Tips In the case of using Offset Function select ...

Page 136: ...actory Default 1 RTN FLOW Return flow rate of circulating fluid 2 PRESS Discharge pressure of circulating fluid 3 FREQ Allows the setting of pump frequency Control Setting screen 3 2 is displayedonly if PUMP IV on Initial Setting screen 3 is set to FREQ 15 0 to 60 0Hz 15 0Hz Tips Pressing ENT key enabling to change the set point of FREQ Unit of RTN FLOW and PRESS can be selected on Initial Setting...

Page 137: ...to 63 0 deg C HRZ008 L L1 F 20 0 to 45 deg C HRZ WS W1S F 93 0 deg C HRZ W2S F 63 0 deg C HRZ008 L L1 F 45 0 deg C 2 LO TEMP Allows the setting of temperature to generate 32 Reservoir Low Temp WRN Alarm is raised when circulating fluid temperature falls below the set value HRZ002 WS W1S F 15 0 to 90 0 deg C HRZ004 008 010 WS W1S F 25 0 to 90 0 deg C HRZ W2S F 5 0 to 60 0 deg C HRZ008 L L1 F 25 0 t...

Page 138: ... if invalid OFF is selected OFF ON ON 2 LO FLOW Allows the setting of flow rate to generate 13 Return Low Flow WRN Alarm is raised when circulating fluid flow rate falls below the set value HRZ WS W1S W2S F 8 0 to 40 0LPM 2 1 10 6GPM HRZ008 L L1 F 15 0 to 40 0LPM 4 0 10 6GPM HRZ WS W1S W2S F 8 0LPM 2 1GPM HRZ008 L L1 F 15 0LPM 4 0GPM Tips or key is used for selecting Item and move to other Alarm S...

Page 139: ...ault 1 LOW DI Allows the setting of DI value to generate 24 DI Low Level WRN Alarm is raised when DI value falls below the set value Alarm is cancelled if the set value is 0 0 0 to 2 0MΩ 0 0MΩ Tips It is displayed only if the DI Control Kit optional is provided or key is used for selecting Item and move to other Alarm Setting screens And pressing the ENT key enabling to change the set value ALARM ...

Page 140: ...ting screen 1 No Item Descriptions Setting Range Factory Default 1 FLOW UNIT Allows the selection of the unit of flow rate LPM GPM LPM 2 PRESS UNIT Allows the selection of the unit of pressure MPa PSI MPa 3 OFFSET Allows the selection of Offset MODE MODE1 to 3 OFF OFF Tips or key is used for selecting Item and move to other Initial Setting screens And pressing the ENT key enabling to select the se...

Page 141: ... stored value after re turn ON the main breaker OFF ON ON 2 REM COM ERR Allows the selection of system condition when serial communication error occurs WRN Stop FLT Continued WRN FLT WRN 3 DEVICE ADRS 1 Allows the setting of the device address for serial communication 1 to 32CH 1 Tips or key is used for selecting Item and move to other Initial Setting screens And pressing the ENT key enabling to s...

Page 142: ... Circulating fluid Flow rate control PRESS Pump discharge pressure control FREQ FLOW PRESS FLOW 2 P LIMIT FUNC Allows the setting of pump discharge pressure upper limit function Valid ON Invalid OFF OFF ON OFF 3 P LIMIT Allows the setting of pump discharge pressure upper limit value This function enables the pump discharge pressure not to exceed the upper limit value to protect your system 0 10 to...

Page 143: ...AUTO Collection operation stops automatically when cllection finished normally TIME Collection continues for the setting time AUTO TIME AUTO 2 PURGE TIME When AUTO mode allows the setting for the time to raise TIME OUT When TIME mode allows the setting of the time to continue collection operation 1 to 600sec 300s Tips It is displayed only if the Circulating Fluid Automatic Collector optional is pr...

Page 144: ... input from operation display panel to prevent from unintended change of setting value from operaiton touch panel ALL When communication mode is LOCAL only following operations are possible START STOP Setting of SETTINGLOCK function When communication mode is DIO SEREMOTE only following operations are possible Setting of SETTINGLOCK function REM When communication mode is LOCAL normal operation is...

Page 145: ...s Setting Range Factory Default 1 TEMP BAND Allows the setting of band range to TEMP PV 1 0 to 99 9 deg C 1 0 deg C 2 READY TIME Allows the setting of time from when TEMP PV reaches the BAND range to when TEMP READY is displayed on operation display panel and Ready signal is output 1 to 999s 60s Tips or key is used for selecting Item and move to other Initial Setting screens And pressing the ENT k...

Page 146: ...larm signal selection P8 10 for details N A ALARM01 to 32 N A 2 E_OUT Allows the selection of EVENT Output Allows the setting of content of output for pin No 8 of Chapter 8 8 1 3Communication specification Table 8 7Compliance pege 8 7 See communication specification for details N A TEMP READY 1 AUTO PURGE N A Tips See Chapter 8 8 5BAND READY function page 8 17 for TEMP BAND READY TIME 1 or key is ...

Page 147: ... Initial Setting screen 8 Table 5 23 Initial Setting screen 8 No Item Descriptions Setting Range Factory Default 1 CUSTOM DIO Allows the setting for DIO signal customize valid ON invalid OFF See Communication Specifications for details OFF ON OFF Tips Press the ENT key to make the setting changeable Select the operation mode with the or key 1 POWER ON ...

Page 148: ...llowed only through contact signal When Analog Communication option is provided TEMP SP value setting is available through analog signal SER REMOTE System start stop and TEMP SP value setting are available only through serial RS 485 communication DNET REMOTE 1 System start stop and TEMP SP value setting are available only through Device Net communication LOCAL DIO REMOTE SER REMOTE DNET REMOTE 1 L...

Page 149: ... ltem screen 3 with the press of the ENT key 2 ALARM HISTORY Switches to the Maintenance ltem screen 4 with the press of the ENT key 3 RUNNING DATA Switches to the Maintenance ltem screen 5 with the press of the ENT key Tips or key is used for selecting Item and move to other Maintenance screens And pressing the ENT key enabling to change the setting or set value MAINTENANCE 1 VALVE OPEN 2 ALARM H...

Page 150: ...ntenance ltem screen 7 with the press of the ENT key 3 DI ACC RESET 2 Switches to the Maintenance ltem screen 8 with the press of the ENT key Tips It is displayed only if the Circulating Fluid Automatic Collector optional is provided 1 It is displayed only if the DI Control Kit optional is provided 2 or key is used for selecting Item and move to other Maintenance screens And pressing the ENT key e...

Page 151: ...riptions 1 VALVE The solenoid valve for DI circuit is opened forcefully The solenoid valve for DI circuit is closed forcefully Tips It is displayed only if the DI Control Kit optional is provided For other options N A is displayed on the screen If you move the screen from Maintenance screen 3 The forced operation of the solenoid valve will be canceled VALVE OPEN VALVE CLOSE 1 POWER ON ...

Page 152: ...Maintenance screen 4 No Item Descriptions 1 ALARM HIST Data recording stores up to 150 pieces of alarm history data If there are 150 or more pieces of data the alarm history data is to be deleted in order of longest stores ALARM HIST 0 11 Reservoir High Temp WRN DRV TIME 17520h ALARM HIST 149 11 Reservoir High Temp WRN DRV TIME 17520h 1 1 POWER ON ...

Page 153: ...tional is provided For other options N A is displayed on the screen If you move the screen from Maintenance screen 3 The forced operation of the solenoid valve will be canceled No Item Descriptions 1 RUN CNT Number of times of operation on the system 2 DRV TIME Operating time on the system 3 DISV CNT 1 Number of times that the solenoid valve for DI circuit is activated RUN CNT 24 DRV TIME 17520h D...

Page 154: ...ESS 2 10MPa LO PRESS 0 20MPa 5 3 30 Maintenance screen 6 Figure 5 33 Maintenance screen 6 Table 5 30 Maintenance screen 6 No Item Descriptions 1 RTN TEMP Return temperature of circulating fluid 2 HI PRESS High pressure of refrigerant circuit 3 LOW PRESS Low pressure of refrigerant circuit 1 2 3 POWER ON ...

Page 155: ...ollecting time exceeds setting value IN RUNNING This system during operation ALARM Alarm raised to this system TEMP OUT Circulating fluid temp is out of range for starting collection 2 PURGE TIME Setting value of PURGE TIME 3 PURGE MODE Start Stop circulating fluid automatic collection After pressing ENT key pressing either or key to select Start Stop Then automatic collection Start Stop is availa...

Page 156: ...ACC Accumulated time that the solenoid valve for DI circuit is activated 2 DATA RESET Allows to reset DI ACC After pressing ENT key pressing either or key to select Yes No Then Reset Not reset DI ACC after pressing ENT key to fix the setting Yes Reset DI ACC No Not reset DI ACC Tips It is displayed only if the DI Control Kit optional is provided DI ACC RESET DI ACC 0h DATA RESET No 1 2 POWER ON ...

Page 157: ...itioning of the electronic expansion valve is performed RESERVOIR The circulating fluid flows in this system through the internal pump Pump Up Mode Running Start If your piping is supplied with an insufficient amount of thecirculating fluid at system startup the circulating pump in this system activated repeating ON OFF to replenish piping with the circulating fluid Continuous operation is initiat...

Page 158: ...lay the Menu screen Figure 5 38 Menu screen 2 With the use of the arrow keys move the cursor to 1 SETTING and press the ENT key The Setting screen is displayed Figure 5 39 Setting screen 3 With the use of the arrow keys move the cursor to 1 CONTROL SET and press the ENT key The Control Setting screen 1 is displayed Figure 5 40 Control setting screen1 MENU 1 SETTING 2 REMOTE MODE 3 MAINTENANCE SETT...

Page 159: ...temperature to 34 1 deg C key Used to add one value on which the cursor is placed key Used to subtract one value on which the cursor is placed key Used to move the cursor to the right Figure 5 42 Control Setting screen 1 Change of set value 6 Press the SEL key to display the Menu screen 1 Figure 5 43 Control Setting screen 1 Setting Confirmation CONTROL SET TEMP SP 25 0 OFFSET 0 0 PUMP SP 20 0LPM ...

Page 160: ...EL key to display the Menu screen Figure 5 45 Menu screen 2 With the use of the arrow keys move the cursor to 2 REMOTE MODE and press the ENT key The Mode Selection screen is displayed Figure 5 46 Mode Selection screen 3 Press the ENT key The name of current mode LOCAL flashes and enable to switch the setting Figure 5 47 Mode Selection screen 4 Use the arrow keys to select SER REMOTE Figure 5 48 M...

Page 161: ...T key The Setting screen is displayed Figure 5 51 Setting screen 3 With the use of the arrow keys move the cursor to 3 INITIAL SET and press the ENT key The Initial setting screen 1 is displayed Figure 5 52 Initial Setting screen 1 4 With the use of the arrow keys Move the cursor to Initial Setting screen 3 Figure 5 53 Initial Setting screen 3 MENU 1 SETTING 2 REMOTE MODE 3 MAINTENANCE SETTING 1 C...

Page 162: ...th the use of the arrow keys move the cursor to PUMP IV and press the ENT key The name of current setting FLOW flashes and enable to switch the setting Figure 5 54 Initial Setting screen 3 6 With the use of the arrow keys to select FREQ Figure 5 55 Initial Setting screen 3 7 Press the ENT key INITIAL SET PUMP IV FREQ P LIMIT FUNC OFF P LIMIT 1 00MPa ...

Page 163: ...amp comes on Alarm buzzer comes on The Alarm Display screen is displayed on the LCD screen Error signal is issued through external communication See section 8 1 3 Communication specification in Chapter 8 Appendix for details on page 8 7 This system is brought to a stop forcefully according to error types Figure 6 1 Error Occurrence LCD screen ALARM lamp is ON Alarm Display screen Alarm No and alar...

Page 164: ...cified value Specified value HRZ WS W1S W2S F 3 0MPa HRZ008 L L1 F 2 5MPa Check that facility water is being supplied to this system 04 CPRSR Overheat FLT Stop The temperature in the compressor was excessive Specified value HRZ WS W1S W2S F 110 deg C HRZ008 L L1 F 110 deg C Check that facility water is being supplied to this system 05 Reservoir Low Level FLT Stop An insufficient amount of the circ...

Page 165: ...w your set value Specified value HRZ WS W1S W2S F 8 0 to 40 0L min 2 1 10 6GPM HRZ008 L L1 F 15 0 to 40 0L min 4 0 10 6GPM Factory default HRZ WS W1S W2S F 8 0L min 2 1GPM HRZ008 L L1 F 15 0Lmin 4 0GPM Reset the setting flow rate 19 FAN Motor Stop WRN Continued The ventilating fan came to a stop Check that the air vent on the back of the system is not blocked off 20 Internal Pump Time Out WRN Cont...

Page 166: ... repair 28 CPRSR INV Error FLT Stop An error was detected in the inverter for compressor Contact the system supplier for request of inspection and repair 29 RFGT Low Press FLT Stop The refrigerant pressure falls below the specified value Specified value 0 1MPa Contact the system supplier for request of inspection and repair 32 Reservoir Low Temp WRN Continued The temperature of the circulating flu...

Page 167: ...on mgFe L Max 1 0 Max 0 3 Copper mgCu L Max 0 3 Max 0 1 Sulfide ion mgS2 L Not be detected Ammonium ion mgNH4 L Max 1 0 Max 0 1 Residual chlorine mgCl L Max 0 3 Max 0 3 Free carbon dioxide mgCO2 L Max 4 0 Max 4 0 Filtering µm Max 5 According to the Water quality guideline for refrigeration air conditioning equipment JRA GL 02 1994 Only designated circulating fluid is permitted to use for this syst...

Page 168: ...of the refrigerant pressure gauge Value of HI PRESS in Maintenance screen 6 page 5 32 should be in the following range HRZ010 W S F 0 5 to 2 5 MPa HRZ008 L L1 F 0 5 to 2 0 MPa Discharge pressure of circulating fluid Confirm the reading on the LCD screen Reading should not have deviated much from last inspection Circulating fluid flow rate Confirm the reading on the LCD screen Reading should not ha...

Page 169: ...cified Ventilation hole and electrical parts No particles and dust should be present 7 3 Storage The following should be performed for system long term storage 1 Drain the circulating fluid See section 7 3 1 Draining of circulating fluid out of tank for details on page 7 4 2 Drain the facility water See section 7 3 2 Draining of facility water for details on page 7 5 3 Cover the system with a plas...

Page 170: ...ort Container for circulating fluid recovery Drain port Circulating fluid fill port cap Circulating fluid return Figure 7 1 Container for Circulating Fluid Recovery Use the clean container for circulating fluid recovery Reuse of the recovered circulating fluid with contaminated will cause insufficient cooling and system failure Be sure to wait until the circulating fluid obtains room temperature f...

Page 171: ...the piping connections on the rear of this system A 7L capacity or bigger drain pan is required Figure 7 2 Plug Attachment Figure 7 3 Drain Pan Attachment Be sure to drain the facility water only when it is at room temperature Trapped fluid inside the system can still be hot Potential burns can occur if disregarded Max 10cm Rear Drain pan Facility water outlet Facility water inlet Plug Circulating...

Page 172: ... port 7 4 Periodic Replacement Parts Replacement of consumables listed in the following table is recommended Contact the system supplier for request of part replacement Table 7 4 Periodic Replacement Part List Part Recommended replacement cycle Internal pump Every 3 yrs Circulating pump Every 3 yrs Ventilating fan Every 3 yrs Inverter Coolong Fan Every 3 yrs Note A replacement cycle may vary with ...

Page 173: ... The capacity is derived under the conditions that the circulating fluid temp is 20 deg C the facility water temp is 25 deg C and that the circulating fluid flow rate is obtained at a specified flow rate of pump capacity 2 This is a system output temperature with flow rate defined in pump capacity secured when stabilized with no disturbance Its upper limit may be violated if an insufficient amount...

Page 174: ... the circulating fluid flow rate is obtained at a specified flow rate of pump capacity 2 This is a system output temperature with flow rate defined in pump capacity secured when stabilized with no disturbance Its upper limit may be violated if an insufficient amount of the circulating fluid is present or a disturbance to flow rate is observed 3 Pure ethylene glycol needs dilution with fresh water ...

Page 175: ...ty 2 This is a system output temperature with flow rate defined in pump capacity secured when stabilized with no disturbance Its upper limit may be violated if an insufficient amount of the circulating fluid is present or a disturbance to flow rate is observed 3 Water quality of The Japan Refrigeration and Air Conditioning Industry Association JRA GL 02 1994 Recirculating fluid of Cooling water sy...

Page 176: ...d under the conditions that the facility water temp is 25 deg C and that the circulating fluid flow rate is obtained at a specified flow rate of pump capacity Applied to 50 60Hz 2 This is a system output temperature with flow rate defined in pump capacity secured when stabilized with no disturbance Its upper limit may be violated if an insufficient amount of the circulating fluid is present or a d...

Page 177: ...e conditions that the facility water temp is 25 deg C and that the circulating fluid flow rate is obtained at a specified flow rate of pump capacity Applied to 50 60Hz 2 This is a system output temperature with flow rate defined in pump capacity secured when stabilized with no disturbance Its upper limit may be violated if an insufficient amount of the circulating fluid is present or a disturbance...

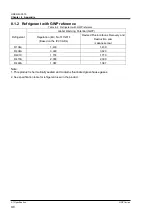
Page 178: ...ing Potential GWP Regulation EU No 517 2014 Based on the IPCC AR4 Revised Fluorocarbons Recovery and Destruction Law Japanese law R134a 1 430 1 430 R404A 3 922 3 920 R407C 1 774 1 770 R410A 2 088 2 090 R448A 1 387 1 387 Note 1 This product is hermetically sealed and contains fluorinated greenhouse gases 2 See specification table for refrigerant used in the product ...

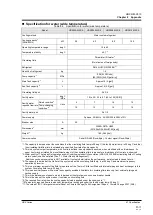
Page 179: ... 7 8 7 8 1 3 Communication specification This section provides the general outline of communications utilized in this system For detail specification we provide a separate system manual Communication Specification which is available through your local distributor ...

Page 180: ...Ω Input accuracy 0 2 F S or less Analog output signa Output voltage range 10 to 10V Max output current 10mA Output accuracy 0 2 F S or less Circuit block diagram The product DIGITAL CIRCUIT DC24V 15V 100Ω ANALOG COM 4 7kΩ 24COM 1 24COM 4 7kΩ 4 7kΩ 4 7kΩ 15V 15V 100Ω 15V ANALOG COM 15V 15V ANALOG COM ANALOG CIRCUIT 14 3 16 4 17 6 19 7 20 8 15 5 18 11 23 10 22 12 24 13 25 1MΩ EMO CIRCUIT 2 DC24V Pin...

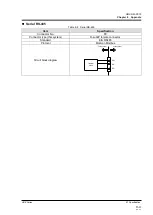
Page 181: ...ion 8 9 8 9 Serial RS 485 Table 8 8 Serial RS 485 Item Specification Connector No P2 Connector type this system D sub9P female connector Standard EIA RS485 Protocol Modicon Modbus Circuit block diagram Internal circuit This system Your system 5 SD SD SG 7 2 ...

Page 182: ...RN 06 ALARM07 Reservoir High Level WRN 07 ALARM08 Temp Fuse Cutout FLT 08 ALARM09 Reservoir High Temp FLT 09 ALARM10 Return High Temp WRN 10 ALARM11 Reservoir High Temp WRN 11 ALARM12 Return Low Flow FLT 12 ALARM13 Return Low Flow WRN 13 ALARM19 FAN Motor Stop WRN 19 ALARM20 Internal Pump Time Out WRN 20 ALARM21 Controller Error FLT 21 ALARM22 Memory Data Error FLT 22 ALARM23 Communication Error 2...

Page 183: ... Outer Dimensions 8 2 1 Part 1 HRZ WS F HRZ W1S F HRZ W2S F Figure 8 1 Outer Dimensions 8 2 2 Part 2 HRZ008 L F HRZ008 L1 F Figure 8 2 Outer Dimensions Top Left Back Front 870 34 25 inch 950 37 4 inch 380 14 96 inch 1080 42 52 inch 1075 42 32 inch 415 16 34 inch Back Left Front ...

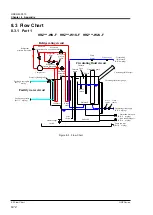
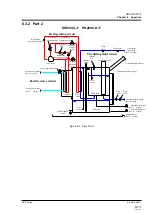
Page 184: ...ch Refrigerant pressure switch Water leakage switch Facility water outlet Rc1 2 w plug Facility water inlet Rc1 2 w plug Circulating fluid return Rc3 4 w plug Sub tank drain port Rc3 8 w plug Circulating fluid supply Rc3 4 w plug Main tank drain port Rc3 8 w plug Drain pan port Rc3 8 w plug Circulating fluid fill port Refrigerating circuit Electronic expansion valve Electronic expansion valve Elec...

Page 185: ...nt pressure switch Water leakage switch Facility water outlet Rc1 2 w plug Facility water inlet Rc1 2 w plug Circulating fluid return Rc3 4 w plug Sub tank drain port Rc3 8 w plug Circulating fluid supply Rc3 4 w plug Main tank drain port Rc3 8 w plug Drain pan port Rc3 8 w plug Circulating fluid fill port Refrigerating circuit Electronic expansion valve Electronic expansion valve Electronic expan...

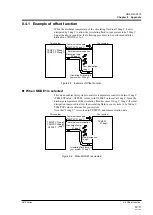
Page 186: ...mperature of the circulating fluid E g TEMP SP value 20 deg C OFFSET value 2 deg C Circulating fluid discharge temp 22 deg C TEMP PV 22 deg C When MODE2 is selected This mode is used to exercise temperature control to allow the discharge temperature of the circulating fluid to be TEMP SP value TEMP PV value denotes Circulating fluid discharge temp value OFFSET value E g TEMP SP value 20 deg C OFFS...

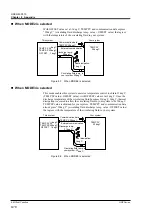
Page 187: ... C Once the discharge temperature of the circulating fluid becomes 31deg C 1deg C thermal dissipation is assured to allow the circulating fluid in your system to be 30deg C TEMP SP value is obtained for your system Note that 31deg C is recorded in TEMP PV and communication data Figure 8 6 When MODE1 is selected This system Your system Discharge temp 30 Circulating fluid temp in your system 29 TEMP...

Page 188: ...d to allow the circulating fluid in your system to be 30deg C TEMP SP value is obtained for your system TEMP PV and communication data also express 30deg C circulating fluid discharge temp value OFFSET value that agrees with the temperature of the circulating fluid in your system Figure 8 8 When MODE3 is selected deg C 1 This system Your system Discharge temp 30 Circulating fluid temp in your syst...

Page 189: ... BAND and REDY TIME Allows the setting of the communication output Figure 8 9 BAND READY function Examples of Setting TEMP SP 20deg C BAND 2deg C READY TIME 60sec TEMP READY is displayed on the operation display panel 60 sec after TEMP PV value becomes 18 deg C to start output by communication Necessary condition is that TEMP PV value after 60 sec is 20 2 0 deg C or less See 5 3 4 Status screen 3 ...

Page 190: ...and attach the anti seismic bracket optional HRZ TK002 to secure this system Figure 8 10 Anchor Bolt Mounting Position Front Anti seismic bracket optional Anchor bolt 4 Ø14 Top Anti seismic bracket is an optional accessory which is required for the installation of this system HRZ TK002 It is your responsibility to prepare anchor bolts suitable for your floor material M12 anchor bolts 4 pcs are req...

Page 191: ...the anti seismic bracket Figure 8 11 Anchor Bolt Mounting Position Anchor bolt Anchor bolt Adjustable foot Top Anchor bolt Anchor bolt 2 Ø9 notch Anti seismic bracket accessory Anti seismic bracket is an accessory which is required for the installation of this system It is your responsibility to prepare anchor bolts suitable for your floor material M8 anchor bolts 8 pcs are required ...

Page 192: ...Compliance HRZ Series 8 20 8 7 Compliance This system conforms to the following standards Table 8 10 Compliance CE Marking EMC Directive 2014 30 EU Machinery Directive 2006 42 EC RoHS Directive 2011 65 EU SEMI S2 S8 F47 UL E229305 UL1995 ...

Page 193: ...Inspection Sheet Model Serial No Circulating fluid supply port cap Looseness IN press Flowrate Temp Operating condition Error Circulating fluid flowrate Circulating fluid outlet press Refrigerant press Circulating fluid temp Fluid Level Cooling water Circulating fluid Humidity Temp Date After installation initial value Your name Installation Facility water Yes No Leakage Yes No Judgment Function D...

Page 194: ......

Page 195: ...stallation conditions defined in the Operation Manual 9 Troubles or damages that are not compliant with the 5 Warranty preconditions 4 Escape clause 1 Expenses of daily inspection and periodic inspection 2 Expenses of repair consigned with neither SMC nor our authorized service station 3 Expenses of transport installation and removal of this system 4 Expenses of removal of non genuine parts and re...

Page 196: ...oda ku Tokyo 101 0021 JAPAN Tel 81 3 5207 8249 Fax 81 3 5298 5362 URL https www smcworld com Note Specifications are subject to change without prior notice and any obligation on the part of the manufacturer 2020 SMC Corporation All Rights Reserved ...

Reviews: