background image

12

Instructions for the user
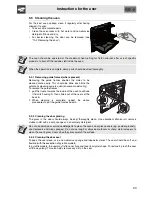
5.2

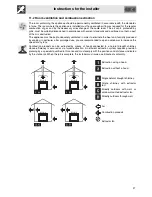
Using the support rack

The support rack is inserted into the tray (as shown in the figure). Using
this, foods can be cooked and the fat can be collected separately from the
food which is being cooked.
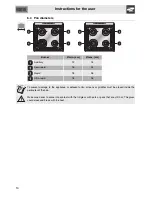
5.3

Using the reduction pan stands

The reduction pan stands should be placed
on top of the hob pan stands as shown in
the adjacent figure. Make sure they are
stable.
The WOK pan stand should only be used
when cooking with a wok.

5.4

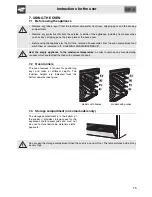
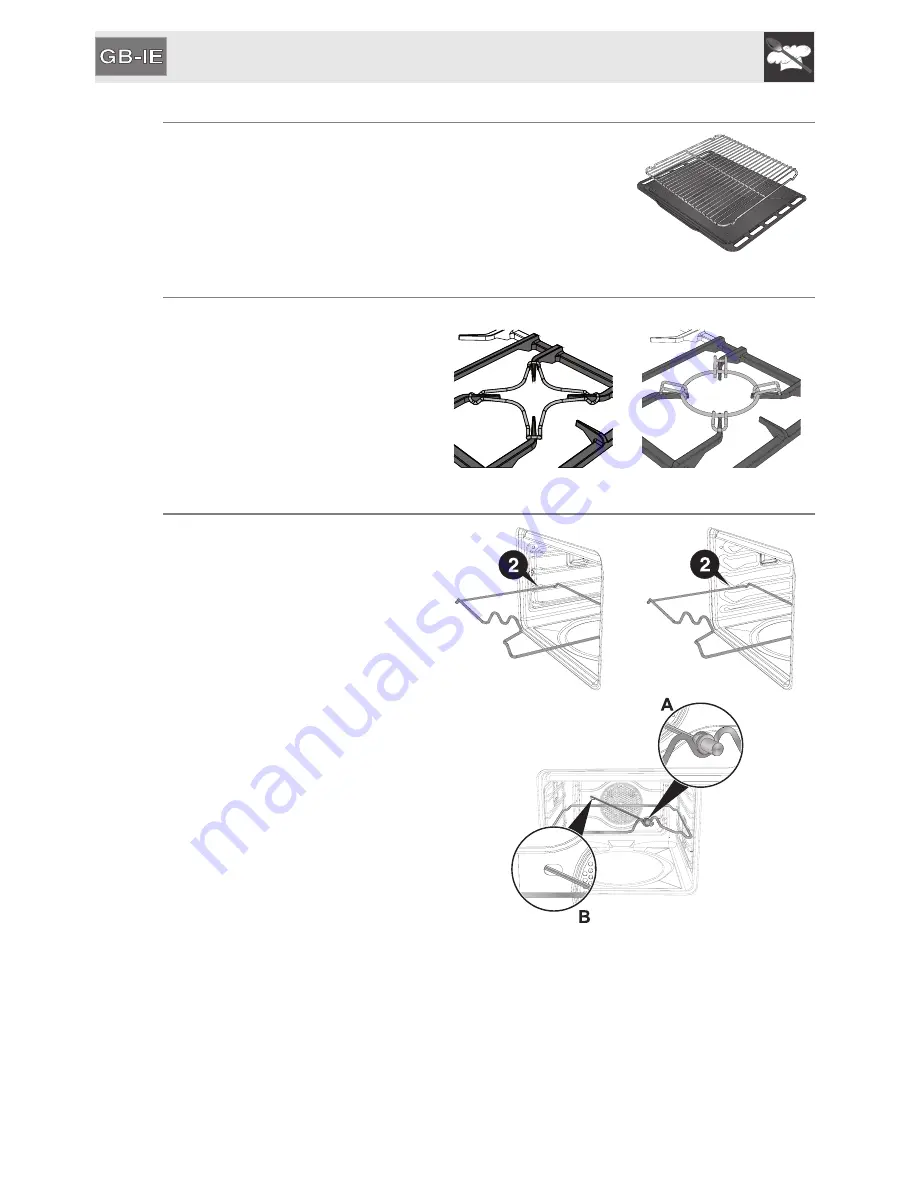
Using the rotisserie rod (on some models only)

When cooking with the rotisserie, position
the frame on the second runner (see 7.2
Oven runners). Once the rod frame is
inserted, the shaped part must sit facing
outwards (as shown in the figure).
Then prepare the rotisserie rod with the
food, using the clip forks provided.
So that you can handle the rod with the
food on it readily, screw on the handle
provided.

Having prepared the rotisserie rod with the
food, position it on the guide frame as
shown in the figure.
Insert the rod into the hole (detail B) so that
it connects with the rotisserie motor.
Make sure that the pin is placed correctly
on the guide frame (detail A).

Summary of Contents for CX 60

Page 1: ...stainless steel 21 9 2 Ordinary daily cleaning 21 9 3 Food stains or residues 21 9 4 Cleaning the cooking hob parts 21 9 5 Cleaning the oven 23 10 EXTRAORDINARY MAINTENANCE 24 10 1 Replacing the light bulb 24 10 2 Removing the door 24 10 3 Removing the door seal not on pyrolitic models 25 10 4 Removing the internal glass panels 25 11 INSTALLATION 26 11 1 Installing in kitchen units 26 11 2 Room ve...

Page 2: ...posed position either in the drawer where present or on the back of the appliance A copy of the identification plate is included in the booklet It should be applied to the appropriate space on the back of the cover Do not remove this plate for any reason Before the appliance is put into operation all labels and protective films applied on external surfaces must be removed Do not use metallic spong...

Page 3: ...rage compartment where present when the oven is on and still hot The temperatures inside it may be very high If the surfaces are still very hot during cooking do not pour water directly onto the trays The steam could cause severe burns and damage enamelled surfaces All cooking operations must take place with the door closed The dissipation of heat may cause hazards The manufacturer declines all re...

Page 4: ...e instructions provided later in this manual Should the appliance not function disconnect it from the power supply and call the nearest technical assistance centre The plug to be connected to the power supply cable and its socket must be of the same type and conform to the standards in force The socket must be accessible after the appliance has been installed Never disconnect the plug by pulling o...

Page 5: ...s must not come into contact with hot cooking zones Do not use steam jets for cleaning the appliance The steam could reach the electronics damaging them and causing short circuits Do not spray any spray products near the household appliance while it is in operation Do not use spray products while the appliance is still hot The gases contained in the spray may catch fire The manufacturer declines a...

Page 6: ...n the application of administrative sanctions The appliance does not contain substances in quantities sufficient to be considered hazardous to health and the environment in accordance with current European directives 3 2 Your environmental care Our appliances are packed in non polluting materials which are therefore compatible with the environment and recyclable Please help by disposing of the pac...

Page 7: ...s for the user 4 GET TO KNOW YOUR APPLIANCE Cooking hob Control panel Oven seal Oven light double on some models Door sensor on some models only Rack tray support frame guide Fan Roof liner on some models only Door ...

Page 8: ...nside the oven is kept constantly on the set level 4 1 2 Function selection knob The oven s various functions are suitable for different cooking modes After selecting the required function set the cooking temperature using the thermostat knob For more information on the cooking functions see 8 COOKING WITH THE OVEN 4 1 3 Hob burners control knob To light the flame press the knob and turn it anti c...

Page 9: ...t Original supplied and optional accessories may be ordered from any Authorised Support Centre Use only original accessories supplied by the manufacturer 5 1 Using the rack or tray The racks and trays are equipped with a mechanical safety lock which prevents them from being taken out accidentally To insert the rack or tray correctly check that the lock is facing downwards as shown in the figure at...

Page 10: ... 4 Using the rotisserie rod on some models only When cooking with the rotisserie position the frame on the second runner see 7 2 Oven runners Once the rod frame is inserted the shaped part must sit facing outwards as shown in the figure Then prepare the rotisserie rod with the food using the clip forks provided So that you can handle the rod with the food on it readily screw on the handle provided...

Page 11: ...the thermocouple has not heated up sufficiently Wait a few moments and repeat the operation keeping the knob pressed for longer If the burners should go out accidentally a safety device will be tripped cutting off the gas supply even if the gas tap is open In this case turn the knob to the OFF position and wait at least 60 seconds before trying to light the burner again 6 3 Practical hints for usi...

Page 12: ...id 16 24 Rapid 18 26 Ultra rapid 18 26 To prevent damage to the appliance or adjacent units all pans or griddles must be placed inside the perimeter of the hob Make sure never to come into contact with the lid glass with pots or pans that are still hot The glass could crack and break with the heat ...

Page 13: ...eat the empty appliance to the maximum temperature in order to remove any manufacturing residues which could affect the food with unpleasant odours 7 2 Oven runners The oven features 4 runners for positioning trays and racks at different heights The insertion heights are indicated from the bottom upwards see figure models with frames models with guides 7 3 Storage compartment on some models only T...

Page 14: ...ting the burners lift the glass lid before closing it again turn off all the burners and wait for them to cool 7 5 Cooling fan system on some models only The appliance is equipped with a cooling system which comes into operation as soon as a cooking function starts The fan causes a steady outflow of air that exits from the rear of the appliance and which may continue for a brief period of time eve...

Page 15: ... door in two stages keep it half open 5 cm approx for 4 5 seconds and then fully open To access food always leave the door open as short a time as possible to prevent the temperature in the oven from falling and ruining the food To prevent excessive amounts of condensation from forming on the internal glass hot food should not be left inside the oven for too long after cooking While cooking desser...

Page 16: ...the grill grilling perfectly even very thick foods Perfect for large cuts of meat e g shin of pork We recommend using the 4th runner FAN ASSISTED BOTTOM The combination of the fan with just the lower heating element allows cooking to be completed more rapidly This system is recommended for sterilising or for finishing off the cooking of foods which are already well cooked on the surface but not in...

Page 17: ...temperature and the cooking time depend on the quality and consistency of the dough Check whether the dessert is cooked right through at the end of the cooking time put a toothpick into the highest point of the dessert If the dough does not stick to the toothpick the dessert is cooked If the dessert collapses when it comes out of the oven on the next occasion reduce the set temperature by about 10...

Page 18: ...ll 3 250 9 11 9 11 Liver Fan assisted grill 4 250 2 3 2 3 Sausages Fan assisted grill 3 250 7 9 5 6 Meatballs Fan assisted grill 3 250 7 9 5 6 ROTISSERIE MEAT where present Chicken Rotisserie grill On a rotisserie rod 250 60 70 FISH Salmon trout 0 7 Kg Circular 2 160 170 35 40 BREAD and FOCACCIA Pizza Fan assisted static 1 250 6 10 Bread Fan assisted static 1 190 200 25 30 Focaccia Fan assisted st...

Page 19: ...cids How to use pour the product onto a damp cloth and wipe the surface rinse thoroughly and dry with a soft cloth or a microfibre cloth 9 3 Food stains or residues Do not use metallic sponges or sharp scrapers as they will damage the surfaces Use ordinary non abrasive products with the aid of wooden or plastic utensils if necessary Rinse thoroughly and dry with a soft cloth or a microfibre cloth ...

Page 20: ...warm water and a non abrasive detergent making sure to remove any encrustation then wait until they are perfectly dry Refit the flame spreader crowns making sure that they are correctly in place with their respective burner caps and ensuring that the holes A in the flame spreaders are aligned with the igniters and thermocouples Do no wash these parts in a dishwasher 9 4 4 Igniters and thermocouple...

Page 21: ...he inside of the oven to unhook it from its housing A then slide it out of the seats at the back B 2 When cleaning is complete repeat the above procedures to put the guide frames back in 9 5 2 Cleaning the door glazing The glass in the door should always be kept thoroughly clean Use absorbent kitchen roll remove stubborn dirt with a damp sponge and an ordinary detergent Do not use abrasive or corr...

Page 22: ...ving guide frames where present Then remove the bulb cover using a tool e g a screwdriver Remove the bulb by unscrewing filament bulbs or pulling it halogen bulbs in the indicated direction Replace the bulb with one of the same type 25W for filament bulbs or 40W for halogen bulbs Do not touch halogen bulbs directly with your fingers wrap them in insulating material 10 2 Removing the door Open the ...

Page 23: ...is operation may have to be repeated during the glass removal process if the door is accidentally freed Removing the internal glass panel Remove the internal glass panel by pulling the rear part gently upwards following the movement indicated by the arrows 1 Then pull the front of the glass panel upwards 2 Doing this detaches the 4 pins attached to the glass from their slots in the oven door Remov...

Page 24: ... on the type of installation this appliance belongs to class 2 subclass 1 Fig A Fig B or class 1 Fig C It may be installed next to walls one of which must be higher than the appliance at a minimum distance of 50 mm from the side of the appliance as shown in figures A and C relative to the installation classes Any wall units must be at a minimum distance of at least 750 mm above the appliance This ...

Page 25: ...eat and humidity produced by cooking in particular after prolonged use you are recommended to open a window or to increase the speed of any fans Combustion products can be extracted by means of hoods connected to a natural draught chimney whose efficiency is assured or via forced extraction An efficient extraction system requires precision planning by a specialist qualified in this area and must c...

Page 26: ...lling in kitchen units Connection using a rubber hose complying with current standards is only permitted if the hose can be inspected along its entire length The inside diameter of the hose must be 8 mm for LPG GAS and 13 mm for NATURAL GAS and CITY GAS Installation with a standards compliant rubber hose must be carried out so that the length of the piping does not exceed 1 5 metres make sure that...

Page 27: ...be used for both built in and free standing appliances Make the connection to the gas mains using a continuous wall flexible steel pipe whose specifications comply with the applicable standard Carefully screw the connector 3 to the appliance s gas connector 1 1 2 thread ISO 228 1 placing the seal 2 between them 11 3 3Connection with a flexible steel hose with conical fitting where present CAUTION ...

Page 28: ...e need replacing it must be longer than the current conduction wires so that if the plug is torn off the power cable it is the last to be detached Avoid use of adapters and shunts as these could cause overheating and risk of burns If a fixed connection is being used fit the power line with an omnipolar circuit breaker with a contact opening gap equal to or greater than 3 mm in an easily accessible...

Page 29: ...orktop by tightening screws A 11 6 Positioning and levelling the appliance After making the electrical and or gas connections level the appliance on the floor by means of its four adjustable feet First insert the front feet and then the rear feet The appliance must be properly levelled to ensure better stability Screw or unscrew the bottom part of the foot until the appliance is stable and level o...

Page 30: ...lame adjusted on the gas taps To change the nozzles proceed as described in the following paragraphs 12 1 Replacement of nozzles on the hob 1 Remove the pan stands and remove all the burner caps and flame spreader crowns to access the burner casings 2 Unscrew the nozzles using a 7 mm socket wrench 3 Replace the burner nozzles according to the type of gas to be used see 12 3 Burner and nozzle chara...

Page 31: ...apacity W Rated g h G30 Rated g h G31 Auxiliary 1 05 50 400 76 75 Semi rapid 1 8 65 500 131 129 Rapid 3 0 85 800 218 214 Ultra rapid 3 5 94 1600 255 250 Burner Rated heating capacity kW NATURAL GAS G20 20 mbar Nozzle diameter 1 100 mm Prechamber printed on nozzle Reduced capacity W Auxiliary 1 05 72 X 400 Semi rapid 1 8 97 Z 500 Rapid 3 0 115 Y 800 Ultra rapid 3 5 133 S 1600 ...

Page 32: ... burner minimum for city or natural gas Light the burner and turn it to the minimum position Extract the gas tap knob and turn the adjustment screw next to the tap rod depending on the model until the correct minimum flame is achieved Refit the knob and verify that the burner flame is stable when turning the knob rapidly from the maximum to the minimum position the flame must not go out Repeat the...

Reviews: