


Instructions for the user
6.
EXTRAORDINARY MAINTENANCE
The sterilizer may require extraordinary maintenance or replacement of
parts subject to wear such as seals, bulbs, and so on. The following
instructions describe how to carry out these minor maintenance
operations.
Before any intervention, disconnect the power supply of the
sterilizer.
6.1
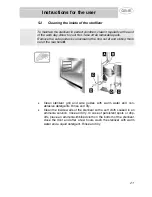
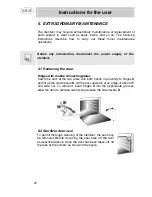
Removing the door
Hinges with mobile connecting plates
Catch the door at the two sides with both hands in proximity to hinges
C
and lift up the small levers
D
. Lift the door upwards at an angle of about 45°
and slide out. To remount, insert hinges
C
into the appropriate grooves,
allow the door to rest downwards and release the small levers
D
.
6.2
Sterilizer door seal
To permit thorough cleaning of the sterilizer, the seal may
be removed. Before removing the seal, take off the door
as described above. Once the door has been taken off, lift
the tabs at the corners as shown in the figure.
22


