background image


Instructions for the installer


2.


INSTALLATION OF THE STERILIZER 


The sterilizer must be set up on a perfectly flat surface and left standing 
free. Make sure to allow enough room at the back for easy access to the 
terminal strip for connection of the power cable to mains. 
Installation must be carried out by a 

qualified technician

 in compliance 

with applicable regulations in force. 


2.1


Electrical connection 


Make sure that the power line voltage matches the specifications 
indicated on the rating plate located to the rear of the sterilizer. 

This 

rating plate must never be removed.


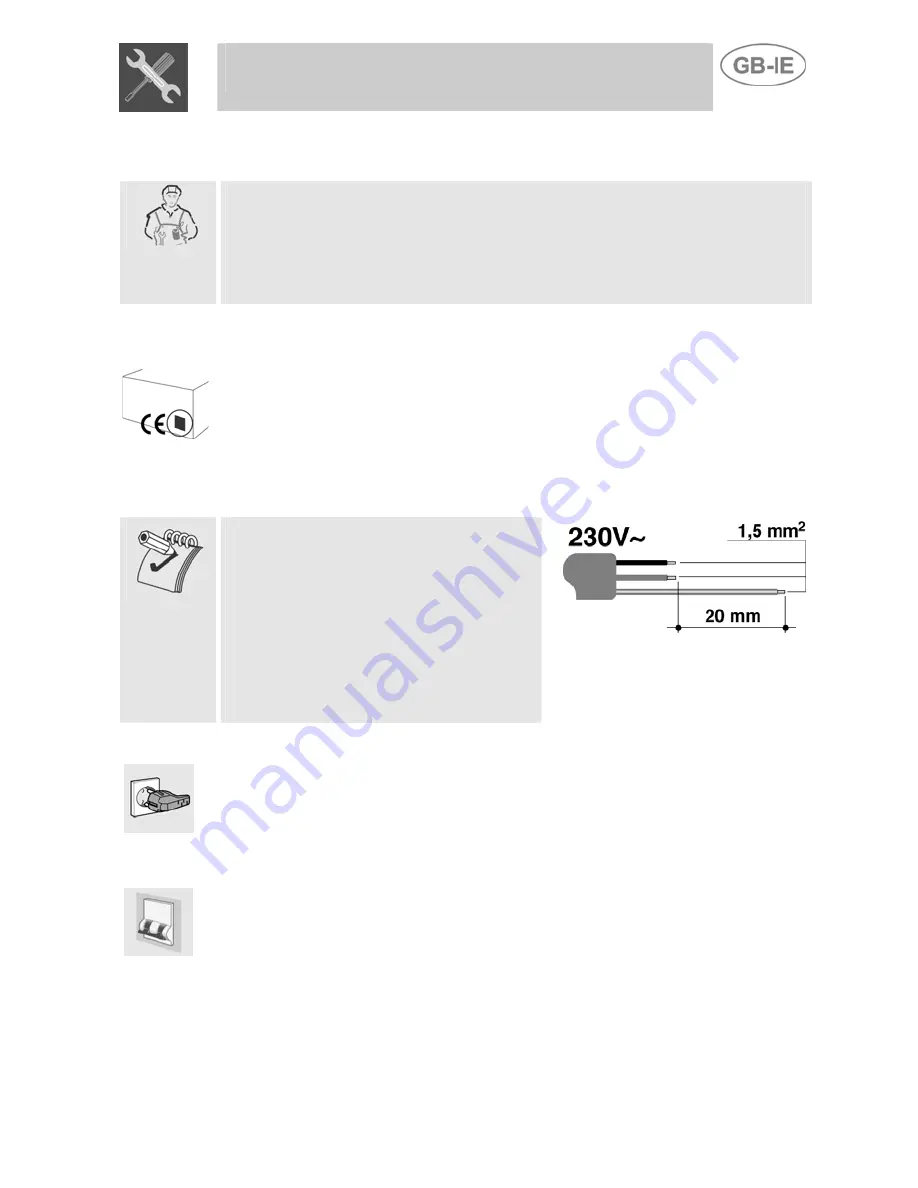
The sterilizer is supplied complete with a H07RN-F three-core supply 
cable for operation from a 

230V

 power supply. 


The standard cable is of the three-core 
3 x 1.5 mm

2

 H07RN-F type. 

If necessary the electrical supply cable 
should be replaced with an oil-resistant 
type (min. H05RN-F 3 x 1.5 mm

2

).  

The (yellow/green) earth cable on the 
end of the cable to be connected to the 
sterilizer should be at least 20 mm 
longer. 


Make sure that plug and wall socket are of the same type and are in 
conformity with regulations in force. Also check that the power supply 
line is provided with adequate earthing. Avoid using adapters or 
shunters. 


In case of permanent connection, ensure that power cable is equipped 
with an easily accessible omnipolar switch fitted in proximity to the 
apparatus and with a gap between contacts equal to or greater than  

3 mm


15 

Summary of Contents for DRY STERIL 60V

Page 1: ..._______________________ 20 6 EXTRAORDINARY MAINTENANCE _________________________ 22 IDENTIFICATION HOT AIR STERILIZER MODEL DRY STERIL 60V YEAR OF CONSTRUCTION INSTRUCTIONS FOR THE INSTALLER these are intended for the qualified technician who must install the appliance set it functioning and carry out an inspection test INSTRUCTIONS FOR THE USER these contain user advice description of the command...

Page 2: ... THE MANUFACTURER DECLINES ALL RESPONSIBILITY FOR IMPROPER USE DO NOT LEAVE THE PACKING IN THE HOME ENVIRONMENT SEPARATE THE VARIOUS WASTE MATERIALS AND TAKE THEM TO THE NEAREST SPECIAL GARBAGE COLLECTION CENTRE THE STERILIZER IS SUPPLIED IN SUITABLE PACKAGING WHICH REQUIRES THE NORMAL PRECAUTIONS FOR TRANSPORTATION OF FRAGILE MATERIALS AS INDICATED ON THE PACKAGING ITSELF IF THE APPLIANCE IS RETU...

Page 3: ...TO PLAY WITH IT THIS APPLIANCE IS MARKED ACCORDING TO THE EUROPEAN DIRECTIVE 2002 96 EC ON WASTE ELECTRICAL AND ELECTRONIC EQUIPMENT WEEE THIS GUIDELINE IS THE FRAME OF A EUROPEAN WIDE VALIDITY OF RETURN AND RECYCLING ON WASTE ELECTRICAL AND ELECTRONIC EQUIPMENT BEFORE THE APPLIANCE IS PUT INTO OPERATION ALL THE LABELS AND PROTECTIVE FILMS APPLIED INSIDE OR OUTSIDE MUST BE REMOVED The manufacturer...

Page 4: ...complete with a H07RN F three core supply cable for operation from a 230V power supply The standard cable is of the three core 3 x 1 5 mm 2 H07RN F type If necessary the electrical supply cable should be replaced with an oil resistant type min H05RN F 3 x 1 5 mm 2 The yellow green earth cable on the end of the cable to be connected to the sterilizer should be at least 20 mm longer Make sure that p...

Page 5: ... centre The manufacturer declines all responsibility for damage to persons or things caused by non observance of the above prescriptions or by interference with any part of the sterilizer 2 2 Levelling Adjust the four feet so as to set the sterilizer on a perfectly level plane For this purpose loosen the lock nut and unscrew the foot The range of adjustment of the screw is 10 mm 16 ...

Page 6: ... the heating element is not TIMER KNOB This permits to select manual or timer controlled cooking with automatic turning off of the sterilizer at end of the cooking cycle For manual control of the cooking time turn the knob to the symbol To set cooking time turn the knob clockwise Time is expressed in minutes 5 to 60 Adjustment is progressive so that time can also be set to any intermediate value U...

Page 7: ...onstant as per the set value GREEN LIGHT This light indicates that the thermostat knob is turned to any setting and does not go out until the thermostat knob is returned to zero or the safety thermostat is tripped RED LIGHT When on it indicates that the safety thermostat with automatic reset has been tripped by an appliance malfunction cutting off the power supply The oven cannot be reused until t...

Page 8: ...goes off various times during the cooking cycle indicating that the temperature in the sterilizer is being kept constant TIMER KNOB SET TO MANUAL THERMOSTAT KNOB ON ANY POSITION Ex 4 4 Timed cooking The sterilizer heats up as signalled by the orange light going on Upon the set temperature being reached the light goes off The orange light comes on and goes off various times during the cooking cycle...

Page 9: ...he end of the work day Allow to cool first To clean and preserve the stainless steel surfaces always use only specific products that do not contain abrasives or chlorine based acids How to use pour the product on a damp cloth and wipe the surface rinse thoroughly and dry with a soft cloth or deerskin Do not use metallic sponges or sharp scrapers they will damage the surface Use normal non abrasive...

Page 10: ...t A and sliding them out of the rear hole B Clean sterilizer grill and side guides with warm water and non abrasive detergents Rinse and dry Clean the inside walls of the sterilizer with a soft cloth soaked in an ammonia solution rinse and dry In case of persistent spots or drip offs place an ammonia imbibed cloth on the bottom of the sterilizer close the door and after a few hours wash the steril...

Page 11: ...ges with mobile connecting plates Catch the door at the two sides with both hands in proximity to hinges C and lift up the small levers D Lift the door upwards at an angle of about 45 and slide out To remount insert hinges C into the appropriate grooves allow the door to rest downwards and release the small levers D 6 2 Sterilizer door seal To permit thorough cleaning of the sterilizer the seal ma...

Reviews:

Related manuals for DRY STERIL 60V