background image

Mounting Instructions

13

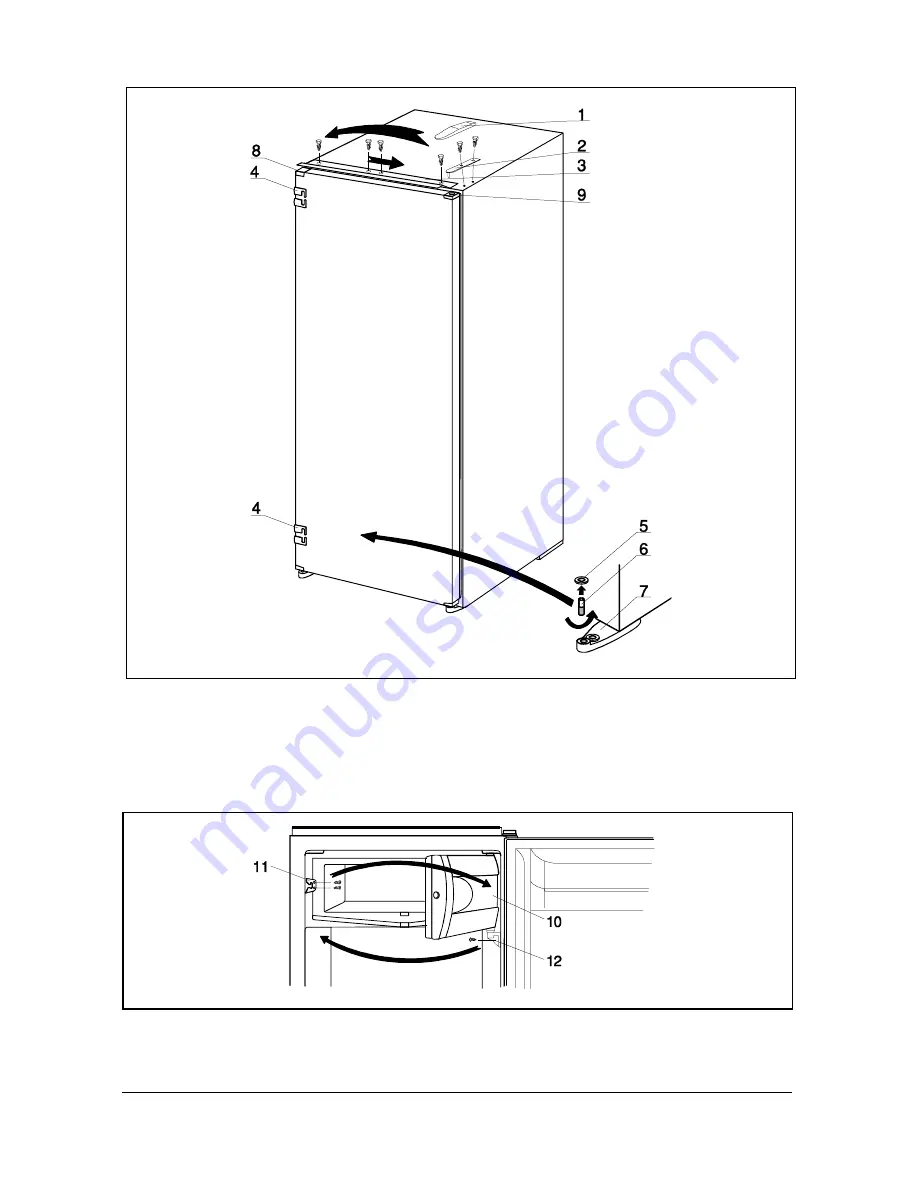
1

 Cover for the upper hinge                       

6

 Lower hinge fastener 

2

 Upper hinge                                            

7

 Lower hinge 

3

 Upper rail                                          

Corner without a hole

4

 Slide guide

9

 Corner with a hole

5

 Lower hinge washer

10

 Low temperature compartment                

12

 Door hinge

11

 Blocking element

Summary of Contents for FL164A

Page 1: ...cessfully serve the purpose for many years Refrigerator is for domestic use only and is intended for storing fresh foods at the temperature higher than 0 C Before Putting Into Use 52 54 Placing and Installation 55 Description of the Appliance 56 58 Operation Controls 59 Use 60 61 Cleaning and Maintenance 62 63 Trouble Shooting Guide 64 66 ...

Page 2: ...itchen unit The appliance should be professionally mounted by qualified technician and instructions are for his use only We Care for the Environment Our products use environmentally friendly packaging which can be either recycled or disposed of in an environmentally friendly manner To this end individual packaging materials are clearly marked These instructions are printed either on recycled paper...

Page 3: ...st be correctly connected to the mains supply see Connecting to the Mains Supply If the food has strange smell or colour throw it away because it is very likely that it is spoiled and therefore dangerous to eat Disconnect the appliance from the power supply before repairing it only a qualified technician should repair it before cleaning and before replacing the light bulb Do not defrost the applia...

Page 4: ...n get locked inside the appliance The refrigerating system of the appliance is filled with refrigerant and insulating substances which should be separately treated and processed Call your nearest authorised service agent or specialised servicing centre If you don t find one contact your local authorities or your distributor Be careful not to damage the tubes on the rear wall of the appliance dange...

Page 5: ...sitioned at least 3 cm away from the electric or gas cooker and at least 30 cm away from the oil or coal stove If this is not possible use an appropriate insulation Behind the appliance there should be free space at least 200 cm wide and above the appliance the high kitchen units should be at least 5 cm away from the appliance in order to assure adequate ventilation of the condenser unit Connectio...

Page 6: ...pulling out If you want to remove it slightly lift up the back part and pull it out Glass shelves some models only have them are protected with plastic spacers Before pulling the shelf out spacers must be moved towards you Spacers can be also removed however it is better to keep them for any later transport Quickly perishable food should be stored on the back i e the coldest part of the shelves ...

Page 7: ...rigerator is cooled with cooling plate incorporated in the rear wall Under the plate there is a channel and an outlet for defrost water Regularly check the defrost water outlet and the channel because they should never be clogged as for example with food rests If clogged use a plastic straw and clean it Fruit and Vegetable Container 3 The container is on the bottom of the appliance under the glass...

Page 8: ...ons for Use 58 NOTE The appliance can be equipped with various accesories depending on the model of the appliance Various accesories spice container tube holder or additional shelves can be bought in authorised centres ...

Page 9: ... the appliance may even drop below 0 C Higher settings should be used only in case higher temperature is recommended or required When the ambient temperature is normal we recommend medium setting Changes of the ambient temprature affect temperature in the interior of the appliance choose correct setting of the thermostat knob In STOP 0 position the appliance does not operate the cooling system is ...

Page 10: ...elicate foods should be stored in the coldest parts of the refrigerator Try not to open the door too often Set the thermostat to the setting where lowest temperatures are reached Set the thermostat gradually as to avoid freezing of the foods Use a thermometer and measure the temperature in the individual compartments Place the thermostat in a glass vessel filled with water Temperature readings are...

Page 11: ...age Time in the Refrigerator Article of food Storage time days 1 2 3 4 5 6 7 8 9 10 11 12 13 14 Butter Eggs Meat fresh uncut chopped smoked Fish Marinade Root Cheese Sweets Fruit Prepared dishes Legend reccomended storage time possible storage time ...

Page 12: ... Clean the exterior with water and detergent Varnished surfaces are cleaned with soft cloth and an alcohol based cleaning agent for example glass cleaners You may also use alcohol ethanol or isoprophylic alcohol The application of abrasive and specially aggressive cleaners such as the stainless steel cleaners is not appropriate for the cleaning of plastic and coated parts Remove the detachable acc...

Page 13: ... Appliance When Not In Use If you do not intend to use the appliance for a longer period set the thermostat knob to the STOP 0 position disconnect the power supply take out the foods and defrost and clean the appliance Leave the door slightly open ...

Page 14: ...uate air circulation and wipe off the condenser Ice Formation on the Inner Rear Wall As long as the defrost water runs to the channel and through the outlet to the drain pan on the compressor automatic defrosting of the appliance is assured In case the ice formation on the inner back wall is increased 3 5 mm ice should be manually defrosted Set the thermostat knob to STOP 0 position and leave the ...

Page 15: ...not operating the refrigerant flow is heard This is a normal condition and it has no influence whatsoever on the lifetime of the appliance After starting the appliance the operation of the compressor and the refrigerant flow may be louder which does not mean that something is wrong with the appliance and it has no influence on the lifetime of the appliance Gradually the noise is reduced Sometimes ...

Page 16: ...he arrow 1 direction and remove the plastic cover in the arrow 2 direction Replace the bulb with a new one E14 max 15 W Don t forget the old bulb does not belong to organic waste Light bulb is consuming good therefore our in guarantee service does not relate to it WE RESERVE THE RIGHT TO ALTER THE SPECIFICATIONS WITH NO INFLUENCE ON THE OPERATION OF THE APPLIANCE ...

Page 17: ...ppliance should be mounted and installed in compliance with these instructions current standards and regulations Mounting instructions were prepared for various types models of appliances therefore they may describe some procedures that do not apply to your appliance Mounting Dimensions and Required Air Circulation 11 Changing the Direction of Opening the Door 12 13 Mounting the Appliance 14 15 ...

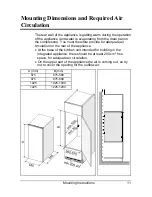
Page 18: ...essor You must therefore provide for adequate air circulation on the rear of the appliance At the base of the kitchen unit intended for building in the integrated appliance there should be at least 200 cm free space for adequate air circulation On the upper part of the appliance the air is coming out so try not to cover the opening for the outflow air A mm B mm 575 575 580 875 875 880 1025 1025 10...

Page 19: ...ole and vice versa Put the door of the appliance on the lower hinge Fix the upper hinge and cover it Replace the slide guides to the opposite side of the door Plug the remaining holes with decorative caps Check the gasket it shouldn t be creased and it should seal well In case it does not fit perfectly pull it out and rotate for 180 In certain models it is not possible to replace the door gasket S...

Page 20: ...er for the upper hinge 6 Lower hinge fastener 2 Upper hinge 7 Lower hinge 3 Upper rail 8 Corner without a hole 4 Slide guide 9 Corner with a hole 5 Lower hinge washer 10 Low temperature compartment 12 Door hinge 11 Blocking element ...

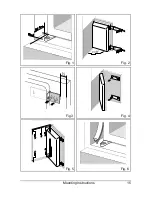
Page 21: ... x 12 screws Fig 3 Remove the slide guides and separate the appliance door from the door of the kitchen unit Fix the slides and be careful not to move them while fixing Fig 4 Fix the slide guides to the original position Close the door and check the gasket it should not be creased The door should open and close smoothly NOTE Appliance with the height of 575 mm have only one slide and one slide gui...

Page 22: ...Mounting Instructions 15 Fig 1 Fig 2 Fig 3 Fig 4 Fig 5 Fig 6 ...

Reviews: