background image

Instructions for the user

55

5.1

Using the rack or tray

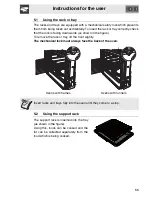
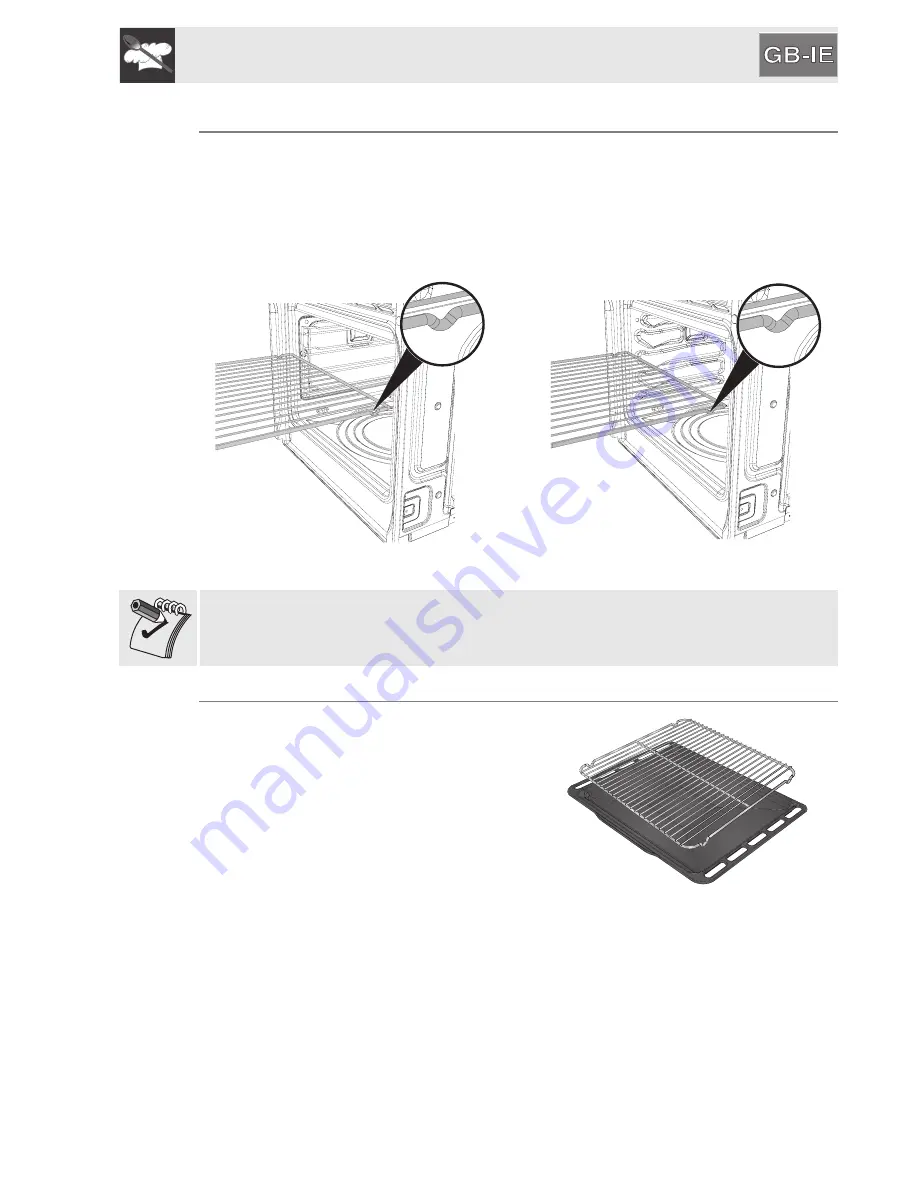
The racks and trays are equipped with a mechanical safety lock which prevents
them from being taken out accidentally. To insert the rack or tray correctly, check
that the lock is facing downwards (as shown in the figure).
To remove the rack or tray, lift the front slightly.

The mechanical lock must always face the back of the oven.

Ovens with frames

Ovens with runners

Insert racks and trays fully into the oven until they come to a stop.

5.2

Using the support rack

The support rack is inserted into the tray
(as shown in the figure).
Using this, foods can be cooked and the
fat can be collected separately from the
food which is being cooked.

Summary of Contents for SC371X-8

Page 1: ...TALLER these are intended for the qualified technician who must install the appliance set it functioning and carry out an inspection test 1 INSTRUCTIONS FOR USE 48 2 SAFETY PRECAUTIONS 50 3 ENVIRONMENTAL RESPONSIBILITY 52 4 GET TO KNOW YOUR OVEN 53 5 AVAILABLE ACCESSORIES 54 6 USING THE OVEN 56 7 COOKING WITH THE OVEN 66 8 CLEANING AND MAINTENANCE 74 9 EXTRAORDINARY MAINTENANCE 82 10 INSTALLING TH...

Page 2: ...RAVANS DO NOT USE IT AS A ROOM HEATER DO NOT USE THIS APPLIANCE FOR HEATING ROOMS THIS APPLIANCE IS MARKED ACCORDING TO EUROPEAN DIRECTIVE 2002 96 EC ON WASTE ELECTRICAL AND ELECTRONIC EQUIPMENT WEEE THIS DIRECTIVE DEFINES THE STANDARDS FOR THE COLLECTION AND RECYCLING OF WASTE ELECTRICAL AND ELECTRONIC EQUIPMENT APPLICABLE THROUGHOUT THE EUROPEAN UNION NEVER OBSTRUCT THE OPENINGS AND SLITS PROVID...

Page 3: ...N COULD MELT THE PLASTIC DAMAGING THE APPLIANCE DO NOT USE SEALED TINS OR CONTAINERS IN THE APPLIANCE OVERPRESSURE MAY OCCUR INSIDE THE CONTAINERS DURING COOKING CREATING A DANGER OF EXPLOSION DO NOT LEAVE THE APPLIANCE UNATTENDED DURING COOKING PROCESSES WHERE FATS OR OILS COULD BE RELEASED FATS AND OILS MAY CATCH FIRE DO NOT COVER THE BOTTOM OF THE OVEN WITH ALUMINIUM OR TINFOIL SHEETS DURING CO...

Page 4: ...IONS IN FORCE THE SOCKET MUST BE ACCESSIBLE AFTER THE APPLIANCE HAS BEEN BUILT IN NEVER DISCONNECT THE PLUG BY PULLING ON THE CABLE IF THE POWER SUPPLY CABLE IS DAMAGED CONTACT THE TECHNICAL SUPPORT SERVICE IMMEDIATELY AND THEY WILL REPLACE IT IT IS OBLIGATORY FOR ALL ELECTRICAL EQUIPMENT TO BE EARTHED ACCORDING TO THE METHODS LAID DOWN BY SAFETY REGULATIONS IMMEDIATELY AFTER INSTALLATION CARRY OU...

Page 5: ... STEAM COULD REACH THE ELECTRONICS DAMAGING THEM AND CAUSING SHORT CIRCUITS DO NOT MODIFY THIS APPLIANCE DO NOT SPRAY ANY SPRAY PRODUCTS NEAR THE ELECTRICAL APPLIANCE WHILE IT IS IN OPERATION DO NOT USE SPRAY PRODUCTS WHILE THE PRODUCT IS STILL HOT The manufacturer cannot be held liable for damage to persons or things caused by failure to observe the above instructions by interference with any par...

Page 6: ...ead to the application of administrative sanctions The product does not contain substances in quantities sufficient to be considered hazardous to health and the environment in accordance with current European directives 3 2 Your environmental responsibility Our product s packing is made of non polluting materials which are therefore compatible with the environment and recyclable Please help by dis...

Page 7: ...ons for the user 53 4 GET TO KNOW YOUR OVEN Control panel Roof liner on some models only Oven light Drawn runners on some models only Rack and tray support frames on some models only Oven fan on some models only ...

Page 8: ... cooking containers Tray rack to be placed over the top of the oven tray for cooking foods which may drip Oven tray for collecting fat from foods placed on the rack above Accessories available on request Original supplied and optional accessories may be ordered from any Authorised Support Centre Use original accessories only ...

Page 9: ...nwards as shown in the figure To remove the rack or tray lift the front slightly The mechanical lock must always face the back of the oven Ovens with frames Ovens with runners Insert racks and trays fully into the oven until they come to a stop 5 2 Using the support rack The support rack is inserted into the tray as shown in the figure Using this foods can be cooked and the fat can be collected se...

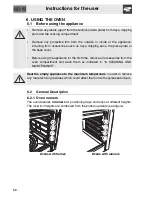
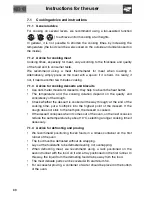
Page 10: ... cover Before using the appliance for the first time remove all accessories from the oven compartment and wash them as indicated in 8 CLEANING AND MAINTENANCE Heat the empty appliance to the maximum temperature in order to remove any manufacturing residues which could affect the food with unpleasant odours 6 2 General Description 6 2 1 Oven runners The oven features 4 runners for positioning trays...

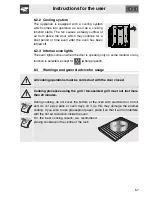
Page 11: ...any function is selected except for where present 6 3 Warnings and general advice for usage All cooking operations must be carried out with the door closed Cooking processes using the grill fan assisted grill must not last more than 20 minutes During cooking do not cover the bottom of the oven with aluminium or tin foil and do not place pans or oven trays on it as this may damage the enamel coatin...

Page 12: ... seconds and then fully open If you need to access the food always leave the door open for as short a time as possible to prevent the temperature in the oven from falling and ruining the food To prevent excessive amounts of condensation from forming on the internal glass hot food should not be left inside the oven for too long after cooking ...

Page 13: ...Instructions for the user 59 6 4 Description of the controls on the front panel All the appliance s control and monitoring devices are located together on the front panel ...

Page 14: ...he oven has reached the selected temperature Multifunction models When the light flashes regularly it means that the temperature inside the oven is kept steady on the set level Pyrolytic models the light stops flashing and remains steady until the oven switches off Moreover the light switches on when the automatic cleaning cycle pyrolysis starts and remains lit until the cycle is complete PROGRAMM...

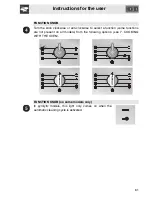
Page 15: ...e or anti clockwise to select a function some functions are not present on all models from the following options see 7 COOKING WITH THE OVEN FUNCTION KNOB on some models only In pyrolytic models this light only comes on when the automatic cleaning cycle is activated ...

Page 16: ... using or Hold down the button to increase or decrease rapidly 6 5 2 Using the timer Warning the timer does not stop the cooking process It only warns the user that the preset number of minutes have passed The timer can be activated at any time Press the display will show the numbers press and hold and use or to set the desired number of minutes When is released the countdown will start and and wi...

Page 17: ... 4 Semi automatic cooking Semi automatic cooking is the function which allows a cooking operation to be started and then ended after a specific length of time set by the user Having selected a function press and hold the display will show the numbers press and hold and simultaneously use or to set the desired number of minutes When is released the programmed cooking time will start and the display...

Page 18: ...ly press or to set the cooking end time When is released the automatic cooking process will start and the display will show the current time together with and A to indicate that a programmed cooking process has been set After making the setting press the button to view the remaining cooking time press the button to view the cooking end time 6 5 6 End of semi automatic automatic cooking At the end ...

Page 19: ...g or until appears on the display The programmer will interpret the cancellation of the program as terminating the cooking process 6 5 8 Modifying the set data The set cooking data can be modified at any time by holding down the function button and at the same time pressing the buttons or to change the value 6 5 9 Adjusting the buzzer volume The buzzer volume can be set to 3 different levels When ...

Page 20: ... in combination with the rotisserie when present it allows the food to be browned evenly at the end of cooking Perfect for sausages ribs and bacon This function enables large quantities of food particularly meat to be grilled evenly SMALL GRILL on some models only Using only the heat released from the central element this function enables small portions of meat and fish to be grilled for making ke...

Page 21: ...king time Hot air circulation ensures instant and uniform distribution of heat It will be possible for instance to cook fish vegetables and biscuits simultaneously on different levels without mixing smells and flavours For multiple level cooking you are advised to use the 2nd and 4th runners TURBO The combination of fan assisted cooking and traditional cooking enables different foods to be cooked ...

Page 22: ...oking duration depend on the quality and consistency of the dough Check whether the dessert is cooked all the way through at the end of the cooking time put a toothpick into the highest point of the dessert If the dough does not stick to the toothpick the dessert is cooked If the dessert collapses when it comes out of the oven on the next occasion reduce the set temperature by about 10 C selecting...

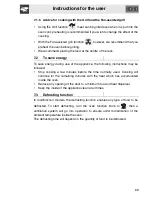
Page 23: ...e following instructions may be followed Stop cooking a few minutes before the time normally used Cooking will continue for the remaining minutes with the heat which has accumulated inside the oven Reduce any opening of the door to a minimum to avoid heat dispersal Keep the inside of the appliance clean at all times 7 3 Defrosting function In multifunction models the defrosting function enables an...

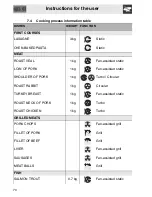
Page 24: ...N OF PORK 1 kg Fan assisted static SHOULDER OF PORK 1 kg Turbo Circular ROAST RABBIT 1 kg Circular TURKEY BREAST 1 kg Fan assisted static ROAST NECK OF PORK 1 kg Turbo ROAST CHICKEN 1 kg Turbo GRILLED MEATS PORK CHOPS Fan assisted grill FILLET OF PORK Grill FILLET OF BEEF Grill LIVER Fan assisted grill SAUSAGES Fan assisted grill MEAT BALLS Grill FISH SALMON TROUT 0 7 kg Fan assisted static ...

Page 25: ...0 230 40 50 1 or 2 220 230 40 2 180 190 70 80 2 180 190 70 80 2 180 190 90 100 2 180 190 70 80 2 180 190 110 120 2 180 190 110 120 2 190 200 60 70 1ST SURFACE 2ND SURFACE 4 250 280 7 9 5 7 3 250 280 9 11 5 9 3 250 280 9 11 9 11 4 250 280 2 3 2 3 3 250 280 7 9 5 6 3 250 280 7 9 5 6 2 160 170 35 40 ...

Page 26: ...FRUIT TART Fan assisted static FRUIT TART Static SHORT PASTRY Circular JAM TARTS Turbo Circular PARADISE CAKE Fan assisted static PARADISE CAKE Static ECLAIR Turbo Circular LIGHT SPONGE CAKE Circular RICE PUDDING Turbo Circular RICE PUDDING Static CROISSANTS Circular APPLE PIE Static CROISSANTS on multiple runners SHORT PASTRY BISCUITS on multiple runners ...

Page 27: ...ME IN MINUTES 1 280 8 2 190 200 30 35 2 180 190 15 20 2 160 170 50 55 2 160 170 30 35 2 170 35 40 2 160 170 20 25 2 170 20 25 2 160 170 50 60 2 170 50 60 2 150 160 40 50 2 150 160 45 50 2 160 40 50 2 170 50 60 2 160 25 30 3 180 60 1 and 3 160 170 16 20 1 and 3 160 170 16 20 ...

Page 28: ...dues Do not use steel sponges or sharp scrapers as they will damage the surface Use normal non abrasive products and a wooden or plastic tool if necessary Rinse thoroughly and dry with a soft cloth or a microfibre cloth Do not allow residues of sugary foods such as jam to set inside the oven If left to set for too long they might damage the enamel lining of the oven 8 4 Cleaning the door glazing T...

Page 29: ... the use of specific products to burn off the residues left inside the oven When the operation is complete damp parts should be dried thoroughly 8 5 1 Removing the guide frames on some models only Removing the guide frames makes it easier to clean the side parts and it also needs to be done whenever the automatic cleaning cycle is used only available on some models To remove the guide frames pull ...

Page 30: ...e to dry Before cleaning remove any dirt burnt onto the stone with the aid of a metal spatula or a scraper of the kind used for cleaning glass ceramic hobs For best results the stone must still be warm otherwise wash it in hot water Use metal mesh sponges or abrasive scotch brite pads dipped in lemon or vinegar Never use detergents Never wash in the dishwasher Never leave the stone to soak The dam...

Page 31: ...y occur due to the normal evaporation of oily manufacturing substances This is an absolutely normal phenomenon which disappears after the first cleaning cycle Before starting the automatic cleaning cycle make sure that the oven does not contain any foods or large spills from previous cooking operations During the pyrolysis cycle a door locking device makes it impossible to open the door IF THE OVE...

Page 32: ... sure that the oven door is firmly closed Refer to the following diagram for setting the cleaning cycle duration CLEANING DURATION LIGHT DIRT MEDIUM DIRT HEAVY DIRT 90 MIN 135 MIN 180 MIN During the automatic cleaning cycle the fans produce a more intense level of noise due to a greater rotation speed this is entirely normal and intended to facilitate heat dissipation At the end of pyrolysis the f...

Page 33: ...The relevant light will switch on to indicate that the locking device has been activated At the end of the cleaning cycle the locking device will remain active until the temperature inside the oven has reached a safety threshold When the oven has cooled down collect the residues from automatic cleaning with a damp microfibre cloth To select a cleaning cycle with a delayed start after setting the d...

Page 34: ...ge spills from previous cooking operations Carry out assisted oven cleaning operations only when the oven is cold 8 8 1 Before starting the assisted cleaning cycle Completely remove all accessories from inside the oven The roof lining can be left inside the oven Pour approx 40cl equivalent to about two glasses of water onto the floor of the oven as shown in the figure Make sure it does not overflo...

Page 35: ... oven heating elements 8 8 3 End of the assisted cleaning cycle The water remaining at the end of the assisted cleaning cycle cannot be left inside the oven for long for example overnight You are advised to wear a pair of gloves during these processes At the end of the cleaning cycle open the door and wipe away the less stubborn dirt with a microfibre cloth Use an anti scratch sponge with brass fi...

Page 36: ...needs to be replaced because it is worn or burnt out in multifunction models remove the guide frames see 8 5 1 Removing the guide frames on some models only Remove the bulb cover using a tool e g a screwdriver Remove the bulb by sliding it out as shown On some models only the bulbs are halogen bulbs so do not touch them directly with your fingers wrap them in an insulating material Replace the bul...

Page 37: ...oth sides with both hands lift it forming an angle of around 30 and remove it If the hinges have not unlocked repeat the operation raising levers A and keeping the door slightly raised To reassemble the door put the hinges in the relevant slots in the oven making sure that grooved sections C are resting completely in the slots Lower the door and once it is in position disengage levers A ...

Page 38: ...of them until they engage Grasp the door on both sides with both hands lift it forming an angle of around 30 and remove it To reassemble the door put the hinges in the relevant slots in the oven making sure that grooved sections C are resting completely in the slots Lower the door and once it is in place remove the pins from the holes in the hinges ...

Page 39: ...y clean To facilitate cleaning it is possible to remove the door see 9 2 Removing the door and place it on a canvas or open it and lock the hinges in order to extract the glass panels The glass panels of the door can be completely removed by following the instructions provided below Warning before removing the glass panels make sure that at least one of the door s hinges has been locked in the ope...

Page 40: ...an intermediate glass panel Remove the intermediate panel by lifting it upwards Cleaning It is now possible to clean the external glass panel and the panels removed previously Use absorbent kitchen roll In the case of stubborn dirt wash with a damp sponge and neutral detergent Replacing the glass panels Replace the panels in the reverse of the order in which they were removed Reposition the intern...

Page 41: ...e compatible Avoid use of adapters and shunts as these could cause overheating and a risk of burns Operation at 220 240 V use a H05V2V2 F type three core cable 3 x 1 5 mm2 The end to be connected to the appliance must have an earth wire yellow green at least 20 mm longer than the others WARNING The values indicated above refer to the cross section of the internal conductor 10 2 Cable replacement S...

Page 42: ... figures 1 2 and 3 For installing under a work top follow the dimensions given in figures 1 and 2 For installing under a work top with combined cooking hobs ensure a minimum clearance from any side walls of at least 110 mm When installing in tall units comply with the dimensions shown in figures 1 and 2 bearing in mind that the top rear of the unit must have an opening 35 40 mm deep Remove the scr...

Page 43: ...Instructions for the installer 89 FIG 1 A B C D E Measurements mm 583 585 554 564 490 500 560 min 35 40 ...

Page 44: ...Instructions for the installer 90 FIG 2 FIG 3 FIG 4 FIG 5 ...

Reviews: