background image

3

smithandnoble.com

4

800 .248 .8888

STEP 1 — GETTING STARTED

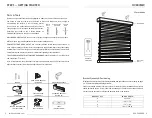
OVERVIEW

HEADRAIL

REMOTE 

CONTROL

BRACKET QTY

SHADE WIDTH

2

up to 

40"

3

>40

1

8

"—72"

4

>72

1

8

"—84"

5

>84

1

8

and up

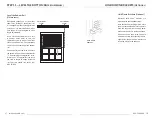
Bracket Quanti ty & Positi oning 

Important: If a solar recharge unit is being installed read the secti on on solar recharge on page 
20 - 31 prior to installing mounti ng brackets. 

Shades are shipped with the required number of brackets for proper installati on. End brackets 
should be located approx. 3" from either end. Depending on the width of the shade, additi onal 
brackets may be necessary, evenly spaced between the two end brackets.  

Motorizati on

BOTTOM 

RAIL

SCREWS

HOLD DOWN BRACKET

(OPTIONAL)

MOUNTING BRACKETS

CHARGER


SPACER BLOCKS

 (OPTIONAL)

EXTENSION BRACKET

(OPTIONAL)


PENCIL & SCREWDRIVER

 (NOT INCLUDED)

POWER DRILL 

 (NOT INCLUDED)

LEVEL

(NOT INCLUDED)

Before you begin, check the accompanying diagram to make sure you have all the parts you need. 
You’ll  need  to  make  sure  the  surface  you  intend  to  install  your  hardware  is  sturdy  enough  to 
accommodate  the  brackets.  If  you’re  screwing  directly 
into  a  surface  this  means  locati ng  wood  studs  that  are 
strong enough to securely bond with the included screws. 
Otherwise,  you’ll  need  to  use  a  secure  fastener  (as 
illustrated) but please note this piece is not included.

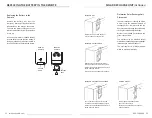
WALLBOARD OR PLASTER:

r4Use a secure fastener designed specifi cally for this purpose.

METAL:

Prepare by pre-drilling holes and then using the included screws.

CONCRETE, STONE, BRICK OR TILE:

 Use a masonry drill and surface-specifi c plugs, anchors, or 

screws. When selecti ng a fastener be sure it’s designed to support the weight of the product being 
installed (if you’re not sure, either give us a call or ask a professional at your local hardware store). Once 
obtained, follow the fastener manufacturer’s instructi ons regarding proper installati on.

TOOLS YOU WILL NEED TO INSTALL YOUR HARDWARE:

Pencil, screwdriver, 

¼

" nut driver, level, 

and a drill with a 

1

16

"

 drill bit.

Note: It’s important to monitor the amount of pressure you apply when using a drill. If the screws are too 
ti ght this may cause the screw itself to break off  in the wall or window frame.

Parts & Tools

MOLLY 

BOLT

SELF DRILLING

ANCHOR

TOGGLE 

BOLT

Summary of Contents for Honeycomb Shades

Page 1: ...Honeycomb Shades STEP BY STEP INSTALLATION INSTRUCTIONS Bottom Up Motorization ...

Page 2: ...g the Battery 30 Solar Recharge Unit optional 31 Install Solar Recharge Unit 32 Troubleshooting 33 Care Cleaning Instructions 34 Safety 34 Warranty Back Cover A Smooth Set Up We want you to love your new window coverings and that includes having a smooth installation experience We recommend saving this guide If you encounter any difficulties or questions please reach out to us for help It s why we...

Page 3: ... sturdy enough to accommodate the brackets If you re screwing directly into a surface this means locating wood studs that are strong enough to securely bond with the included screws Otherwise you ll need to use a secure fastener as illustrated but please note this piece is not included WALLBOARD OR PLASTER r4Use a secure fastener designed specifically for this purpose METAL Prepare by pre drilling ...

Page 4: ...ach using two screws Screws should be long enough to secure the bracket to the mounting surface Outside Mount The minimum mounting height for outside mounted shades is 7 8 Make sure that the brackets are level and aligned Attach using two screws Using the installation bracket as a template measure to the center of the bracket and mark the hole locations with a pencil for drilling Brackets must be ...

Page 5: ...isplay If a number is shown deactivate the Top Down Bottom Up function for that channel by pressing the RAIL SELECTOR and DOWN buttons at the same time until the rail selector number disappears from the left side of the screen 3 Press the SETTING button on the motor until the motor starts to beep Release the button immediately after the beeps start The motor will make 4 fast beeps followed by 5 lo...

Page 6: ... Tapping the UP or DOWN buttons for less than 2 seconds will move the shade in short steps Holding the UP or DOWN buttons down for more than 2 seconds before releasing will operate the shade in the faster standard speed Press the UP or DOWN buttons to raise or lower the shade Press the STOP button to stop the shade anywhere along the travel To De Activate the Jog Function The remote comes pre set ...

Page 7: ...n STEP 3 LINK REMOTE found on pages 7 10 STEP 6 ADJUST MOTOR LIMITS if desired REMOTE BACK LIMIT BUTTON CONFIRM BUTTON CHANNEL DISPLAY UP STOP FAVORITES DOWN CHANNEL RAIL SELECTOR 14 CHANNEL REMOTE FRONT STEP 7 SETTING LIMITS LOWER LIMIT Hold the LIMIT button until the shade starts beeping After the shade stops beeping use the DOWN button to lower the shade Press stop when the shade is near the de...

Page 8: ...he next page and then relink turned off shades by following the steps in STEP 3 LINK REMOTE found on pages 7 10 STEP 8 SETTING USING A FAVORITE POSITION 14 CHANNEL REMOTE FRONT CHANNEL DISPLAY UP STOP FAVORITES DOWN CHANNEL CHANNEL REMOTE BACK LIMIT BUTTON CONFIRM BUTTON Setting A Favorite Position Use the UP or DOWN buttons to position the shade at the desired favorite position While holding the ...

Page 9: ...ps 1 2 to program the rest of the channels on a multi channel remote It is recommended to only link one shade per channel unless it is absolutely necessary to group shades other than the all channel This simplifies adjusting limits and setting favorites 4 All shades linked to a remote will also automatically be programmed to the ALL channel P Remove shade from the window to access the settings but...

Page 10: ... One quarter turn of the screw will move the bottom rail up or down approximately 1 4 Over turning the adjustment screw more than 1 of adjustment can cause the cord to tangle or wedge inside the rail The screw should turn easily DO NOT FORCE ADJUSTMENT SCREW ADJUSTMENT SCREW HOLD DOWN BRACKETS OPTIONAL Hold Down Brackets Optional Optional hold down brackets are mounted with the supplied screws Wit...

Page 11: ... Insert screwdriver here and gently pry CHARGING THE MOTOR Charging the Motor When the shade begins to operate slower than normal it is time to charge the motor Plug the 8 4v charger into the charging wire The charging wire is attached to the back of the head rail at the left end Plug the charger into an electrical outlet A red light on the charger indicates that the battery is charging Allow the ...

Page 12: ...posure Bracket can be mounted behind or next to shade mounting bracket Note only two of the holes are threaded INSIDE MOUNT WITH TOP REVERSED The top portion of the bracket may be reversed if necessary depending on space Bracket can be mounted behind or next to shade mounting bracket OUTSIDE MOUNT This method will provide the least amount of sun exposure Bracket can be mounted next to shade mounti...

Page 13: ...of the unit onto the bottom bracket hook The press the top of the unit until it snaps into place If space is limited it may be easier to attach the brackets to the solar unit before screwing the brackets in place Connect Solar Recharge Unit to Motor After the shade is installed plug the solar unit into the motor recharge port Use the cable ties included with the solar panel to manage excess wire D...

Page 14: ...gent and lukewarm water test an unobtrusive corner of the shade If you have any questions call your dealer for advice Safety First Style Second To None Great style should never come at the cost of safety Every Smith Noble window treatment conforms strictly to today s safety standards including permanent tie down devices and built in cord stops To protect young children and pets there s no better w...

Page 15: ...arranty The warranty applies to the original owner requires a proof of purchase and covers defects in material or craftsmanship Shades or blinds must have been properly installed We reserve the right to determine if your window covering warrants a repair or a replacement In need of warranty service Call us at 800 248 8888 and we ll arrange for a repair or replacement ASAP SN082019 ...

Reviews: