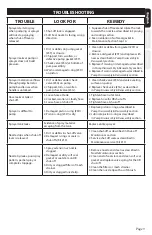
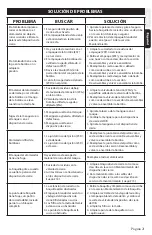
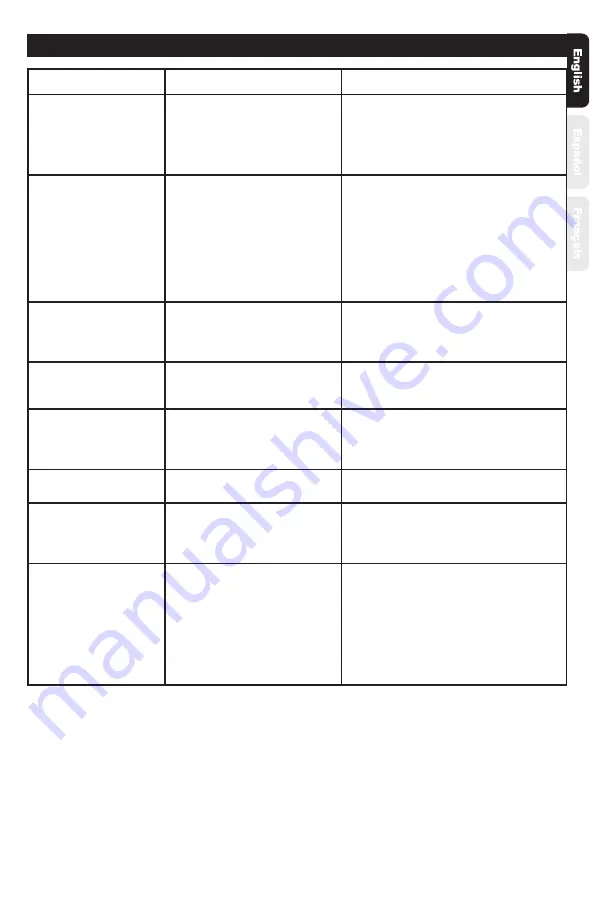
background image

Page 9

TROUBLE

LOOK FOR

REMEDY

Sprayer starts to spray 

when pumping or sprayer 

will not stop spraying 

when shut-off lever is 

released.

1. Shut-off lock is engaged.

2. Soft Seat Gasket is facing wrong  

    direction.

1. Squeeze shut-off lever and rotate the lock 

    towards the nozzle as described in 

Spraying

    and Locking

 section.

2. See orientation of soft seal gasket in 

     Maintenance Section Step 16.

Sprayer leaks at pump or 

sprayer does not build

pressure.

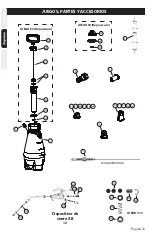
1. Dirt or debris on pump gasket 

    (#3F) or closure.

2. Chipped, torn, swollen, or 

    defective pump gasket (#3F).  

3. Check valve (#3G) at bottom of 

    pump assembly.

4. Worn or damaged o-ring (#3D)

    on piston.

1. Clean dirt or debris from gasket (#3F) or

     closure.

2. Remove old gasket (#3F) and replace with

    new as described in 

Pump Disassembly &

     Reassembly 

section.

3. Replace if missing or damaged as described

     in 

Pump Disassembly & Reassembly

 section.

4. Replace if worn or damaged as described in


Pump Disassembly & Reassembly 

section.

Sprayer material overflows 

through pump barrel or 

pump handle rises when 

handle is unlocked.

1. Dirt or debris under check

    valve (#3G) on pump.

2. Chipped, torn, or swollen

    pump check valve (#3G).

1. Clean check valve (#3G) and valve sealing

    surface on pump.

2. Replace check valve (#3G) as described

    in 

Pump Disassembly & Reassembly

 section.

Hose leaks at tank or 

shut-off.

1. Loose hose at tank.

2. Cracked, swollen, or faulty hose.

3. Loose hose at shut-off.

1. Tighten hose nut at tank.

2. Replace hose for XB shut-offs.

3. Tighten hose at shut-off. 

Sprayer is difficult to 

pump.

1. Damaged piston o-ring (#3D)   

2. Piston o-ring (#3D) is dry.

1. Replace piston o-ring as described in 


Pump Disassembly & Reassembly

 section.

2. Lubricate piston o-ring as described

    in 

Pump Disassembly & Reassembly 

section.

Sprayer tank leaks.

Evidence of spray material

escaping from the tank.

Replace entire sprayer.

Nozzle drips when shut-off 

lever is released.

1. Dirt or debris in shut-off valve.

2. Damaged o-rings or seals in

    shut-offs (Kit #13).

1. Clean shut-off as described in 

Shut-off 

     Maintenance

 section.

2. Service shut-off seals as described in

    Maintenance service (Kit #13).

Nozzle tip leaks, poor spray 

pattern, partial spray or 

complete stoppage.

1. Spray extension or nozzle 

    clogged.

2. Damaged or dirty soft seat  

    gasket or seat stem on XB

    shut-off.

3. Dirty or clogged filters of mesh

    strainer.

4. Dirty or clogged nozzle tip.

1. Remove nozzle and clean as described in


Nozzle Maintenance 

section.

2. Clean end of seat stem and clean soft seat 

    gasket and replace valve spring for the XB 

    shut-off. 

3. Clean the filters or mesh strainer.

4. Clean the nozzle tip with a soft brush.

TROUBLESHOOTING

Summary of Contents for 190450

Page 1: ...23 Garden St New York Mills NY 13417 1 800 311 9903 www TheFountainheadGroup com www smithperformancesprayers com CAUTION Read and follow all instructions Use and Care Manual Acetone Compression Spra...

Page 2: ...ngerous pressure level and bursting of parts resulting in serious injury Only use original pump Do not store chemicals in this tank Always release pressure when sprayer is not in use and before removi...

Page 3: ...t is oriented correctly See Figure M 3 When placing different nozzles on end of wand make certain the Soft Seat is always used and the white gasket is facing correctly The small end of the seat into t...

Page 4: ...Figure R Figure P Pressurizing 1 Make sure shut off lock is not engaged If shut off lock is engaged while pressurizing the unit will immediately start spraying 2 Push down on the handle and turn coun...

Page 5: ...pressure 2 Empty remaining chemical back into original filling container 3 Add approximately one pint of acetone place pump back into tank and tighten 4 Shake the liquid in the tank to try and get the...

Page 6: ...sition See Figure 5 Figure 2 Figure 1 Figure 3 Figure 4 Figure 5 MAINTENANCE CONTINUED Nozzle Maintenance 1 If nozzle clogs remove and disassemble the nozzle assembly 2 Clean the openings of any obstr...

Page 7: ...k nut and the Seat Stem Unscrew the Seat stem and Lock nut and slide off the Spring Place these small pieces in a closed container they are easily misplaced 7 Remove the stainless steel cable by pulli...

Page 8: ...Packing washers onto the cable then slide on the Packing nut behind the washers and tighten 13 Screw onto the cable the Lock nut and the Adjustment screw Turn the Adjustment screw so the end of the ca...

Page 9: ...ump 2 Replace check valve 3G as described in Pump Disassembly Reassembly section Hose leaks at tank or shut off 1 Loose hose at tank 2 Cracked swollen or faulty hose 3 Loose hose at shut off 1 Tighten...

Page 10: ...RTS ACCESSORIES 13D 13E 13F 13B 13A KIT 13 13E 13F 13C 13B 13A XB Shut off 12 13D 5 RED HOSE 11 6 9 1 9 2 9 3 9 4 9 5 7 KIT 4 Dark Red 4B 4C 4A 8 1 8 2 8 3 8 4 8 5 8 6 10 1 KIT 3 Dark Red 2 3A 3C 3D 3...

Page 11: ...ctor Series 7 176332 POLY CHECK VALVE 8 KEY PART DESCRIPTION 1 182578 FLAT FAN TIP BRASS 2 GPM 65 2 176042P FLAT FAN TIP BRASS 2 GPM 80 3 176116 FLAT FAN TIP BRASS 4 GPM 80 4 176171 FLAT FAN TIP BRASS...

Page 12: ...E AVAILABLE BY CONTACTING The Fountainhead Group Inc Customer Service Center Monday Friday 8 A M 5 P M EST Toll Free 1 800 311 9903 or e mail Info TheFGI com or Access online at www TheFountainheadGro...

Page 13: ...Garden St New York Mills NY 13417 1 800 311 9903 www TheFountainheadGroup com www smithperformancesprayers com PRECAUCI N Lea y siga todas las instrucciones Manual No 183279 Rev A 04 27 17 ECN16 080 5...

Page 14: ...por ejemplo un compresor de aire ya que esto puede crear un nivel de presi n peligroso y la rotura de piezas que puede dar lugar a lesiones graves S lo utilice la bomba original No almacene productos...

Page 15: ...Vea la figura M 3 Al poner diferentes boquillas en el extremo de la extensi n aseg rese de usar siempre un asiento blando y de que el empaque blanco est orientado correctamente El extremo peque o del...

Page 16: ...itivo de cierre no est activado Si el dispositivo de cierre est activado mientras se est aplicando presi n la unidad empezar de inmediato a atomizar 2 Empuje la manija hacia abajo y g rela hacia la iz...

Page 17: ...manente en su recipiente original 3 A ada aproximadamente medio litro de acetona vuelva a colocar la bomba en el tanque y apriete 4 Agite el l quido en el tanque para tratar de disolver los residuos d...

Page 18: ...en su posici n Vea la figura 5 Figura 2 Figura 1 Figura 3 Figura 4 Figura 5 CONTIN A MANTENIMIENTO Mantenimiento de la boquilla 1 Si se obstruye la boquilla qu tela y des rmela 2 Limpie las obstrucci...

Page 19: ...lle el v stago del asiento y la contratuerca y deslice el resorte hacia afuera Coloque estas piezas peque as en un recipiente cerrado ya que es muy f cil perderlas 7 Retire el cable de acero inoxidabl...

Page 20: ...luego desl celas sobre la tuerca de relleno por detr s de las arandelas y apri tela 13 Atornille en el cable la contratuerca y el tornillo de ajuste Gire el tornillo de ajuste de modo que el extremo d...

Page 21: ...anguera en el tanque o en el dispositivo de cierre 1 Manguera suelta en el tanque 2 Manguera agrietada dilatada o defectuosa 3 Manguera suelta en el dispositivo de cierre 1 Apriete la tuerca de la man...

Page 22: ...E 13F 13B 13A JUEGO 13 13E 13F 13C 13B 13A Dispositivo de cierre XB 12 13D 5 MANGUERA ROJA 11 6 9 1 9 2 9 3 9 4 9 5 7 JUEGO 4 Rojo oscuro 4B 4C 4A 8 1 8 2 8 3 8 4 8 5 8 6 10 1 JUEGO 3 Rojo oscuro 2 3A...

Page 23: ...3B 182701 ANILLO DE RETENCI N 13C 182699 V LVULA DE RELLENO 13D 182698 EMPAQUE DE NYLON 13E 182692 RESORTE DEL EMPAQUE BLANDO DEL 13F 182696 V STAGO DEL ASIENTO KEY PART DESCRIPTION 10 182785 BOQUILLA...

Page 24: ...ACTANDO A The Fountainhead Group Inc Centro de Servicio al Cliente De Lunes a viernes de 8 am a 5 pm hora del este N mero gratuito 1 800 311 9903 o por correo electr nico Info TheFGI com o en l nea en...

Page 25: ...Mills NY 13417 USA 1 800 311 9903 www TheFountainheadGroup com www smithperformancesprayers com ATTENTION Lire enti rement et suivre scrupuleusement le mode d emploi Notice d utilisation et d entreti...

Page 26: ...ainsi de graves blessures Utiliser uniquement la pompe d origine Ne pas stocker de produits chimiques dans ce r servoir Toujours rel cher la pression du pulv risateur une fois l utilisation termin e a...

Page 27: ...et This Side 80 FAN 07 GPM 4 GREEN 80 80 80 80 SPRAY ANGLE SPRAY PATTERN FAN FAN FAN FAN FLOW RATE 10 GPM 13 GPM 10 GPM 20 GPM COLOR 6 RED 10 BLACK 8 GRAY 12 BROWN 65 FAN 2 GPM 80 80 80 95 SPRAY ANGLE...

Page 28: ...gure R Mise en pression 1 V rifier que le verrou de la soupape de fermeture n est pas engag si le verrou de la soupape de fermeture est engag pendant la mise sous pression l appareil commencera imm di...

Page 29: ...de remplissage d origine 3 Verser environ une chopine d ac tone remettre la pompe dans le r servoir et serrer 4 Secouer vigoureusement le liquide contenu dans le r servoir pour essayer de d coller le...

Page 30: ...e jusqu ce qu il s embo te solidement en place Voir la figure 5 Figure 2 Figure 1 Figure 3 Figure 4 Figure 5 ENTRETIEN SUITE Entretien de la buse 1 Si la buse se bouche retirer et d monter l ensemble...

Page 31: ...au petit crou frein et la tige d assise D visser la tige d assise et l crou frein et sortir le ressort Placer ces petites pi ces faciles garer dans un r cipient ferm elles sont faciles garer 7 Retirer...

Page 32: ...it longue du c ble 13 Visser l crou frein et la vis de r glage sur le c ble Tourner la vis de r glage de mani re ce que l extr mit du c ble arrive au niveau de la fente du dessus de la vis Serrer l cr...

Page 33: ...a pompe Le flexible fuit au niveau du r servoir ou de la soupape de fermeture 1 Flexible desserr au niveau du r servoir 2 Flexible fissur gonfl ou d fectueux 3 Tuyau desserr au niveau de la soupape de...

Page 34: ...SSOIRES 13D 13E 13F 13B 13A KIT N 13 13E 13F 13C 13B 13A SOUPAPE DE FERMETURE XB 12 13D 5 FLEXIBLE ROUGE 11 6 9 1 9 2 9 3 9 4 9 5 7 4B 4C 4A 8 1 8 2 8 3 8 4 8 5 8 6 10 1 KIT N 3 Rouge fonc 2 3A 3C 3D...

Page 35: ...ent 7 176332 CLAPET DE NON RETOUR POLY KIT N 13 182569 N CESSAIRE D ENTRETIEN DE SOUPAPE DE FERMETURE XB 13A 182700 CROU PRESSE TOUPE 13B 182701 BAGUE RESSORT 13C 182699 TOUPE SOUPAPE 13D 182698 JOINT...

Page 36: ...ONT DISPONIBLES EN CONTACTANT The Fountainhead Group Inc Customer Service Center Lundi Vendredi 8 h 17 h HNE Sans frais 1 800 311 9903 ou e mail Info TheFGI com ou Acc s en ligne www TheFountainheadGr...

Reviews: