background image

AirVerter

® 

Stencil Pro HVLP Paint Spray System

DO NOT OPERATE SPRAY GUNS WITHOUT PERSONAL SAFETY EQUIPMENT

EQUIPMENT REQUIREMENTS

Air Compressor

Air compressors used with AirVerter

®

 Spray Guns

must be able to HOLD a minimum of 40 PSI while
spraying.


Note

:  Position a pressure gauge in

the air hose nearest the spray gun to be assured
of the PSI required to satisfactorily spray your
coating.

High Pressure Air Hose

A. Air hose lengths up to 50 feet 

MUST

 have an

I.D. of 3/8" including fittings.

B. 

Air hose lengths greater than 50 feet 

MUST

have an I.D. of 1/2" including fittings.

OPERATING INSTRUCTIONS

OPERATION:

Starting:

A. The Stencil Pro CT-100 Spray Gun operates

with the trigger controlling both the fluid flow
and air flow.  The Stencil Pro Spray Gun may
be used with either an AirVerter

®

 Inductor

Assembly between the gun and the
compressed air supply, or connected directly
to the compressed air supply.

 Note: if

connecting directly to the air supply, gun inlet
pressure is limited to 43 PSI.

B. 

Consult the 

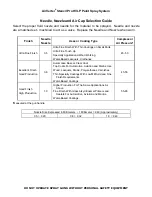
Needle, Nozzle and Air Cap

Selection Guide

 to select the proper

combination for the coating and finish
quality desired.


Too much pressure will

create unnecessary overspray!

Before Spraying

A. 

Follow the 

Air and Paint Management

Guidelines

 listed on the following page.

B. Before paint is poured into the cup, 

make

certain paint is properly mixed

.  This is

particularly true when mixing multi-component
paints.  Use a paint shaker, rotary mixer, or
paint paddle to achieve a homogeneous
mixture. (

Hint:

 Split your paint into two parts;

the top will be lighter and the bottom will be
heavier.  Completely stir the bottom half of the
paint and slowly add small amounts of the top
half into the heavier bottom.)

C. 

Strain your paint to remove impurities

.  Use

a cone strainer or a 100-mesh nylon bag or
equivalent strainer.

D. 

Thin your paint

 according to the

manufacturer’s specifications.

E. 

Ensure needle packings are properly
adjusted

.  Needle packings are preset at the

factory to proper tension.  However, use and
cleaning may alter this setting.  To adjust
needle packings to proper tension:

1. With gun disconnected from air and fluid

sources, pull trigger to move the needle out
of the nozzle.

2. Adjust packing nut until needle is held in

the open position by tension from the
needle packings.

3. 

Loosen packing nut approximately ¼ turn or
until needle returns to closed position.

Spraying

A. Gravity forces paint from the paint container

into the fluid chamber of the gun and out
through the nozzle where the flow of
atomizing air breaks the paint stream into tiny
particles, creating the spray.

1. Needle position controls the amount of

paint flowing through the fluid nozzle.

2. Trigger action controls needle position.

3. The Fluid Control Knob (CT-05-1) at the

rear of the spray gun controls trigger action.
Turning the knob to the right reduces the
fluid flow, turning it to the left increases the
flow.

B. Adjust the pattern by turning the Pattern

Control Knob (CT-07) on the side of the Spray
Gun.

1. 

Round Pattern - used to draw fine lines with
the gun close to the work, for touch-up
work, camouflage patterns and painting
surfaces in difficult to reach places distant
from the spray gun.  This pattern is
achieved by turning the Pattern Control
Knob clockwise

Summary of Contents for AirVerter Stencil Pro CT-100

Page 1: ...497 7600 800 937 HVLP 4857 Fax 301 497 7613 stencilpro airverter com www airverter com Compliance Compliance Quality Quality Performance Performance Reliability Reliability HVLP PAINT SPRAY SYSTEM U U U Us s s se e e er r r r s s s s M M M Ma a a an n n nu u u ua a a al l l l Stencil Pro Models Stencil Pro Models CT 100 CT 100 CT 200 CT 200 ...

Page 2: ...E WARRANTY Smith Eastern Corporation warrants to the Purchaser that the Stencil Pro CT 100 Spray Gun is free from defects in material or workmanship under normal use and service for a period of twelve 12 months from the date of purchase Should any failure appear during this period Smith Eastern shall if given prompt written notice by the Purchaser correct such nonconformity by repair or replacemen...

Page 3: ...to two parts the top will be lighter and the bottom will be heavier Completely stir the bottom half of the paint and slowly add small amounts of the top half into the heavier bottom C Strain your paint to remove impurities Use a cone strainer or a 100 mesh nylon bag or equivalent strainer D Thin your paint according to the manufacturer s specifications E Ensure needle packings are properly adjuste...

Page 4: ...ressor pressure Dual gun work for all of the above listed applications will support up to 50 of 3 8 ID hose for each gun Also for higher production levels of all of the above High Solid Coatings ZAHN 3 Test 37 seconds 50 to 70 PSI compressor pressure Marine epoxies marine enamels high production steelwork high production with conveyer lines large surfaces with thinner viscosity material latex on w...

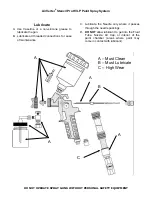
Page 5: ...o lubricate the gun B Lubricate all threaded connections for ease of maintenance C Lubricate the Needle only where it passes through the needle packings D DO NOT allow lubricant to get into the Fluid Tube Nozzle Air Cap or interior of the paint chamber areas where paint may come in contact with lubricant A Must Clean B Must Lubricate C High Wear A B C A A A ...

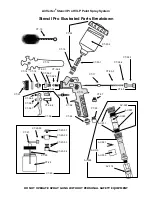
Page 6: ...own CT 13 CT 03 CT 03 2 CT 12 CT 05 1 CT 05 2 CT 05 3 CT 16 CT 01 CT 15 CT 17 CT 14 CT 18 CT 02 2 CT 02 3 CT 02 4 CT 07 AV 007 AV 011 AV 023 AV 019 AV 021 AV 009 PT 25 CT 24 CT 02 CT 06 CT 04 3 CT 04 4 CT 04 2 CT 04 5 CT 04 1 CT 04 CT 20 01 CT 20 02 CT 20 03 CT 20 04 CT 21 CT 20 05 CT 22 CT 25 CT 05 AV 174 AV 022 AV 005 CT 20 CT 03 1 CT 02 1 ...

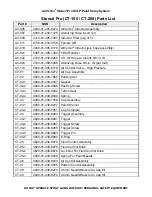
Page 7: ... Packing Set CT 02 1 4940 01 439 9947 Gasket CT 02 2 4940 01 439 9946 Packing Screw CT 02 3 4940 01 439 9942 Teflon Seal CT 02 4 4940 01 439 9939 Spring CT 03 4940 01 439 7056 Cup Assembly CT 03 1 4940 01 439 9937 Paint Strainer CT 03 2 4940 01 439 7051 Cup Complete CT 04 4940 01 439 8993 Trigger Assembly CT 04 1 4940 01 439 8991 Trigger CT 04 2 4940 01 439 8987 Trigger Screw CT 04 3 4940 01 439 8...

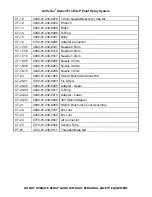
Page 8: ...39 8317 Needle 1 0mm CT 18 05 4940 01 439 8289 Nozzle 0 5mm CT 18 08 4940 01 439 8283 Nozzle 0 8mm CT 18 10 4940 01 439 8286 Nozzle 1 0mm CT 20 4940 01 439 7968 Stencil Brush Attachment Kit CT 20 01 4730 01 439 9003 Fix Screw CT 20 02 4940 01 439 9005 Adapter Upper CT 20 03 4940 01 439 9011 O Ring CT 20 04 4940 01 439 9010 Adapter Lower CT 20 05 4940 01 439 9009 360 Swivel Adapter CT 21 4940 01 43...

Page 9: ...a Fine Touch Up Specialty Applications Wood Working Water Based Lacquers Urethanes 45 50 Excellent Finish Good Production 0 8 Automotive Base or Clear Coat Top Coats For Automotive Aviation and Marine Use Wood Lacquers Stains Polyurethanes Varnishes Thin Specialty Coatings With Low Mil Build and Fine Finish Requirements Water Based Coatings 45 55 Good Finish High Production 1 0 Higher Production F...

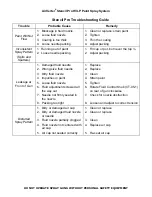
Page 10: ...g Leakage at Front of Gun 1 Damaged fluid needle 2 Wrong size fluid needle 3 Dirty fluid nozzle 4 Impurities in paint 5 Loose fluid nozzle 6 Fluid adjustment screwed all the way out 7 Needle not firmly seated in the nozzle 8 Packing too tight 1 Replace 2 Replace 3 Clean 4 Strain paint 5 Tighten 6 Rotate Fluid Control Knob CT 05 1 on rear of gun clockwise 7 Check for nozzle obstruction 8 Loosen and...

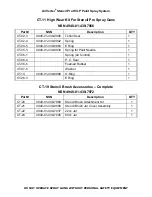
Page 11: ...4940 01 439 8983 E Ring 1 CT 05 3 4940 01 439 9930 Spring for Paint Needle 1 CT 06 1 Spring Air Control 1 CT 06 4 P C Seal 1 CT 06 5 Foamed Rubber 1 CT 07 5 Washer 1 CT 14 4940 01 439 8998 O Ring 1 CT 26 3 E Ring 1 CT 19 Stencil Brush Accessories Complete NSN 4940 01 439 7972 Part NSN Description QTY CT 20 4940 01 439 7968 Stencil Brush Attachment Kit 1 CT 21 4940 01 439 9008 Stencil Brush Jar Cov...

Page 12: ......

Reviews: